Product SiteDocumentation Site

Pacemaker 1.1

Configuration Explained

An A-Z guide to Pacemaker's Configuration Options

Edizione 1

Andrew Beekhof

Primary author 
Red Hat

Dan Frîncu

Romanian translation 

Philipp Marek

Style and formatting updates. Indexing. 
LINBit

Tanja Roth

Utilization chapter Resource Templates chapter Multi-Site Clusters chapter 
SUSE

Lars Marowsky-Bree

Multi-Site Clusters chapter 
SUSE

Yan Gao

Utilization chapter Resource Templates chapter Multi-Site Clusters chapter 
SUSE

Thomas Schraitle

Utilization chapter Resource Templates chapter Multi-Site Clusters chapter 
SUSE

Dejan Muhamedagic

Resource Templates chapter 
SUSE

Nota Legale

Copyright © 2009-2011 Andrew Beekhof.
The text of and illustrations in this document are licensed under a Creative Commons Attribution–Share Alike 3.0 Unported license ("CC-BY-SA")[2].
In accordance with CC-BY-SA, if you distribute this document or an adaptation of it, you must provide the URL for the original version.
In addition to the requirements of this license, the following activities are looked upon favorably:
  1. If you are distributing Open Publication works on hardcopy or CD-ROM, you provide email notification to the authors of your intent to redistribute at least thirty days before your manuscript or media freeze, to give the authors time to provide updated documents. This notification should describe modifications, if any, made to the document.
  2. All substantive modifications (including deletions) be either clearly marked up in the document or else described in an attachment to the document.
  3. Finally, while it is not mandatory under this license, it is considered good form to offer a free copy of any hardcopy or CD-ROM expression of the author(s) work.

Sommario

The purpose of this document is to definitively explain the concepts used to configure Pacemaker. To achieve this, it will focus exclusively on the XML syntax used to configure the CIB.
For those that are allergic to XML, there exist several unified shells and GUIs for Pacemaker. However these tools will not be covered at all in this document[1], precisely because they hide the XML.
Additionally, this document is NOT a step-by-step how-to guide for configuring a specific clustering scenario. Although such guides exist, the purpose of this document is to provide an understanding of the building blocks that can be used to construct any type of Pacemaker cluster. Try the Clusters from Scratch document instead.


[1] I hope, however, that the concepts explained here make the functionality of these tools more easily understood.

Indice

Prefazione
1. Convenzioni del documento
1.1. Convenzioni tipografiche
1.2. Convenzioni del documento
1.3. Note ed avvertimenti
2. We Need Feedback!
1. Leggimi-Prima
1.1. Scopo di questo documento
1.2. Cos'è Pacemaker?
1.3. Tipologia dei cluster Pacemaker
1.4. Architettura di Pacemaker
1.4.1. Panoramica concettuale dello Stack
1.4.2. Componenti interni
2. Nozioni di base sulla configurazione
2.1. Layout della configurazione
2.2. Lo stato attuale del Cluster
2.3. Come dovrebbe essere aggiornata la configurazione?
2.4. Eliminare velocemente parte della configurazione
2.5. Aggiornare la configurazione senza utilizzare XML
2.6. Effettuare modifiche alla configurazione in un ambiente di prova
2.7. Testare le proprie modifiche
2.8. Interpretare l'output di Graphviz
2.8.1. Una piccola transizione del cluster
2.8.2. Una complessa transizione del cluster
2.9. Esiste l'esigenza di aggiornare la configurazione su tutti i nodi del cluster?
3. Opzioni del cluster
3.1. Opzioni speciali
3.2. Versione della configurazione
3.3. Altri campi
3.4. Campi gestiti dal cluster
3.5. Opzioni del cluster
3.6. Opzioni disponibili nel cluster
3.7. Interrogare e valorizzare le opzioni del cluster
3.8. Quando le opzioni vengono elencate più di una volta
4. Nodi del cluster
4.1. Definire un nodo del cluster
4.2. Where Pacemaker Gets the Node Name
4.3. Descrivere un nodo del cluster
4.4. Corosync
4.4.1. Adding a New Corosync Node
4.4.2. Removing a Corosync Node
4.4.3. Replacing a Corosync Node
4.5. CMAN
4.5.1. Adding a New CMAN Node
4.5.2. Removing a CMAN Node
4.6. Heartbeat
4.6.1. Adding a New Heartbeat Node
4.6.2. Removing a Heartbeat Node
4.6.3. Replacing a Heartbeat Node
5. Risorse del cluster
5.1. Cos'è una risorsa del cluster
5.2. Classi di risorse supportate
5.2.1. Open Cluster Framework
5.2.2. Linux Standard Base
5.2.3. Systemd
5.2.4. Upstart
5.2.5. System Services
5.2.6. STONITH
5.3. Resource Properties
5.4. Opzioni delle risorse
5.5. Settaggio dei valori di default globali per le opzioni delle risorse
5.6. Attributi dell'istanza
5.7. Operazioni sulle risorse
5.7.1. Monitoraggio di anomalie sulle risorse
5.7.2. Settaggio dei valori di default globali per le operazioni
6. Vincoli delle risorse
6.1. Punteggi
6.1.1. Il valore INFINITY
6.2. Decidere quale nodo può erogare una risorsa
6.2.1. Opzioni
6.2.2. Asymmetrical "Opt-In" Clusters
6.2.3. Symmetrical "Opt-Out" Clusters
6.2.4. What if Two Nodes Have the Same Score
6.3. Specifying in which Order Resources Should Start/Stop
6.3.1. Mandatory Ordering
6.3.2. Advisory Ordering
6.4. Placing Resources Relative to other Resources
6.4.1. Opzioni
6.4.2. Mandatory Placement
6.4.3. Advisory Placement
6.5. Ordering Sets of Resources
6.6. Ordered Set
6.7. Two Sets of Unordered Resources
6.8. Three Resources Sets
6.9. Collocating Sets of Resources
6.10. Another Three Resources Sets
7. Receiving Notification for Cluster Events
7.1. Configuring SNMP Notifications
7.2. Configuring Email Notifications
7.3. Configuring Notifications via External-Agent
8. Regole
8.1. Espressioni relative agli attributi del nodo
8.2. Espressioni basate su Ora/Data
8.2.1. Dichiarare date
8.2.2. Durate
8.3. Espressioni temporali di esempio
8.4. Utilizzare regole per determinare il posizionamento delle risorse
8.4.1. Utilizzo di score-attribute invece di score
8.5. Utilizzare regole per controllare le opzioni delle risorse
8.6. Utilizzare le regole per controllare le opzioni del cluster
8.7. Assicurarsi che le regole basate sugli orari abbiano effetto
9. Configurazione avanzata
9.1. Connecting from a Remote Machine
9.2. Specificare tempistiche per le azioni ricorrenti
9.3. Spostare le risorse
9.3.1. Intervenire manualmente
9.3.2. Spostare risorse in seguito ad un fallimento
9.3.3. Spostare le risorse in base a variazioni della connettività
9.3.4. Migrazione delle risorse
9.4. Riutilizzare regole, opzioni e set di operazioni
9.5. Effettuare il reload dei servizi dopo una variazione della definizione
10. Tipi di risorse avanzati
10.1. Gruppi - Una scorciatoia sintattica
10.1.1. Group Properties
10.1.2. Group Options
10.1.3. Group Instance Attributes
10.1.4. Group Contents
10.1.5. Group Constraints
10.1.6. Group Stickiness
10.2. Clones - Resources That Get Active on Multiple Hosts
10.2.1. Clone Properties
10.2.2. Clone Options
10.2.3. Clone Instance Attributes
10.2.4. Clone Contents
10.2.5. Clone Constraints
10.2.6. Clone Stickiness
10.2.7. Clone Resource Agent Requirements
10.3. Multi-state - Risorse con modalità multipla
10.3.1. Multi-state Properties
10.3.2. Multi-state Options
10.3.3. Multi-state Instance Attributes
10.3.4. Multi-state Contents
10.3.5. Monitoraggio delle risorse multi-state
10.3.6. Multi-state Constraints
10.3.7. Multi-state Stickiness
10.3.8. Quale istanza della risorsa è promossa
10.3.9. Multi-state Resource Agent Requirements
10.3.10. Multi-state Notifications
10.3.11. Multi-state - Proper Interpretation of Notification Environment Variables
11. Utilization and Placement Strategy
11.1. Background
11.2. Utilization attributes
11.3. Placement Strategy
11.4. Allocation Details
11.4.1. Which node is preferred to be chosen to get consumed first on allocating resources?
11.4.2. Which resource is preferred to be chosen to get assigned first?
11.5. Limitations
11.6. Strategies for Dealing with the Limitations
12. Resource Templates
12.1. Abstract
12.2. Configuring Resources with Templates
12.3. Referencing Templates in Constraints
13. Configure STONITH
13.1. What Is STONITH
13.2. Quale STONITH device si dovrebbe usare
13.3. Configurare STONITH
13.4. Esempio
14. Status - Here be dragons
14.1. Stato dei nodi
14.2. Attributi dei nodi transitori
14.3. Storico delle operazioni
14.3.1. Un semplice esempio
14.3.2. Un complesso esempio di storico per risorsa
15. Multi-Site Clusters and Tickets
15.1. Abstract
15.2. Challenges for Multi-Site Clusters
15.3. Conceptual Overview
15.3.1. Components and Concepts
15.4. Configuring Ticket Dependencies
15.5. Managing Multi-Site Clusters
15.5.1. Granting and Revoking Tickets Manually
15.5.2. Granting and Revoking Tickets via a Cluster Ticket Registry
15.5.3. General Management of Tickets
15.6. For more information
A. FAQ
B. Maggiori informazioni sui Resource Agent OCF
B.1. Dove si trovano gli script personalizzati
B.2. Azioni
B.3. How are OCF Return Codes Interpreted?
B.4. OCF Return Codes
B.5. Eccezioni
C. Cosa è cambiato nella versione 1.0
C.1. Nuovo
C.2. Modifiche
C.3. Rimozioni
D. Installazione
D.1. Scegliere lo stack del cluster
D.2. Abilitare Pacemaker
D.2.1. Per Corosync
D.2.2. Per Heartbeat
E. Aggiornare il software del cluster
E.1. Compatibilità delle versioni
E.2. Completo spegnimento del cluster
E.2.1. Procedura
E.3. Rolling (nodo dopo nodo)
E.3.1. Procedura
E.3.2. Compatibilità delle versioni
E.3.3. Limiti di compatibilità
E.4. Disconnessione e riaggancio
E.4.1. Procedura
E.4.2. Note
F. Aggiornare la configurazione dalla versione 0.6
F.1. Preparazione
F.2. Effettuale l'aggiornamento
F.2.1. Aggiornamento del software
F.2.2. Aggiornare la configurazione
F.2.3. Aggiornamento manuale della configurazione
G. init-Script LSB Compliance
H. Configurazioni di esempio
H.1. Empty
H.2. Simple
H.3. Advanced Configuration
I. Approfondimenti
J. Revision History
Indice analitico

Lista delle figure

1.1. Ridondanza Active/Passive
1.2. Failover condiviso
1.3. Ridondanza N a N
1.4. Panoramica concettuale dello stack del cluster
1.5. Lo stack Pacemaker nell'esecuzione su Corosync
1.6. Subsystems of a Pacemaker cluster
6.1. Visual representation of the four resources' start order for the above constraints
6.2. Visual representation of the start order for two ordered sets of unordered resources
6.3. Visual representation of the start order for the three sets defined above
6.4. Visual representation of a colocation chain where the members of the middle set have no inter-dependencies

Lista delle tabelle

3.1. Proprietà relative alla versione della configurazione
3.2. Properties Controlling Validation
3.3. Proprietà gestite dal cluster
3.4. Opzioni del cluster
5.1. Proprietà di una Primitive Resource
5.2. Opzioni per una Primitive Resource
5.3. Proprietà di un'operazione
6.1. Opzioni per semplici vincoli di locazione (location constraints)
6.2. Properties of an Ordering Constraint
6.3. Properties of a Collocation Constraint
7.1. Environment Variables Passed to the External Agent
8.1. Proprietà di una regola
8.2. Proprietà di un'espressione
8.3. Proprietà di un'espressione basata sulla data
8.4. Prorpietà di una specifica data
9.1. Variabili d'ambiente utilizzate per connettersi ad istanze remote del CIB
9.2. Opzioni top-level extra per l'accesso remoto
9.3. Common Options for a ping Resource
10.1. Proprietà di un gruppo di risorse
10.2. Proprietà di una risorsa di tipo clone
10.3. Opzioni specifiche di configurazione per le risorse Clone
10.4. Variabili d'ambiente fornite alle azioni notify delle risorse clone
10.5. Proprietà delle risorse multi-state
10.6. Opzioni di configurazione specifiche alle risorse multi-state
10.7. Opzioni aggiuntive per le constraint relative alle risorse multi-state
10.8. Implicazioni dei ruoli nei return code OCF
10.9. Environment variables supplied with Master notify actions
14.1. Sorgenti autoritative per le informazioni di stato
14.2. Campi relativi allo status dei nodi
14.3. Contents of an lrm_rsc_op job
B.1. Azioni richieste per gli agenti OCF
B.2. Azioni facoltative per gli agent OCF
B.3. Tipi di ripristino effettuati dal cluster
B.4. OCF Return Codes and their Recovery Types
E.1. Riepilogo delle metodologie di aggiornamento
E.2. Tabella della compatibilità delle versioni

Lista degli esempi

2.1. Una configurazione vuota
2.2. Esempio dell'output di crm_mon
2.3. Esempio dell'output di crm_mon -n
2.4. Utilizzare un editor per modificare la configurazione del cluster in sicurezza
2.5. Utilizzare in sicurezza un editor per modificare una sotto sezione della configurazione del cluster
2.6. Ricerca di oggetti relativi alla configurazione di STONITH
2.7. Creazione e visualizzazione dell'ambiente di test
2.8. Utilizzare un ambiente di test per effettuare più cambiamenti contemporaneamente
3.1. Un esempio dei campi settati per un oggetto cib
3.2. Cancellare un'opzione dichiarata due volte
4.1. Example Heartbeat cluster node entry
4.2. Example Corosync cluster node entry
4.3. Risultato dell'utilizzo di crm_attribute per specificare quale kernel sta funzionando su pcmk-1
5.1. An example system resource
5.2. Un esempio di risorsa OCF
5.3. Una risorsa LSB con le opzioni cluster
5.4. Una risorsa OCF di esempio con attributi di istanza
5.5. Visualizzazione dei metadata per il template del resource agent Dummy
5.6. Una risorsa OCF con un controllo dello stato di salute ciclico
5.7. Una risorsa OCF on timeout personalizzato per le proprie azioni implicite
5.8. An OCF resource with two recurring health checks, performing different levels of checks - specified via OCF_CHECK_LEVEL.
5.9. Esempio di una risorsa OCF con controllo di sanità disabilitato
6.1. Example set of opt-in location constraints
6.2. Example set of opt-out location constraints
6.3. Example of two resources that prefer two nodes equally
6.4. Example of an optional and mandatory ordering constraint
6.5. A chain of ordered resources
6.6. A chain of ordered resources expressed as a set
6.7. A group resource with the equivalent ordering rules
6.8. Ordered sets of unordered resources
6.9. Advanced use of set ordering - Three ordered sets, two of which are internally unordered
6.10. A chain of collocated resources
6.11. The equivalent colocation chain expressed using resource_sets
6.12. Using colocation sets to specify a common peer.
6.13. A colocation chain where the members of the middle set have no inter-dependencies and the last has master status.
7.1. Configuring ClusterMon to send SNMP traps
7.2. Configuring ClusterMon to send email alerts
7.3. Configuring ClusterMon to execute an external-agent
8.1. Vero se "now" è un qualsiasi momento nell'anno 2005
8.2. Equivalent expression
8.3. 9:00-17:00, lunedì-venerdì
8.4. 9:00-18:00, lunedì-venerdì, o qualsiasi ora di sabato
8.5. 9:00-17:00 o 21:00-24:00, lunedì-venerdì
8.6. Tutti i lunedì del mese di marzo 2005
8.7. In luna piena di venerdì 13
8.8. Impedisci a myApacheRsc di essere eseguita su c001n03
8.9. Impedisci a myApacheRsc di essere eseguita su c001n03 - versione estesa
8.10. Una sezione nodi di esempio da utilizzare con score-attribute
8.11. Definire opzioni per le risorse differenti in base al nome del nodo
8.12. Change resource-stickiness during working hours
9.1. Specificare una base di partenza per gli intervalli relativi alle azioni ricorrenti
9.2. An example ping cluster resource that checks node connectivity once every minute
9.3. Don’t run on unconnected nodes
9.4. Run only on nodes connected to three or more ping nodes; this assumes multiplier is set to 1000:
9.5. Prediligi il nodo che il maggior numero di nodi ping
9.6. Come il cluster traduce le constraint pingd
9.7. Un esempio più complesso di location basata sui valori di connettività
9.8. Referenziare regole da altre constraint
9.9. Referencing attributes, options, and operations from other resources
9.10. The DRBD Agent’s Control logic for Supporting the reload Operation
9.11. La logica di controllo dell'operazione di reload implementata dall'agente DRBD
9.12. Paramtro modificabile utilizzando reload
10.1. Un esempio di gruppo
10.2. Come il gruppo di risorse è visto dal cluster
10.3. Esempio di constraint che coinvolgono i gruppi
10.4. Un esempio di risorsa clonata
10.5. Esempi di constraint che coinvolgono cloni
10.6. Esempio di variabili notifica
10.7. Monitorare entrambi gli stati di una risorsa multi-state
10.8. Esempio di constraint che coinvolge risorse multi-state
10.9. Specificare manualmente quale nodo dovrebbe essere promosso
14.1. A bare-bones status entry for a healthy node called cl-virt-1
14.2. Example set of transient node attributes for node "cl-virt-1"
14.3. Un record della risorsa apcstonith
14.4. A monitor operation (determines current state of the apcstonith resource)
14.5. Storico di una risorsa clone pingd con job multipli
H.1. Una configurazione vuota
H.2. Simple Configuration - 2 nodes, some cluster options and a resource
H.3. Advanced configuration - groups and clones with stonith

Prefazione

1. Convenzioni del documento

Questo manuale utilizza numerose convenzioni per evidenziare parole e frasi, ponendo attenzione su informazioni specifiche.
Nelle edizioni PDF e cartacea questo manuale utilizza caratteri presenti nel set Font Liberation. Il set Font Liberation viene anche utilizzato nelle edizioni HTML se il set stesso è stato installato sul vostro sistema. In caso contrario, verranno mostrati caratteri alternativi ma equivalenti. Da notare: Red Hat Enterprise Linux 5 e versioni più recenti, includono per default il set Font Liberation.

1.1. Convenzioni tipografiche

Vengono utilizzate quattro convenzioni tipografiche per richiamare l'attenzione su parole e frasi specifiche. Queste convenzioni, e le circostanze alle quali vengono applicate, sono le seguenti.
Neretto monospazio
Usato per evidenziare l'input del sistema, incluso i comandi della shell, i nomi dei file ed i percorsi. Utilizzato anche per evidenziare tasti e combinazione di tasti. Per esempio:
Per visualizzare i contenuti del file my_next_bestselling_novel nella vostra directory di lavoro corrente, inserire il comando cat my_next_bestselling_novel al prompt della shell e premere Invio per eseguire il comando.
Quanto sopra riportato include il nome del file, un comando della shell ed un tasto, il tutto riportato in neretto monospazio e distinguibile grazie al contesto.
Le combinazioni si distinguono dai tasti singoli tramite l'uso del segno più, il quale viene usato per creare una combinazione di tasti. Per esempio:
Premere Invio per eseguire il comando.
Premere Ctrl+Alt+F2 per usare un terminale virtuale.
Il primo esempio evidenzia il tasto specifico singolo da premere. Il secondo riporta una combinazione di tasti: un insieme di tre tasti premuti contemporaneamente.
Se si discute del codice sorgente, i nomi della classe, i metodi, le funzioni i nomi della variabile ed i valori ritornati indicati all'interno di un paragrafo, essi verranno indicati come sopra, e cioè in neretto monospazio. Per esempio:
Le classi relative ad un file includono filesystem per file system, file per file, e dir per directory. Ogni classe possiede il proprio set associato di permessi.
Proportional Bold
Ciò denota le parole e le frasi incontrate su di un sistema, incluso i nomi delle applicazioni; il testo delle caselle di dialogo; i pulsanti etichettati; le caselle e le etichette per pulsanti di selezione, titoli del menu e dei sottomenu. Per esempio:
Selezionare SistemaPreferenzeMouse dalla barra del menu principale per lanciare Preferenze del Mouse. Nella scheda Pulsanti, fate clic sulla casella di dialogo mouse per mancini, e successivamente fate clic su Chiudi per cambiare il pulsante primario del mouse da sinistra a destra (rendendo così il mouse idoneo per un utilizzo con la mano sinistra).
Per inserire un carattere speciale in un file gedit selezionare ApplicazioniAccessoriMappa del carattere dalla barra del menu principale. Selezionare successivamente CercaTrova… dal menu Mappa del carattere, digitare il nome desiderato nel campo Cerca e selezionare Successivo. Il carattere desiderato sarà evidenziato nella Tabella dei caratteri. Eseguire un doppio clic sul carattere per poterlo posizionare nel campo Testo da copiare e successivamente fare clic sul pulsante Copia. Ritornare sul documento e selezionare ModificaIncolla dalla barra del menu di gedit.
Il testo sopra riportato include i nomi delle applicazioni; nomi ed oggetti del menu per l'intero sistema; nomi del menu specifici alle applicazioni; e pulsanti e testo trovati all'interno di una interfaccia GUI, tutti presentati in neretto proporzionale e distinguibili dal contesto.
Corsivo neretto monospazio o Corsivo neretto proporzionale
Sia se si tratta di neretto monospazio o neretto proporzionale, l'aggiunta del carattere corsivo indica un testo variabile o sostituibile . Il carattere corsivo denota un testo che non viene inserito letteralmente, o visualizzato che varia a seconda delle circostanze. Per esempio:
Per collegarsi ad una macchina remota utilizzando ssh, digitare ssh username@domain.name al prompt della shell. Se la macchina remota è example.com ed il nome utente sulla macchina interessata è john, digitare ssh john@example.com.
Il comando mount -o remount file-system rimonta il file system indicato. Per esempio, per rimontare il file system /home, il comando è mount -o remount /home.
Per visualizzare la versione di un pacchetto attualmente installato, utilizzare il comando rpm -q package. Esso ritornerà il seguente risultato: package-version-release.
Da notare le parole in corsivo grassetto - username, domain.name, file-system, package, version e release. Ogni parola funge da segnaposto, sia esso un testo inserito per emettere un comando o mostrato dal sistema.
Oltre all'utilizzo normale per la presentazione di un titolo, il carattere Corsivo denota il primo utilizzo di un termine nuovo ed importante. Per esempio:
Publican è un sistema di pubblicazione per DocBook.

1.2. Convenzioni del documento

Gli elenchi originati dal codice sorgente e l'output del terminale vengono evidenziati rispetto al testo circostante.
L'output inviato ad un terminale è impostato su tondo monospazio e così presentato:
books        Desktop   documentation  drafts  mss    photos   stuff  svn
books_tests  Desktop1  downloads      images  notes  scripts  svgs
Gli elenchi del codice sorgente sono impostati in tondo monospazio ma vengono presentati ed evidenziati nel modo seguente:
package org.jboss.book.jca.ex1;

import javax.naming.InitialContext;

public class ExClient
{
   public static void main(String args[]) 
       throws Exception
   {
      InitialContext iniCtx = new InitialContext();
      Object         ref    = iniCtx.lookup("EchoBean");
      EchoHome       home   = (EchoHome) ref;
      Echo           echo   = home.create();

      System.out.println("Created Echo");

      System.out.println("Echo.echo('Hello') = " + echo.echo("Hello"));
   }
}

1.3. Note ed avvertimenti

E per finire, tre stili vengono usati per richiamare l'attenzione su informazioni che in caso contrario potrebbero essere ignorate.

Nota

Una nota è un suggerimento o un approccio alternativo per il compito da svolgere. Non dovrebbe verificarsi alcuna conseguenza negativa se la nota viene ignorata, ma al tempo stesso potreste non usufruire di qualche trucco in grado di facilitarvi il compito.

Importante

Le caselle 'importante' riportano informazioni che potrebbero passare facilmente inosservate: modifiche alla configurazione applicabili solo alla sessione corrente, o servizi i quali necessitano di un riavvio prima di applicare un aggiornamento. Ignorare queste caselle non causa alcuna perdita di dati ma potrebbe causare irritazione e frustrazione da parte dell'utente.

Avvertimento

Un Avvertimento non dovrebbe essere ignorato. Se ignorato, potrebbe verificarsi una perdita di dati.

2. We Need Feedback!

If you find a typographical error in this manual, or if you have thought of a way to make this manual better, we would love to hear from you! Please submit a report in Bugzilla[3] against the product Pacemaker.
When submitting a bug report, be sure to mention the manual's identifier: Pacemaker_Explained
If you have a suggestion for improving the documentation, try to be as specific as possible when describing it. If you have found an error, please include the section number and some of the surrounding text so we can find it easily.

Capitolo 1. Leggimi-Prima

1.1. Scopo di questo documento

The purpose of this document is to definitively explain the concepts used to configure Pacemaker. To achieve this, it will focus exclusively on the XML syntax used to configure the CIB.
For those that are allergic to XML, there exist several unified shells and GUIs for Pacemaker. However these tools will not be covered at all in this document [4] , precisely because they hide the XML.
Additionally, this document is NOT a step-by-step how-to guide for configuring a specific clustering scenario.
Although such guides exist, the purpose of this document is to provide an understanding of the building blocks that can be used to construct any type of Pacemaker cluster.

1.2. Cos'è Pacemaker?

Pacemaker is a cluster resource manager.
It achieves maximum availability for your cluster services (aka. resources) by detecting and recovering from node and resource-level failures by making use of the messaging and membership capabilities provided by your preferred cluster infrastructure (either Corosync or Heartbeat.
Pacemaker’s key features include:
  • Rilevazione e ripristino di malfunzionamenti di nodi e servizi
  • Storage agnostic, non richiede uno storage condiviso
  • Resource agnostic, tutto quello che può essere scriptato può essere clusterizzato
  • Supporto STONITH per garantire l'integrità dei dati
  • Supporto a cluster grandi e piccoli
  • Supporto a cluster quorati e resource driven
  • Supporto a praticamente qualsiasi configurazione ridondata
  • Configurazione replicata automaticamente che può essere aggiornata da qualsiasi nodo
  • Capacità di specificare ordine, collocazione e anti-collocazione per i servizi lato cluster
  • Supporto per servizi di tipo avanzato
    • Cloni: per servizi che necessitano di essere attivi su nodi multipli
    • Muliti-state: per servizi con modi multipli (ad esempio master/slave, primary/secondary/)

1.3. Tipologia dei cluster Pacemaker

Pacemaker non fa alcuna ipotesi in merito all'ambiente operativo, questo consente di supportare praticamente qualsiasi configurazione ridondata come Active/Active, Active/Passive, N+1, N+M, N-to-1 e N-to-N.
Active/Passive Redundancy

Figura 1.1. Ridondanza Active/Passive


I cluster a due nodi Active/Passive che utilizzano Pacemaker e DRBD sono soluzioni con rapporto qualità-prezzo ottimale in molti ambiti di alta affidabilità.
Shared Failover

Figura 1.2. Failover condiviso


Supportando più nodi, Pacemaker può ridurre drammaticamente i costi hardware consentendo a diversi cluster active/passive di combinare e condividere nodi di backup comuni
N to N Redundancy

Figura 1.3. Ridondanza N a N


Quando è disponibile uno storage condiviso ogni nodo può essere utilizzato per il failover. Pacemaker può anche eseguire copie multiple dei servizi per distribuire il carico di lavoro.

1.4. Architettura di Pacemaker

Al livello più elevato il cluster è composto da tre componenti:
  • Infrastruttura core del cluster che rende disponibili le funzionalità di messaging e membership (illustrate in rosso)
  • Non-cluster aware components (illustrated in green).
    In a Pacemaker cluster, these pieces include not only the scripts that knows how to start, stop and monitor resources, but also a local daemon that masks the differences between the different standards these scripts implement.
  • A brain (illustrated in blue)
    This component processes and reacts to events from the cluster (nodes leaving or joining) and resources (eg. monitor failures) as well as configuration changes from the administrator. In response to all of these events, Pacemaker will compute the ideal state of the cluster and plot a path to achieve it. This may include moving resources, stopping nodes and even forcing nodes offline with remote power switches.

1.4.1. Panoramica concettuale dello Stack

Conceptual overview of the cluster stack

Figura 1.4. Panoramica concettuale dello stack del cluster


When combined with Corosync, Pacemaker also supports popular open source cluster filesystems. footnote:[ Even though Pacemaker also supports Heartbeat, the filesystems need to use the stack for messaging and membership and Corosync seems to be what they’re standardizing on.
Technically it would be possible for them to support Heartbeat as well, however there seems little interest in this. ]
Due to recent standardization within the cluster filesystem community, they make use of a common distributed lock manager which makes use of Corosync for its messaging capabilities and Pacemaker for its membership (which nodes are up/down) and fencing services.
The Pacemaker stack when running on Corosync

Figura 1.5. Lo stack Pacemaker nell'esecuzione su Corosync


1.4.2. Componenti interni

Pacemaker stesso è composto da quatto componenti chiave (illustrati sotto nello stesso schema di colori del diagramma precedente):
  • CIB (acronimo di come Cluster Information Base)
  • CRMd (acronimo di Cluster Resource Management daemon)
  • PEngine (acronimo di Policy Engine)
  • STONITHd
Subsystems of a Pacemaker cluster

Figura 1.6. Subsystems of a Pacemaker cluster


The CIB uses XML to represent both the cluster’s configuration and current state of all resources in the cluster. The contents of the CIB are automatically kept in sync across the entire cluster and are used by the PEngine to compute the ideal state of the cluster and how it should be achieved.
This list of instructions is then fed to the DC (Designated Controller). Pacemaker centralizes all cluster decision making by electing one of the CRMd instances to act as a master. Should the elected CRMd process (or the node it is on) fail… a new one is quickly established.
The DC carries out PEngine’s instructions in the required order by passing them to either the LRMd (Local Resource Management daemon) or CRMd peers on other nodes via the cluster messaging infrastructure (which in turn passes them on to their LRMd process).
The peer nodes all report the results of their operations back to the DC and, based on the expected and actual results, will either execute any actions that needed to wait for the previous one to complete, or abort processing and ask the PEngine to recalculate the ideal cluster state based on the unexpected results.
In some cases, it may be necessary to power off nodes in order to protect shared data or complete resource recovery. For this Pacemaker comes with STONITHd.
STONITH is an acronym for Shoot-The-Other-Node-In-The-Head and is usually implemented with a remote power switch.
In Pacemaker, STONITH devices are modeled as resources (and configured in the CIB) to enable them to be easily monitored for failure, however STONITHd takes care of understanding the STONITH topology such that its clients simply request a node be fenced and it does the rest.


[4] I hope, however, that the concepts explained here make the functionality of these tools more easily understood.

Capitolo 2. Nozioni di base sulla configurazione

2.1. Layout della configurazione

The cluster is written using XML notation and divided into two main sections: configuration and status.
The status section contains the history of each resource on each node and based on this data, the cluster can construct the complete current state of the cluster. The authoritative source for the status section is the local resource manager (lrmd) process on each cluster node and the cluster will occasionally repopulate the entire section. For this reason it is never written to disk and administrators are advised against modifying it in any way.
La sezione configuration contiene le informazioni più tradizionali come le opzioni del cluster, la lista delle risorse ed indicazioni su dove queste dovranno essere poste. La comprensione della sezione configuration è l'obiettivo primario di questo documento.
La sezione configuration è a sua volta divisa in quattro parti:
  • Opzioni di configurazione (chiamata crm_config)
  • Nodi
  • Risorse
  • Relazioni delle risorse (chiamate constraints)

Esempio 2.1. Una configurazione vuota

  <cib admin_epoch="0" epoch="0" num_updates="0" have-quorum="false">
     <configuration>
        <crm_config/>
        <nodes/>
        <resources/>
        <constraints/>
     </configuration>
     <status/>
  </cib>

2.2. Lo stato attuale del Cluster

Before one starts to configure a cluster, it is worth explaining how to view the finished product. For this purpose we have created the crm_mon utility that will display the current state of an active cluster. It can show the cluster status by node or by resource and can be used in either single-shot or dynamically-updating mode. There are also modes for displaying a list of the operations performed (grouped by node and resource) as well as information about failures.
Utilizzando questo strumento è possibile esaminare le irregolarità presenti nello stato del Cluster e vedere come questo risponda una volta che tali problemi si verificano o vengono simulati.
Details on all the available options can be obtained using the crm_mon --help command.

Esempio 2.2. Esempio dell'output di crm_mon

  ============
  Last updated: Fri Nov 23 15:26:13 2007
  Current DC: sles-3 (2298606a-6a8c-499a-9d25-76242f7006ec)
  3 Nodes configured.
  5 Resources configured.
  ============

  Node: sles-1 (1186dc9a-324d-425a-966e-d757e693dc86): online
      192.168.100.181    (heartbeat::ocf:IPaddr):    Started sles-1
      192.168.100.182    (heartbeat:IPaddr):         Started sles-1
      192.168.100.183    (heartbeat::ocf:IPaddr):    Started sles-1
      rsc_sles-1         (heartbeat::ocf:IPaddr):    Started sles-1
      child_DoFencing:2  (stonith:external/vmware):  Started sles-1
  Node: sles-2 (02fb99a8-e30e-482f-b3ad-0fb3ce27d088): standby
  Node: sles-3 (2298606a-6a8c-499a-9d25-76242f7006ec): online
      rsc_sles-2    (heartbeat::ocf:IPaddr):    Started sles-3
      rsc_sles-3    (heartbeat::ocf:IPaddr):    Started sles-3
      child_DoFencing:0    (stonith:external/vmware):    Started sles-3

Esempio 2.3. Esempio dell'output di crm_mon -n

  ============
  Last updated: Fri Nov 23 15:26:13 2007
  Current DC: sles-3 (2298606a-6a8c-499a-9d25-76242f7006ec)
  3 Nodes configured.
  5 Resources configured.
  ============

  Node: sles-1 (1186dc9a-324d-425a-966e-d757e693dc86): online
  Node: sles-2 (02fb99a8-e30e-482f-b3ad-0fb3ce27d088): standby
  Node: sles-3 (2298606a-6a8c-499a-9d25-76242f7006ec): online

  Resource Group: group-1
    192.168.100.181    (heartbeat::ocf:IPaddr):    Started sles-1
    192.168.100.182    (heartbeat:IPaddr):        Started sles-1
    192.168.100.183    (heartbeat::ocf:IPaddr):    Started sles-1
  rsc_sles-1    (heartbeat::ocf:IPaddr):    Started sles-1
  rsc_sles-2    (heartbeat::ocf:IPaddr):    Started sles-3
  rsc_sles-3    (heartbeat::ocf:IPaddr):    Started sles-3
  Clone Set: DoFencing
    child_DoFencing:0    (stonith:external/vmware):    Started sles-3
    child_DoFencing:1    (stonith:external/vmware):    Stopped
    child_DoFencing:2    (stonith:external/vmware):    Started sles-1

Sul nodo DC (Designated Controller) vengono prese tutte le decisioni e se l'attuale DC fallisce, uno nuovo viene eletto partendo dai nodi rimanenti. La scelta del DC non è di competenza dell'amministratore, mentre lo sono i log generati dallo stesso.

2.3. Come dovrebbe essere aggiornata la configurazione?

Ci sono tre regole base per aggiornare la configurazione del cluster:
  • Rule 1 - Never edit the cib.xml file manually. Ever. I’m not making this up.
  • Regola 2 - Leggere nuovamente la regola 1.
  • Regola 3 - Il cluster noterà se sono state ignorate le regole 1 e 2 e si rifiuterà di utilizzare la configurazione.
Ora che è chiaro com NON modificare la configurazione, è possibile spiegare come invece si debba fare.
The most powerful tool for modifying the configuration is the cibadmin command which talks to a running cluster. With cibadmin, the user can query, add, remove, update or replace any part of the configuration; all changes take effect immediately, so there is no need to perform a reload-like operation.
The simplest way of using cibadmin is to use it to save the current configuration to a temporary file, edit that file with your favorite text or XML editor and then upload the revised configuration.

Esempio 2.4. Utilizzare un editor per modificare la configurazione del cluster in sicurezza

# cibadmin --query > tmp.xml
# vi tmp.xml
# cibadmin --replace --xml-file tmp.xml

Some of the better XML editors can make use of a Relax NG schema to help make sure any changes you make are valid. The schema describing the configuration can normally be found in /usr/lib/heartbeat/pacemaker.rng on most systems.
Se invece la necessità è quella di modificare unicamente la sezione risores, allora è possibile fare

Esempio 2.5. Utilizzare in sicurezza un editor per modificare una sotto sezione della configurazione del cluster

# cibadmin --query --obj_type resources > tmp.xml
# vi tmp.xml
# cibadmin --replace --obj_type resources --xml-file tmp.xml

per consentire la modifica di qualsiasi altra parte della configurazione.

2.4. Eliminare velocemente parte della configurazione

Identify the object you wish to delete. Eg. run

Esempio 2.6. Ricerca di oggetti relativi alla configurazione di STONITH

# cibadmin -Q | grep stonith
 <nvpair id="cib-bootstrap-options-stonith-action" name="stonith-action" value="reboot"/>
 <nvpair id="cib-bootstrap-options-stonith-enabled" name="stonith-enabled" value="1"/>
 <primitive id="child_DoFencing" class="stonith" type="external/vmware">
 <lrm_resource id="child_DoFencing:0" type="external/vmware" class="stonith">
 <lrm_resource id="child_DoFencing:0" type="external/vmware" class="stonith">
 <lrm_resource id="child_DoFencing:1" type="external/vmware" class="stonith">
 <lrm_resource id="child_DoFencing:0" type="external/vmware" class="stonith">
 <lrm_resource id="child_DoFencing:2" type="external/vmware" class="stonith">
 <lrm_resource id="child_DoFencing:0" type="external/vmware" class="stonith">
 <lrm_resource id="child_DoFencing:3" type="external/vmware" class="stonith">

Next identify the resource’s tag name and id (in this case we’ll choose primitive and child_DoFencing). Then simply execute:
# cibadmin --delete --crm_xml '<primitive id="child_DoFencing"/>'

2.5. Aggiornare la configurazione senza utilizzare XML

Alcune operazioni comuni possono essere eseguite con uno dei tanti strumenti ad alto livello, per ovviare alla necessità di leggere o modificare XML.
Per abilitare stonith, ad esempio, è possibile lanciare:
# crm_attribute --attr-name stonith-enabled --attr-value true
Or, to see if somenode is allowed to run resources, there is:
# crm_standby --get-value --node-uname somenode
Or, to find the current location of my-test-rsc, one can use:
# crm_resource --locate --resource my-test-rsc

2.6. Effettuare modifiche alla configurazione in un ambiente di prova

Often it is desirable to preview the effects of a series of changes before updating the configuration atomically. For this purpose we have created crm_shadow which creates a "shadow" copy of the configuration and arranges for all the command line tools to use it.
To begin, simply invoke crm_shadow and give it the name of a configuration to create [5] ; be sure to follow the simple on-screen instructions.

Avvertimento

Read the above carefully, failure to do so could result in you destroying the cluster’s active configuration!

Esempio 2.7. Creazione e visualizzazione dell'ambiente di test

 # crm_shadow --create test
 Setting up shadow instance
 Type Ctrl-D to exit the crm_shadow shell
 shadow[test]:
 shadow[test] # crm_shadow --which
 test

From this point on, all cluster commands will automatically use the shadow copy instead of talking to the cluster’s active configuration. Once you have finished experimenting, you can either commit the changes, or discard them as shown below. Again, be sure to follow the on-screen instructions carefully.
For a full list of crm_shadow options and commands, invoke it with the <parameter>--help</parameter> option.

Esempio 2.8. Utilizzare un ambiente di test per effettuare più cambiamenti contemporaneamente

 shadow[test] # crm_failcount -G -r rsc_c001n01
  name=fail-count-rsc_c001n01 value=0
 shadow[test] # crm_standby -v on -n c001n02
 shadow[test] # crm_standby -G -n c001n02
 name=c001n02 scope=nodes value=on
 shadow[test] # cibadmin --erase --force
 shadow[test] # cibadmin --query
 <cib cib_feature_revision="1" validate-with="pacemaker-1.0" admin_epoch="0" crm_feature_set="3.0" have-quorum="1" epoch="112"
      dc-uuid="c001n01" num_updates="1" cib-last-written="Fri Jun 27 12:17:10 2008">
    <configuration>
       <crm_config/>
       <nodes/>
       <resources/>
       <constraints/>
    </configuration>
    <status/>
 </cib>
  shadow[test] # crm_shadow --delete test --force
  Now type Ctrl-D to exit the crm_shadow shell
  shadow[test] # exit
  # crm_shadow --which
  No shadow instance provided
  # cibadmin -Q
 <cib cib_feature_revision="1" validate-with="pacemaker-1.0" admin_epoch="0" crm_feature_set="3.0" have-quorum="1" epoch="110"
       dc-uuid="c001n01" num_updates="551">
    <configuration>
       <crm_config>
          <cluster_property_set id="cib-bootstrap-options">
             <nvpair id="cib-bootstrap-1" name="stonith-enabled" value="1"/>
             <nvpair id="cib-bootstrap-2" name="pe-input-series-max" value="30000"/>

Effettuare i cambiamenti nell'ambiente di test e verificare che la configurazione reale sia intonsa

2.7. Testare le proprie modifiche

We saw previously how to make a series of changes to a "shadow" copy of the configuration. Before loading the changes back into the cluster (eg. crm_shadow --commit mytest --force), it is often advisable to simulate the effect of the changes with crm_simulate, eg.
# crm_simulate --live-check -VVVVV --save-graph tmp.graph --save-dotfile tmp.dot
The tool uses the same library as the live cluster to show what it would have done given the supplied input. It’s output, in addition to a significant amount of logging, is stored in two files tmp.graph and tmp.dot, both are representations of the same thing — the cluster’s response to your changes.
In the graph file is stored the complete transition, containing a list of all the actions, their parameters and their pre-requisites. Because the transition graph is not terribly easy to read, the tool also generates a Graphviz dot-file representing the same information.

2.8. Interpretare l'output di Graphviz

  • Le frecce indicano le dipendenze relative all'ordine
  • Le frecce tratteggiate indicano dipendenze che non sono presenti nel grafico di transizione
  • Azioni con un bordo tratteggiato di qualsiasi colore non fanno parte del grafico di transizione
  • Azioni con un bordo verde sono parte del grafico di transizione
  • Actions with a red border are ones the cluster would like to execute but cannot run
  • Azioni con un bordo blu sono azioni che il cluster non sente il bisogno di eseguire
  • Azioni con un testo arancione sono pseudo azioni che il cluster utilizza per semplificare il grafico
  • Azioni con un testo nero sono inviate a LRM
  • Azioni relative alle risorse hanno un testo nella forma rsc_action_interval node
  • Ogni azione dipendente da un'azione con un bordo rosso non avrà la possibilità di essere eseguita
  • I loop sono qualcosa di veramente negativo. Essi vanno riportati al team di sviluppo.

2.8.1. Una piccola transizione del cluster

An example transition graph as represented by Graphviz
Nell'esempio soprastante appare come un nuovo nodo, 
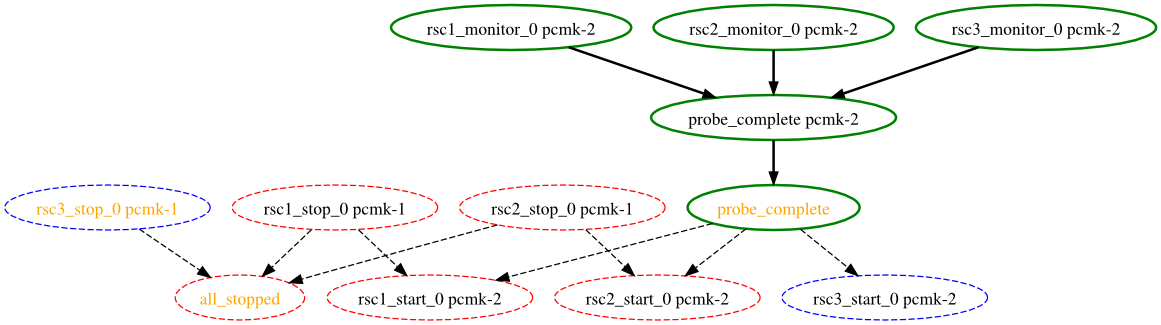
node2, è giunto online e che il cluster sta controllando che rsc1, rsc2 e rsc3 non stiano già funzionando su di esso (indicato dalle entry *_monitor_0). Una volta completato il controllo ed assunto che le risorse non sono attive qui, il cluster vorrebbe stoppare rsc1 ed rsc2 su node1 e muovere tali risorse su node2. Tuttavia, sembrano esserci problemi ed il cluster non può o non riesce ad effettuare lo azioni di stop, che implicano quindi l'impossibilità di eseguire le azioni di start. Per qualche ragione il cluster non vuole avviare rsc3 da nessuna parte.
For information on the options supported by crm_simulate, use the --help option.

2.8.2. Una complessa transizione del cluster

Another, slightly more complex, transition graph that you're not expected to be able to read

2.9. Esiste l'esigenza di aggiornare la configurazione su tutti i nodi del cluster?

No. Ogni modifica è immediatamente sincronizzata con gli altri membri attivi del cluster.
To reduce bandwidth, the cluster only broadcasts the incremental updates that result from your changes and uses MD5 checksums to ensure that each copy is completely consistent.


[5] Shadow copies are identified with a name, making it possible to have more than one.

Capitolo 3. Opzioni del cluster

3.1. Opzioni speciali

La ragione per cui questi campi vengono posti in cima anziché con il resto delle opzioni del cluster è meramente una questione di parsing. Queste opzioni sono utilizzate dal database di configurazione che è, per natura, piuttosto ignorante dei contenuti che detetiene. Quindi la decisione è stata presa in modo da porli in una locazione facile da individuare.

3.2. Versione della configurazione

When a node joins the cluster, the cluster will perform a check to see who has the best configuration based on the fields below. It then asks the node with the highest (admin_epoch, epoch, num_updates) tuple to replace the configuration on all the nodes - which makes setting them, and setting them correctly, very important.

Tabella 3.1. Proprietà relative alla versione della configurazione

Campo Descrizione
admin_epoch
Never modified by the cluster. Use this to make the configurations on any inactive nodes obsolete.
Never set this value to zero, in such cases the cluster cannot tell the difference between your configuration and the "empty" one used when nothing is found on disk.
epoch
Incremented every time the configuration is updated (usually by the admin)
num_updates
Incremented every time the configuration or status is updated (usually by the cluster)

3.3. Altri campi

Tabella 3.2. Properties Controlling Validation

Campo Descrizione
validate-with
Determines the type of validation being done on the configuration. If set to "none", the cluster will not verify that updates conform to the DTD (nor reject ones that don’t). This option can be useful when operating a mixed version cluster during an upgrade.

3.4. Campi gestiti dal cluster

Tabella 3.3. Proprietà gestite dal cluster

Campo Descrizione
cib-last-written
Indicates when the configuration was last written to disk. Informational purposes only.
dc-uuid
Indicates which cluster node is the current leader. Used by the cluster when placing resources and determining the order of some events.
have-quorum
Indicates if the cluster has quorum. If false, this may mean that the cluster cannot start resources or fence other nodes. See no-quorum-policy below.

Note that although these fields can be written to by the admin, in most cases the cluster will overwrite any values specified by the admin with the "correct" ones. To change the admin_epoch, for example, one would use:
# cibadmin --modify --crm_xml '<cib admin_epoch="42"/>'
Un set completo di campi assomiglierà a questo:

Esempio 3.1. Un esempio dei campi settati per un oggetto cib

<cib have-quorum="true" validate-with="pacemaker-1.0"
  admin_epoch="1" epoch="12" num_updates="65"
  dc-uuid="ea7d39f4-3b94-4cfa-ba7a-952956daabee">

3.5. Opzioni del cluster

Cluster options, as you might expect, control how the cluster behaves when confronted with certain situations.
They are grouped into sets and, in advanced configurations, there may be more than one. [6] For now we will describe the simple case where each option is present at most once.

3.6. Opzioni disponibili nel cluster

Tabella 3.4. Opzioni del cluster

Opzione Default Descrizione
batch-limit
30
The number of jobs that the TE is allowed to execute in parallel. The "correct" value will depend on the speed and load of your network and cluster nodes.
migration-limit
-1 (unlimited)
The number of migration jobs that the TE is allowed to execute in parallel on a node.
no-quorum-policy
stop
What to do when the cluster does not have quorum. Allowed values:
* ignore - continue all resource management
* freeze - continue resource management, but don’t recover resources from nodes not in the affected partition
* stop - stop all resources in the affected cluster partition
* suicide - fence all nodes in the affected cluster partition
symmetric-cluster
TRUE
Can all resources run on any node by default?
stonith-enabled
TRUE
Should failed nodes and nodes with resources that can’t be stopped be shot? If you value your data, set up a STONITH device and enable this.
Se "true" o non valorizzata, il cluster rifiuterà di avviare risorse a meno che uno o più dispositivi STONITH siano stati configurati.
stonith-action
reboot
Action to send to STONITH device. Allowed values: reboot, off. The value poweroff is also allowed, but is only used for legacy devices.
cluster-delay
60s
Round trip delay over the network (excluding action execution). The "correct" value will depend on the speed and load of your network and cluster nodes.
stop-orphan-resources
TRUE
Should deleted resources be stopped?
stop-orphan-actions
TRUE
Should deleted actions be cancelled?
start-failure-is-fatal
TRUE
When set to FALSE, the cluster will instead use the resource’s failcount and value for resource-failure-stickiness.
pe-error-series-max
-1 (tutti)
The number of PE inputs resulting in ERRORs to save. Used when reporting problems.
pe-warn-series-max
-1 (tutti)
The number of PE inputs resulting in WARNINGs to save. Used when reporting problems.
pe-input-series-max
-1 (tutti)
The number of "normal" PE inputs to save. Used when reporting problems.

You can always obtain an up-to-date list of cluster options, including their default values, by running the pengine metadata command.

3.7. Interrogare e valorizzare le opzioni del cluster

Cluster options can be queried and modified using the crm_attribute tool. To get the current value of cluster-delay, simply use:
# crm_attribute --attr-name cluster-delay --get-value
più semplicemente scrivibile come
# crm_attribute --get-value -n cluster-delay
If a value is found, you’ll see a result like this:
# crm_attribute --get-value -n cluster-delay
 name=cluster-delay value=60s
However, if no value is found, the tool will display an error:
# crm_attribute --get-value -n clusta-deway`
name=clusta-deway value=(null)
Error performing operation: The object/attribute does not exist
To use a different value, eg. 30, simply run:
# crm_attribute --attr-name cluster-delay --attr-value 30s
To go back to the cluster’s default value you can delete the value, for example with this command:
# crm_attribute --attr-name cluster-delay --delete-attr

3.8. Quando le opzioni vengono elencate più di una volta

If you ever see something like the following, it means that the option you’re modifying is present more than once.

Esempio 3.2. Cancellare un'opzione dichiarata due volte

# crm_attribute --attr-name batch-limit --delete-attr

Multiple attributes match name=batch-limit in crm_config:
Value: 50          (set=cib-bootstrap-options, id=cib-bootstrap-options-batch-limit)
Value: 100         (set=custom, id=custom-batch-limit)
Please choose from one of the matches above and supply the 'id' with --attr-id

In such cases follow the on-screen instructions to perform the requested action. To determine which value is currently being used by the cluster, please refer to Chapter 8, Rules.


[6] This will be described later in the section on Chapter 8, Rules where we will show how to have the cluster use different sets of options during working hours (when downtime is usually to be avoided at all costs) than it does during the weekends (when resources can be moved to the their preferred hosts without bothering end users)

Capitolo 4. Nodi del cluster

4.1. Definire un nodo del cluster

Each node in the cluster will have an entry in the nodes section containing its UUID, uname, and type.

Esempio 4.1. Example Heartbeat cluster node entry

<node id="1186dc9a-324d-425a-966e-d757e693dc86" uname="pcmk-1" type="normal"/>

Esempio 4.2. Example Corosync cluster node entry

<node id="101" uname="pcmk-1" type="normal"/>

In normal circumstances, the admin should let the cluster populate this information automatically from the communications and membership data. However for Heartbeat, one can use the crm_uuid tool to read an existing UUID or define a value before the cluster starts.

4.2. Where Pacemaker Gets the Node Name

Traditionally, Pacemaker required nodes to be referred to by the value returned by uname -n. This can be problematic for services that require the uname -n to be a specific value (ie. for a licence file).
Since version 2.0.0 of Pacemaker, this requirement has been relaxed for clusters using Corosync 2.0 or later. The name Pacemaker uses is:
  1. The value stored in corosync.conf under ring0_addr in the nodelist, if it does not contain an IP address; otherwise
  2. The value stored in corosync.conf under name in the nodelist; otherwise
  3. The value of uname -n
Pacemaker provides the crm_node -n command which displays the name used by a running cluster.
If a Corosync nodelist is used, crm_node --name-for-id $number is also available to display the name used by the node with the corosync nodeid of $number, for example: crm_node --name-for-id 2.

4.3. Descrivere un nodo del cluster

Beyond the basic definition of a node the administrator can also describe the node’s attributes, such as how much RAM, disk, what OS or kernel version it has, perhaps even its physical location. This information can then be used by the cluster when deciding where to place resources. For more information on the use of node attributes, see Chapter 8, Rules.
Node attributes can be specified ahead of time or populated later, when the cluster is running, using crm_attribute.
Below is what the node’s definition would look like if the admin ran the command:

Esempio 4.3. Risultato dell'utilizzo di crm_attribute per specificare quale kernel sta funzionando su pcmk-1

# crm_attribute --type nodes --node-uname pcmk-1 --attr-name kernel --attr-value `uname -r`
<node uname="pcmk-1" type="normal" id="101">
   <instance_attributes id="nodes-101">
     <nvpair id="kernel-101" name="kernel" value="2.6.16.46-0.4-default"/>
   </instance_attributes>
</node>

A simpler way to determine the current value of an attribute is to use crm_attribute command again:
# crm_attribute --type nodes --node-uname pcmk-1 --attr-name kernel --get-value
By specifying --type nodes the admin tells the cluster that this attribute is persistent. There are also transient attributes which are kept in the status section which are "forgotten" whenever the node rejoins the cluster. The cluster uses this area to store a record of how many times a resource has failed on that node but administrators can also read and write to this section by specifying --type status.

4.4. Corosync

4.4.1. Adding a New Corosync Node

Adding a new node is as simple as installing Corosync and Pacemaker, and copying /etc/corosync/corosync.conf and /etc/corosync/authkey (if it exists) from an existing node. You may need to modify the mcastaddr option to match the new node’s IP address.
If a log message containing "Invalid digest" appears from Corosync, the keys are not consistent between the machines.

4.4.2. Removing a Corosync Node

Because the messaging and membership layers are the authoritative source for cluster nodes, deleting them from the CIB is not a reliable solution. First one must arrange for corosync to forget about the node (pcmk-1 in the example below).
Sull'host da rimuovere:
  1. Stop the cluster: /etc/init.d/corosync stop
Quindi, da uno dei nodi rimasti attivi:
  1. Tell Pacemaker to forget about the removed host:
    # crm_node -R pcmk-1
    This includes deleting the node from the CIB

Nota

This proceedure only works for versions after 1.1.8

4.4.3. Replacing a Corosync Node

The five-step guide to replacing an existing cluster node:
  1. Assicurarsi che il vecchio nodo sia completamente stoppato
  2. Assegnare alla nuova macchina lo stesso hostname ed indirizzo IP della vecchia macchina
  3. Installare il software del cluster :-)
  4. Copy /etc/corosync/corosync.conf and /etc/corosync/authkey (if it exists) to the new node
  5. Avviare il nuovo nodo del cluster
If a log message containing "Invalid digest" appears from Corosync, the keys are not consistent between the machines.

4.5. CMAN

4.5.1. Adding a New CMAN Node

4.5.2. Removing a CMAN Node

4.6. Heartbeat

4.6.1. Adding a New Heartbeat Node

Provided you specified autojoin any in ha.cf, adding a new node is as simple as installing heartbeat and copying ha.cf and authkeys from an existing node.
If you don’t want to use autojoin, then after setting up ha.cf and authkeys, you must use hb_addnode before starting the new node.

4.6.2. Removing a Heartbeat Node

Because the messaging and membership layers are the authoritative source for cluster nodes, deleting them from the CIB is not a reliable solution.
First one must arrange for Heartbeat to forget about the node (pcmk-1 in the example below).
Sull'host da rimuovere:
  1. Stop the cluster: /etc/init.d/corosync stop
Quindi, da uno dei nodi rimasti attivi:
  1. Tell Heartbeat the node should be removed
# hb_delnode pcmk-1
  1. Tell Pacemaker to forget about the removed host:
# crm_node -R pcmk-1

Nota

This proceedure only works for versions after 1.1.8

4.6.3. Replacing a Heartbeat Node

The seven-step guide to replacing an existing cluster node:
  1. Assicurarsi che il vecchio nodo sia completamente stoppato
  2. Dare alla nuova macchina lo stesso hostname della vecchia
  3. Go to an active cluster node and look up the UUID for the old node in /var/lib/heartbeat/hostcache
  4. Installare il software del cluster
  5. Copy ha.cf and authkeys to the new node
  6. On the new node, populate it’s UUID using crm_uuid -w and the UUID from step 2
  7. Avviare il nuovo nodo del cluster

Capitolo 5. Risorse del cluster

5.1. Cos'è una risorsa del cluster

The role of a resource agent is to abstract the service it provides and present a consistent view to the cluster, which allows the cluster to be agnostic about the resources it manages.
The cluster doesn’t need to understand how the resource works because it relies on the resource agent to do the right thing when given a start, stop or monitor command.
Per questa ragione è cruciale che i resource agent siano ben testati.
Tipicamente i resource agents nascono come script di shell, tuttavia possono essere scritti utilizzando qualsiasi tecnologia (come C, Python o Perl) con la quale l'autore abbia familiarità.

5.2. Classi di risorse supportate

There are five classes of agents supported by Pacemaker:
  • OCF
  • LSB
  • Upstart
  • Systemd
  • Fencing
  • Service
Version 1 of Heartbeat came with its own style of resource agents and it is highly likely that many people have written their own agents based on its conventions. [7]
Although deprecated with the release of Heartbeat v2, they were supported by Pacemaker up until the release of 1.1.8 to enable administrators to continue to use these agents.

5.2.1. Open Cluster Framework

The OCF standard [8] [9] is basically an extension of the Linux Standard Base conventions for init scripts to:
  • support parameters,
  • make them self describing and
  • estensibili
OCF specs have strict definitions of the exit codes that actions must return. [10]
The cluster follows these specifications exactly, and giving the wrong exit code will cause the cluster to behave in ways you will likely find puzzling and annoying. In particular, the cluster needs to distinguish a completely stopped resource from one which is in some erroneous and indeterminate state.
Parameters are passed to the script as environment variables, with the special prefix OCF_RESKEY_. So, a parameter which the user thinks of as ip it will be passed to the script as OCF_RESKEY_ip. The number and purpose of the parameters is completely arbitrary, however your script should advertise any that it supports using the meta-data command.
La classe OCF è la preferita poiché è uno standard industriale, altamente flessibile (permettendo che i parametri vengano passati agli agenti in maniera non posizionale) ed auto esplicativi.

5.2.2. Linux Standard Base

LSB resource agents are those found in /etc/init.d.
Generally they are provided by the OS/distribution and, in order to be used with the cluster, they must conform to the LSB Spec. [11]
Many distributions claim LSB compliance but ship with broken init scripts. For details on how to check if your init script is LSB-compatible, see Appendice G, init-Script LSB Compliance. The most common problems are:
  • Assenza dell'operazione status
  • Assenza dell'exit status corretto per le azioni start/stop/status
  • Lo start di una risorsa avviata restituisce un errore (questo viola le specifiche LSB)
  • Lo stop di una risorsa ferma restituisce un errore (questo viola le specifiche LSB)

5.2.3. Systemd

Some newer distributions have replaced the old SYS-V style of initialization daemons (and scripts) with an alternative called Systemd.
Pacemaker is able to manage these services if they are present.
Instead of init scripts, systemd has unit files. Generally the services (or unit files) are provided by the OS/distribution but there are some instructions for converting from init scripts at: http://0pointer.de/blog/projects/systemd-for-admins-3.html

Nota

Remember to make sure the computer is not configured to start any services at boot time that should be controlled by the cluster.

5.2.4. Upstart

Some newer distributions have replaced the old SYS-V style of initialization daemons (and scripts) with an alternative called Upstart.
Pacemaker is able to manage these services if they are present.
Instead of init scripts, upstart has jobs. Generally the services (or jobs) are provided by the OS/distribution.

Nota

Remember to make sure the computer is not configured to start any services at boot time that should be controlled by the cluster.

5.2.5. System Services

Since there are now many "common" types of system services (systemd, upstart, and lsb), Pacemaker supports a special alias which intelligently figures out which one applies to a given cluster node.
This is particularly useful when the cluster contains a mix of systemd, upstart, and lsb.
In order, Pacemaker will try to find the named service as:
  1. an LSB (SYS-V) init script
  2. a Systemd unit file
  3. an Upstart job

5.2.6. STONITH

Esiste ancheuna classe aggiuntiva, STONITH, che viene usata esclusivamente per effettuare il fence delle risorse relative. L'argomento è trattato più avanti nel Chapter 13, STONITH.

5.3. Resource Properties

Questo valore indica al cluster quale script utilizzare per la risorsa, dove trovarlo ed a quali standard è conforme.

Tabella 5.1. Proprietà di una Primitive Resource

Campo Descrizione
id
Your name for the resource
class
The standard the script conforms to. Allowed values: ocf, service, upstart, systemd, lsb, stonith
type
The name of the Resource Agent you wish to use. Eg. IPaddr or Filesystem
provider
The OCF spec allows multiple vendors to supply the same ResourceAgent. To use the OCF resource agents supplied with Heartbeat, you should specify heartbeat here.

Resource definitions can be queried with the crm_resource tool. For example
# crm_resource --resource Email --query-xml
might produce:

Esempio 5.1. An example system resource

<primitive id="Email" class="service" type="exim"/>

Nota

One of the main drawbacks to system services (such as LSB, Systemd and Upstart) resources is that they do not allow any parameters!

Esempio 5.2. Un esempio di risorsa OCF

<primitive id="Public-IP" class="ocf" type="IPaddr" provider="heartbeat">
   <instance_attributes id="params-public-ip">
      <nvpair id="public-ip-addr" name="ip" value="1.2.3.4"/>
   </instance_attributes>
</primitive>

5.4. Opzioni delle risorse

Options are used by the cluster to decide how your resource should behave and can be easily set using the --meta option of the crm_resource command.

Tabella 5.2. Opzioni per una Primitive Resource

Campo Default Descrizione
priority
0
If not all resources can be active, the cluster will stop lower priority resources in order to keep higher priority ones active.
target-role
Started
In quale stato il cluster deve cercare di tenere questa risorsa? Valori permessi:
* Stopped - Force the resource to be stopped
* Started - Allow the resource to be started (In the case of multi-state resources, they will not promoted to master)
* Master - Allow the resource to be started and, if appropriate, promoted
is-managed
TRUE
Is the cluster allowed to start and stop the resource? Allowed values: true, false
resource-stickiness
Calculated
How much does the resource prefer to stay where it is? Defaults to the value of resource-stickiness in the rsc_defaults section
requires
Calculated
Under what conditions can the resource be started. (Since 1.1.8)
Defaults to fencing unless stonith-enabled is false or class is stonith - under those conditions the default is quorum. Possible values:
* nothing - can always be started
* quorum - The cluster can only start this resource if a majority of the configured nodes are active
* fencing - The cluster can only start this resource if a majority of the configured nodes are active and any failed or unknown nodes have been powered off.
* unfencing - The cluster can only start this resource if a majority of the configured nodes are active and any failed or unknown nodes have been powered off and only on nodes that have been unfenced indexterm: Option[requires,Resource]
migration-threshold
INFINITY (disabled)
How many failures may occur for this resource on a node, before this node is marked ineligible to host this resource.
failure-timeout
0 (disabled)
How many seconds to wait before acting as if the failure had not occurred, and potentially allowing the resource back to the node on which it failed.
multiple-active
stop_start
Cosa dovrebbe fare il cluster se mai trovasse la risorsa attiva su più di un nodo. Valori permessi:
* block - mark the resource as unmanaged
* stop_only - stop all active instances and leave them that way
* stop_start - stop all active instances and start the resource in one location only

Se sono stati eseguiti i seguenti comandi nella precedente risorsa LSB Email
# crm_resource --meta --resource Email --set-parameter priority --property-value 100
# crm_resource --meta --resource Email --set-parameter multiple-active --property-value block
la definizione della risorsa risultate sarebbe

Esempio 5.3. Una risorsa LSB con le opzioni cluster

<primitive id="Email" class="lsb" type="exim">
   <meta_attributes id="meta-email">
      <nvpair id="email-priority" name="priority" value="100"/>
      <nvpair id="email-active" name="multiple-active" value="block"/>
   </meta_attributes>
</primitive>

5.5. Settaggio dei valori di default globali per le opzioni delle risorse

To set a default value for a resource option, simply add it to the rsc_defaults section with crm_attribute. Thus,
# crm_attribute --type rsc_defaults --attr-name is-managed --attr-value false
would prevent the cluster from starting or stopping any of the resources in the configuration (unless of course the individual resources were specifically enabled and had is-managed set to true).

5.6. Attributi dell'istanza

Gli script di alcune classi di risorse (ad esclusione di quelli LSB) supportano il passaggio di parametri che determinano come questi si devono comportare e quale istanza del servizio controllano.
If your resource agent supports parameters, you can add them with the crm_resource command. For instance
# crm_resource --resource Public-IP --set-parameter ip --property-value 1.2.3.4
would create an entry in the resource like this:

Esempio 5.4. Una risorsa OCF di esempio con attributi di istanza

<primitive id="Public-IP" class="ocf" type="IPaddr" provider="heartbeat">
   <instance_attributes id="params-public-ip">
      <nvpair id="public-ip-addr" name="ip" value="1.2.3.4"/>
   </instance_attributes>
</primitive>

For an OCF resource, the result would be an environment variable called OCF_RESKEY_ip with a value of 1.2.3.4.
The list of instance attributes supported by an OCF script can be found by calling the resource script with the meta-data command. The output contains an XML description of all the supported attributes, their purpose and default values.

Esempio 5.5. Visualizzazione dei metadata per il template del resource agent Dummy

# export OCF_ROOT=/usr/lib/ocf
# $OCF_ROOT/resource.d/pacemaker/Dummy meta-data
<?xml version="1.0"?>
  <!DOCTYPE resource-agent SYSTEM "ra-api-1.dtd">
  <resource-agent name="Dummy" version="0.9">
    <version>1.0</version>

    <longdesc lang="en-US">
      This is a Dummy Resource Agent. It does absolutely nothing except
      keep track of whether its running or not.
      Its purpose in life is for testing and to serve as a template for RA writers.
    </longdesc>
    <shortdesc lang="en-US">Dummy resource agent</shortdesc>

    <parameters>
      <parameter name="state" unique="1">
        <longdesc lang="en-US">
          Location to store the resource state in.
        </longdesc>
        <shortdesc lang="en-US">State file</shortdesc>
        <content type="string" default="/var/run/Dummy-{OCF_RESOURCE_INSTANCE}.state" />
      </parameter>

      <parameter name="dummy" unique="0">
        <longdesc lang="en-US">
          Dummy attribute that can be changed to cause a reload
        </longdesc>
        <shortdesc lang="en-US">Dummy attribute that can be changed to cause a reload</shortdesc>
        <content type="string" default="blah" />
      </parameter>
    </parameters>

    <actions>
      <action name="start"        timeout="90" />
      <action name="stop"         timeout="100" />
      <action name="monitor"      timeout="20" interval="10",height="0" start-delay="0" />
      <action name="reload"       timeout="90" />
      <action name="migrate_to"   timeout="100" />
      <action name="migrate_from" timeout="90" />
      <action name="meta-data"    timeout="5" />
      <action name="validate-all" timeout="30" />
    </actions>
  </resource-agent>

5.7. Operazioni sulle risorse

5.7.1. Monitoraggio di anomalie sulle risorse

By default, the cluster will not ensure your resources are still healthy. To instruct the cluster to do this, you need to add a monitor operation to the resource’s definition.

Esempio 5.6. Una risorsa OCF con un controllo dello stato di salute ciclico

<primitive id="Public-IP" class="ocf" type="IPaddr" provider="heartbeat">
  <operations>
     <op id="public-ip-check" name="monitor" interval="60s"/>
  </operations>
  <instance_attributes id="params-public-ip">
     <nvpair id="public-ip-addr" name="ip" value="1.2.3.4"/>
  </instance_attributes>
</primitive>

Tabella 5.3. Proprietà di un'operazione

Campo Descrizione
id
Your name for the action. Must be unique.
name
The action to perform. Common values: monitor, start, stop
interval
How frequently (in seconds) to perform the operation. Default value: 0, meaning never.
timeout
How long to wait before declaring the action has failed.
on-fail
L'azione da intraprendere se l'azione principale dovesse fallire. Valori permessi:
* ignore - Pretend the resource did not fail
* block - Don’t perform any further operations on the resource
* stop - Stop the resource and do not start it elsewhere
* restart - Stop the resource and start it again (possibly on a different node)
* fence - STONITH the node on which the resource failed
* standby - Move all resources away from the node on which the resource failed
The default for the stop operation is fence when STONITH is enabled and block otherwise. All other operations default to stop.
enabled
If false, the operation is treated as if it does not exist. Allowed values: true, false

5.7.2. Settaggio dei valori di default globali per le operazioni

To set a default value for a operation option, simply add it to the op_defaults section with crm_attribute. Thus,
# crm_attribute --type op_defaults --attr-name timeout --attr-value 20s
would default each operation’s timeout to 20 seconds. If an operation’s definition also includes a value for timeout, then that value would be used instead (for that operation only).

5.7.2.1. Quando una risorsa impiega molto tempo per Avviarsi/Fermarsi

There are a number of implicit operations that the cluster will always perform - start, stop and a non-recurring monitor operation (used at startup to check the resource isn’t already active). If one of these is taking too long, then you can create an entry for them and simply specify a new value.

Esempio 5.7. Una risorsa OCF on timeout personalizzato per le proprie azioni implicite

<primitive id="Public-IP" class="ocf" type="IPaddr" provider="heartbeat">
  <operations>
     <op id="public-ip-startup" name="monitor" interval="0" timeout="90s"/>
     <op id="public-ip-start" name="start" interval="0" timeout="180s"/>
     <op id="public-ip-stop" name="stop" interval="0" timeout="15min"/>
  </operations>
  <instance_attributes id="params-public-ip">
     <nvpair id="public-ip-addr" name="ip" value="1.2.3.4"/>
  </instance_attributes>
</primitive>

5.7.2.2. Operazioni di monitoraggio multiple

Purché non ci sono due operazioni (per una singola risorsa) con lo stesso nome ed intervallo è possibile avere un umero arbitrario di operazioni di monitoraggio . In questo modo si può fare un controllo superficiale ogni minuto, che si intensificherà con intervalli più alti.
To tell the resource agent what kind of check to perform, you need to provide each monitor with a different value for a common parameter. The OCF standard creates a special parameter called OCF_CHECK_LEVEL for this purpose and dictates that it is "made available to the resource agent without the normal OCF_RESKEY prefix".
Whatever name you choose, you can specify it by adding an instance_attributes block to the op tag. Note that it is up to each resource agent to look for the parameter and decide how to use it.

Esempio 5.8. An OCF resource with two recurring health checks, performing different levels of checks - specified via OCF_CHECK_LEVEL.

<primitive id="Public-IP" class="ocf" type="IPaddr" provider="heartbeat">
   <operations>
      <op id="public-ip-health-60" name="monitor" interval="60">
         <instance_attributes id="params-public-ip-depth-60">
            <nvpair id="public-ip-depth-60" name="OCF_CHECK_LEVEL" value="10"/>
         </instance_attributes>
      </op>
      <op id="public-ip-health-300" name="monitor" interval="300">
         <instance_attributes id="params-public-ip-depth-300">
            <nvpair id="public-ip-depth-300" name="OCF_CHECK_LEVEL" value="20"/>
       </instance_attributes>
     </op>
   </operations>
   <instance_attributes id="params-public-ip">
       <nvpair id="public-ip-level" name="ip" value="1.2.3.4"/>
   </instance_attributes>
</primitive>

5.7.2.3. Disabilitare un'operazione di monitoring

The easiest way to stop a recurring monitor is to just delete it. However, there can be times when you only want to disable it temporarily. In such cases, simply add enabled="false" to the operation’s definition.

Esempio 5.9. Esempio di una risorsa OCF con controllo di sanità disabilitato

<primitive id="Public-IP" class="ocf" type="IPaddr" provider="heartbeat">
   <operations>
      <op id="public-ip-check" name="monitor" interval="60s" enabled="false"/>
   </operations>
   <instance_attributes id="params-public-ip">
      <nvpair id="public-ip-addr" name="ip" value="1.2.3.4"/>
   </instance_attributes>
</primitive>

L'operazione è effettuabile da linea di comando, eseguendo
# cibadmin -M -X '<op id="public-ip-check" enabled="false"/>'
Once you’ve done whatever you needed to do, you can then re-enable it with


[9] The Pacemaker implementation has been somewhat extended from the OCF Specs, but none of those changes are incompatible with the original OCF specification.
[10] Included with the cluster is the ocf-tester script, which can be useful in this regard.

Capitolo 6. Vincoli delle risorse

6.1. Punteggi

Nel funzionamento del cluster sono integrati punteggi di ogni tipo. Praticamente qualsiasi decisione, dallo spostamento di una risorsa sino a quale risorsa fermare in un cluster degradato, è ottenuta manipolando in qualche forma i punteggi.
Scores are calculated on a per-resource basis and any node with a negative score for a resource can’t run that resource. After calculating the scores for a resource, the cluster then chooses the node with the highest one.

6.1.1. Il valore INFINITY

INFINITY is currently defined as 1,000,000 and addition/subtraction with it follows these three basic rules:
  • Qualsiasi valore + INFINITY = INFINITY
  • Qualsiasi valore - INFINITY = -INFINITY
  • INFINITY - INFINITY = -INFINITY

6.2. Decidere quale nodo può erogare una risorsa

There are two alternative strategies for specifying which nodes a resources can run on. One way is to say that by default they can run anywhere and then create location constraints for nodes that are not allowed. The other option is to have nodes "opt-in"… to start with nothing able to run anywhere and selectively enable allowed nodes.

6.2.1. Opzioni

Tabella 6.1. Opzioni per semplici vincoli di locazione (location constraints)

Campo Descrizione
id
A unique name for the constraint
rsc
A resource name
node
A node’s name
score
Positive values indicate the resource should run on this node. Negative values indicate the resource should not run on this node.
Values of +/- INFINITY change "should"/"should not" to "must"/"must not".

6.2.2. Asymmetrical "Opt-In" Clusters

To create an opt-in cluster, start by preventing resources from running anywhere by default:
# crm_attribute --attr-name symmetric-cluster --attr-value false
Then start enabling nodes. The following fragment says that the web server prefers sles-1, the database prefers sles-2 and both can fail over to sles-3 if their most preferred node fails.

Esempio 6.1. Example set of opt-in location constraints

<constraints>
    <rsc_location id="loc-1" rsc="Webserver" node="sles-1" score="200"/>
    <rsc_location id="loc-2" rsc="Webserver" node="sles-3" score="0"/>
    <rsc_location id="loc-3" rsc="Database" node="sles-2" score="200"/>
    <rsc_location id="loc-4" rsc="Database" node="sles-3" score="0"/>
</constraints>

6.2.3. Symmetrical "Opt-Out" Clusters

To create an opt-out cluster, start by allowing resources to run anywhere by default:
# crm_attribute --attr-name symmetric-cluster --attr-value true
Then start disabling nodes. The following fragment is the equivalent of the above opt-in configuration.

Esempio 6.2. Example set of opt-out location constraints

<constraints>
    <rsc_location id="loc-1" rsc="Webserver" node="sles-1" score="200"/>
    <rsc_location id="loc-2-dont-run" rsc="Webserver" node="sles-2" score="-INFINITY"/>
    <rsc_location id="loc-3-dont-run" rsc="Database" node="sles-1" score="-INFINITY"/>
    <rsc_location id="loc-4" rsc="Database" node="sles-2" score="200"/>
</constraints>

Whether you should choose opt-in or opt-out depends both on your personal preference and the make-up of your cluster. If most of your resources can run on most of the nodes, then an opt-out arrangement is likely to result in a simpler configuration. On the other-hand, if most resources can only run on a small subset of nodes an opt-in configuration might be simpler.

6.2.4. What if Two Nodes Have the Same Score

If two nodes have the same score, then the cluster will choose one. This choice may seem random and may not be what was intended, however the cluster was not given enough information to know any better.

Esempio 6.3. Example of two resources that prefer two nodes equally

<constraints>
    <rsc_location id="loc-1" rsc="Webserver" node="sles-1" score="INFINITY"/>
    <rsc_location id="loc-2" rsc="Webserver" node="sles-2" score="INFINITY"/>
    <rsc_location id="loc-3" rsc="Database" node="sles-1" score="500"/>
    <rsc_location id="loc-4" rsc="Database" node="sles-2" score="300"/>
    <rsc_location id="loc-5" rsc="Database" node="sles-2" score="200"/>
</constraints>

In the example above, assuming no other constraints and an inactive cluster, Webserver would probably be placed on sles-1 and Database on sles-2. It would likely have placed Webserver based on the node’s uname and Database based on the desire to spread the resource load evenly across the cluster. However other factors can also be involved in more complex configurations.

6.3. Specifying in which Order Resources Should Start/Stop

The way to specify the order in which resources should start is by creating rsc_order constraints.

Tabella 6.2. Properties of an Ordering Constraint

Campo Descrizione
id
A unique name for the constraint
first
The name of a resource that must be started before the then resource is allowed to.
then
The name of a resource. This resource will start after the first resource.
kind
How to enforce the constraint. (Since 1.1.2)
* Optional - Just a suggestion. Only applies if both resources are starting/stopping.
* Mandatory - Always. If first is stopping or cannot be started, then must be stopped.
* Serialize - Ensure that no two stop/start actions occur concurrently for a set of resources.
symmetrical
If true, which is the default, stop the resources in the reverse order. Default value: true

6.3.1. Mandatory Ordering

When the then resource cannot run without the first resource being active, one should use mandatory constraints. To specify a constraint is mandatory, use scores greater than zero. This will ensure that the then resource will react when the first resource changes state.
  • If the first resource was running and is stopped, the then resource will also be stopped (if it is running).
  • If the first resource was not running and cannot be started, the then resource will be stopped (if it is running).
  • If the first resource is (re)started while the then resource is running, the then resource will be stopped and restarted.

6.3.2. Advisory Ordering

On the other hand, when score="0" is specified for a constraint, the constraint is considered optional and only has an effect when both resources are stopping and/or starting. Any change in state by the first resource will have no effect on the then resource.

Esempio 6.4. Example of an optional and mandatory ordering constraint

<constraints>
    <rsc_order id="order-1" first="Database" then="Webserver" />
    <rsc_order id="order-2" first="IP" then="Webserver" score="0"/>
</constraints>

Some additional information on ordering constraints can be found in the document Ordering Explained.

6.4. Placing Resources Relative to other Resources

When the location of one resource depends on the location of another one, we call this colocation.
There is an important side-effect of creating a colocation constraint between two resources: it affects the order in which resources are assigned to a node. If you think about it, it’s somewhat obvious. You can’t place A relative to B unless you know where B is. [12]
So when you are creating colocation constraints, it is important to consider whether you should colocate A with B or B with A.
Another thing to keep in mind is that, assuming A is collocated with B, the cluster will also take into account A’s preferences when deciding which node to choose for B.
For a detailed look at exactly how this occurs, see the Colocation Explained document.

6.4.1. Opzioni

Tabella 6.3. Properties of a Collocation Constraint

Campo Descrizione
id
A unique name for the constraint.
rsc
The colocation source. If the constraint cannot be satisfied, the cluster may decide not to allow the resource to run at all.
with-rsc
The colocation target. The cluster will decide where to put this resource first and then decide where to put the resource in the rsc field.
score
Positive values indicate the resource should run on the same node. Negative values indicate the resources should not run on the same node. Values of +/- INFINITY change "should" to "must".

6.4.2. Mandatory Placement

Mandatory placement occurs any time the constraint’s score is +INFINITY or -INFINITY. In such cases, if the constraint can’t be satisfied, then the rsc resource is not permitted to run. For score=INFINITY, this includes cases where the with-rsc resource is not active.
If you need resource1 to always run on the same machine as resource2, you would add the following constraint:
An example colocation constraint
<rsc_colocation id="colocate" rsc="resource1" with-rsc="resource2" score="INFINITY"/>
Remember, because INFINITY was used, if resource2 can’t run on any of the cluster nodes (for whatever reason) then resource1 will not be allowed to run.
Alternatively, you may want the opposite… that resource1 cannot run on the same machine as resource2. In this case use score="-INFINITY"
An example anti-colocation constraint
<rsc_colocation id="anti-colocate" rsc="resource1" with-rsc="resource2" score="-INFINITY"/>
Again, by specifying -INFINTY, the constraint is binding. So if the only place left to run is where resource2 already is, then resource1 may not run anywhere.

6.4.3. Advisory Placement

If mandatory placement is about "must" and "must not", then advisory placement is the "I’d prefer if" alternative. For constraints with scores greater than -INFINITY and less than INFINITY, the cluster will try and accommodate your wishes but may ignore them if the alternative is to stop some of the cluster resources.
Like in life, where if enough people prefer something it effectively becomes mandatory, advisory colocation constraints can combine with other elements of the configuration to behave as if they were mandatory.
An example advisory-only colocation constraint
<rsc_colocation id="colocate-maybe" rsc="resource1" with-rsc="resource2" score="500"/>

6.5. Ordering Sets of Resources

A common situation is for an administrator to create a chain of ordered resources, such as:

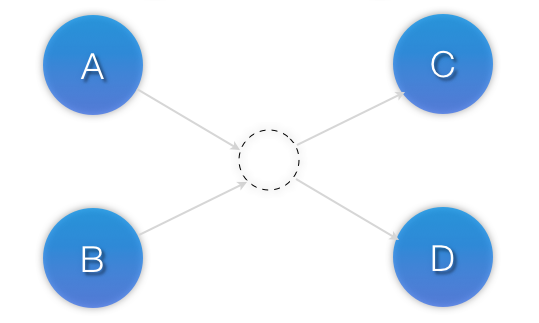
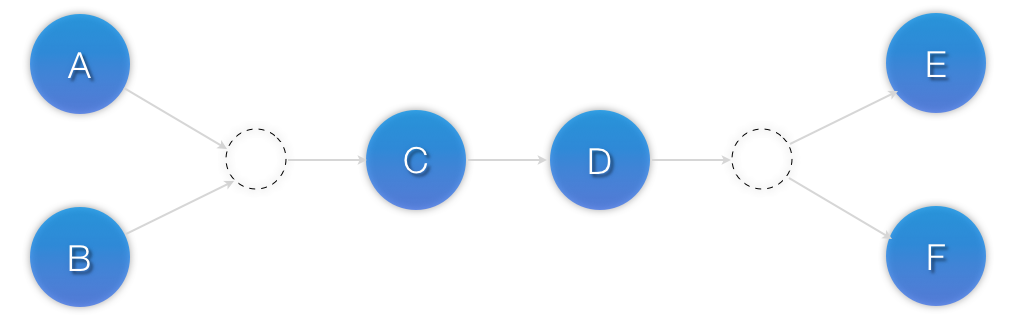
Esempio 6.5. A chain of ordered resources

<constraints>
    <rsc_order id="order-1" first="A" then="B" />
    <rsc_order id="order-2" first="B" then="C" />
    <rsc_order id="order-3" first="C" then="D" />
</constraints>

6.6. Ordered Set

Ordered set

Figura 6.1. Visual representation of the four resources' start order for the above constraints


To simplify this situation, there is an alternate format for ordering constraints:

Esempio 6.6. A chain of ordered resources expressed as a set

<constraints>
    <rsc_order id="order-1">
      <resource_set id="ordered-set-example" sequential="true">
        <resource_ref id="A"/>
        <resource_ref id="B"/>
        <resource_ref id="C"/>
        <resource_ref id="D"/>
      </resource_set>
    </rsc_order>
</constraints>

Nota

Resource sets have the same ordering semantics as groups.

Esempio 6.7. A group resource with the equivalent ordering rules

<group id="dummy">
    <primitive id="A" .../>
    <primitive id="B" .../>
    <primitive id="C" .../>
    <primitive id="D" .../>
</group>

While the set-based format is not less verbose, it is significantly easier to get right and maintain. It can also be expanded to allow ordered sets of (un)ordered resources. In the example below, rscA and rscB can both start in parallel, as can rscC and rscD, however rscC and rscD can only start once both rscA and rscB are active.

Esempio 6.8. Ordered sets of unordered resources

<constraints>
    <rsc_order id="order-1">
      <resource_set id="ordered-set-1" sequential="false">
        <resource_ref id="A"/>
        <resource_ref id="B"/>
      </resource_set>
      <resource_set id="ordered-set-2" sequential="false">
        <resource_ref id="C"/>
        <resource_ref id="D"/>
      </resource_set>
    </rsc_order>
  </constraints>

6.7. Two Sets of Unordered Resources

Two ordered sets

Figura 6.2. Visual representation of the start order for two ordered sets of unordered resources


Of course either set — or both sets — of resources can also be internally ordered (by setting sequential="true") and there is no limit to the number of sets that can be specified.

Esempio 6.9. Advanced use of set ordering - Three ordered sets, two of which are internally unordered

<constraints>
    <rsc_order id="order-1">
      <resource_set id="ordered-set-1" sequential="false">
        <resource_ref id="A"/>
        <resource_ref id="B"/>
      </resource_set>
      <resource_set id="ordered-set-2" sequential="true">
        <resource_ref id="C"/>
        <resource_ref id="D"/>
      </resource_set>
      <resource_set id="ordered-set-3" sequential="false">
        <resource_ref id="E"/>
        <resource_ref id="F"/>
      </resource_set>
    </rsc_order>
</constraints>

6.8. Three Resources Sets

Three ordered sets

Figura 6.3. Visual representation of the start order for the three sets defined above


6.9. Collocating Sets of Resources

Another common situation is for an administrator to create a set of collocated resources. Previously this was possible either by defining a resource group (See Sezione 10.1, «Gruppi - Una scorciatoia sintattica») which could not always accurately express the design; or by defining each relationship as an individual constraint, causing a constraint explosion as the number of resources and combinations grew.

Esempio 6.10. A chain of collocated resources

<constraints>
    <rsc_colocation id="coloc-1" rsc="B" with-rsc="A" score="INFINITY"/>
    <rsc_colocation id="coloc-2" rsc="C" with-rsc="B" score="INFINITY"/>
    <rsc_colocation id="coloc-3" rsc="D" with-rsc="C" score="INFINITY"/>
</constraints>

To make things easier, we allow an alternate form of colocation constraints using resource_sets. Just like the expanded version, a resource that can’t be active also prevents any resource that must be collocated with it from being active. For example, if B was not able to run, then both C (+and by inference +D) must also remain stopped.

Esempio 6.11. The equivalent colocation chain expressed using resource_sets

<constraints>
    <rsc_colocation id="coloc-1" score="INFINITY" >
      <resource_set id="collocated-set-example" sequential="true">
        <resource_ref id="A"/>
        <resource_ref id="B"/>
        <resource_ref id="C"/>
        <resource_ref id="D"/>
      </resource_set>
    </rsc_colocation>
</constraints>

Nota

Resource sets have the same colocation semantics as groups.
A group resource with the equivalent colocation rules
<group id="dummy">
    <primitive id="A" .../>
    <primitive id="B" .../>
    <primitive id="C" .../>
    <primitive id="D" .../>
</group>
This notation can also be used in this context to tell the cluster that a set of resources must all be located with a common peer, but have no dependencies on each other. In this scenario, unlike the previous, B would be allowed to remain active even if A or C (or both) were inactive.

Esempio 6.12. Using colocation sets to specify a common peer.

<constraints>
    <rsc_colocation id="coloc-1" score="INFINITY" >
      <resource_set id="collocated-set-1" sequential="false">
        <resource_ref id="A"/>
        <resource_ref id="B"/>
        <resource_ref id="C"/>
      </resource_set>
      <resource_set id="collocated-set-2" sequential="true">
        <resource_ref id="D"/>
      </resource_set>
    </rsc_colocation>
</constraints>

Of course there is no limit to the number and size of the sets used. The only thing that matters is that in order for any member of set N to be active, all the members of set N+1 must also be active (and naturally on the same node); and if a set has sequential="true", then in order for member M to be active, member M+1 must also be active. You can even specify the role in which the members of a set must be in using the set’s role attribute.

Esempio 6.13. A colocation chain where the members of the middle set have no inter-dependencies and the last has master status.

<constraints>
    <rsc_colocation id="coloc-1" score="INFINITY" >
      <resource_set id="collocated-set-1" sequential="true">
        <resource_ref id="A"/>
        <resource_ref id="B"/>
      </resource_set>
      <resource_set id="collocated-set-2" sequential="false">
        <resource_ref id="C"/>
        <resource_ref id="D"/>
        <resource_ref id="E"/>
      </resource_set>
      <resource_set id="collocated-set-2" sequential="true" role="Master">
        <resource_ref id="F"/>
        <resource_ref id="G"/>
      </resource_set>
    </rsc_colocation>
</constraints>

6.10. Another Three Resources Sets

Colocation chain

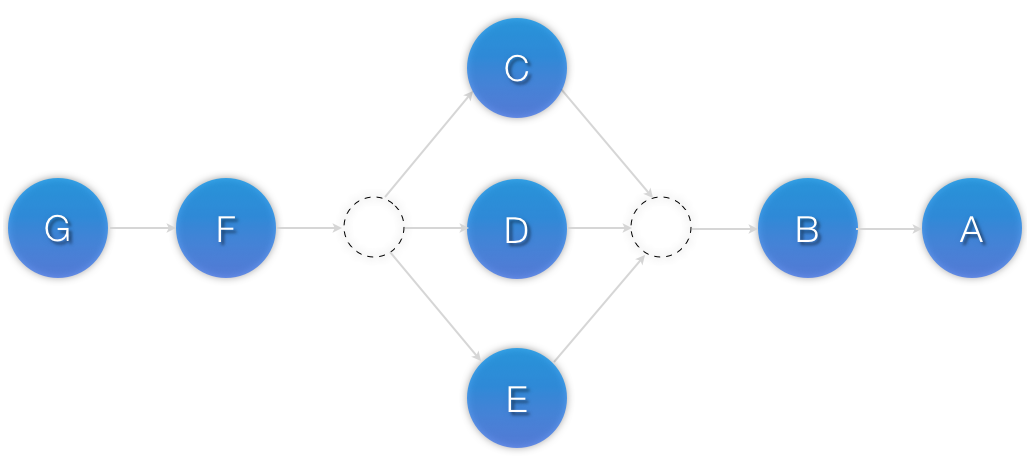
Figura 6.4. Visual representation of a colocation chain where the members of the middle set have no inter-dependencies


[12] While the human brain is sophisticated enough to read the constraint in any order and choose the correct one depending on the situation, the cluster is not quite so smart. Yet.

Capitolo 7. Receiving Notification for Cluster Events

A Pacemaker cluster is an event driven system. In this context, an event is a resource failure or configuration change (not exhaustive).
The ocf:pacemaker:ClusterMon resource can monitor the cluster status and triggers alerts on each cluster event. This resource runs crm_mon in the background at regular intervals (configurable) and uses crm_mon capabilities to send emails (SMTP), SNMP traps or to execute an external program via the extra_options parameter.

Nota

Depending on your system settings and compilation settings, SNMP or email alerts might be unavailable. Check crm_mon --help output to see if these options are available to you. In any case, executing an external agent will always be available, and you can have this agent to send emails, SNMP traps, or whatever action you develop.

7.1. Configuring SNMP Notifications

Requires an IP to send SNMP traps to, and a SNMP community. Pacemaker MIB is found in /usr/share/snmp/mibs/PCMK-MIB.txt

Esempio 7.1. Configuring ClusterMon to send SNMP traps

<clone id="ClusterMon-clone">
    <primitive class="ocf" id="ClusterMon-SNMP" provider="pacemaker" type="ClusterMon">
        <instance_attributes id="ClusterMon-instance_attributes">
            <nvpair id="ClusterMon-instance_attributes-user" name="user" value="root"/>
            <nvpair id="ClusterMon-instance_attributes-update" name="update" value="30"/>
            <nvpair id="ClusterMon-instance_attributes-extra_options" name="extra_options" value="-S snmphost.example.com -C public"/>
        </instance_attributes>
    </primitive>
</clone>

7.2. Configuring Email Notifications

Requires a user to send mail alerts to. "Mail-From", SMTP relay and Subject prefix can also be configured.

Esempio 7.2. Configuring ClusterMon to send email alerts

<clone id="ClusterMon-clone">
    <primitive class="ocf" id="ClusterMon-SMTP" provider="pacemaker" type="ClusterMon">
        <instance_attributes id="ClusterMon-instance_attributes">
            <nvpair id="ClusterMon-instance_attributes-user" name="user" value="root"/>
            <nvpair id="ClusterMon-instance_attributes-update" name="update" value="30"/>
            <nvpair id="ClusterMon-instance_attributes-extra_options" name="extra_options" value="-T pacemaker@example.com -F pacemaker@node2.example.com -P PACEMAKER -H mail.example.com"/>
        </instance_attributes>
    </primitive>
</clone>

7.3. Configuring Notifications via External-Agent

Requires a program (external-agent) to run when resource operations take place, and an external-recipient (IP address, Email address, URI). When triggered, the external-agent is fed with dynamically filled environnement variables describing precisely the cluster event that occurred. By making smart usage of these variables in your external-agent code, you can trigger any action.

Esempio 7.3. Configuring ClusterMon to execute an external-agent

<clone id="ClusterMon-clone">
    <primitive class="ocf" id="ClusterMon" provider="pacemaker" type="ClusterMon">
        <instance_attributes id="ClusterMon-instance_attributes">
            <nvpair id="ClusterMon-instance_attributes-user" name="user" value="root"/>
            <nvpair id="ClusterMon-instance_attributes-update" name="update" value="30"/>
            <nvpair id="ClusterMon-instance_attributes-extra_options" name="extra_options" value="-E /usr/local/bin/example.sh -e 192.168.12.1"/>
        </instance_attributes>
    </primitive>
</clone>

Tabella 7.1. Environment Variables Passed to the External Agent

Environment Variable Description
CRM_notify_recipient
The static external-recipient from the resource definition.
CRM_notify_node
The node on which the status change happened.
CRM_notify_rsc
The name of the resource that changed the status.
CRM_notify_task
The operation that caused the status change.
CRM_notify_desc
The textual output relevant error code of the operation (if any) that caused the status change.
CRM_notify_rc
The return code of the operation.
CRM_notify_target_rc
The expected return code of the operation.
CRM_notify_status
The numerical representation of the status of the operation.

Capitolo 8. Regole

Rules can be used to make your configuration more dynamic. One common example is to set one value for resource-stickiness during working hours, to prevent resources from being moved back to their most preferred location, and another on weekends when no-one is around to notice an outage.
Un'altra regola impostabile potrebbe essere quella di assegnare le macchine a differenti gruppi di processo (utilizzando gli attributi del nodo) basati sulle tempistiche ed utilizzare quindi questi attributi nella creazione delle constraint di tipo location.
Each rule can contain a number of expressions, date-expressions and even other rules. The results of the expressions are combined based on the rule’s boolean-op field to determine if the rule ultimately evaluates to true or false. What happens next depends on the context in which the rule is being used.

Tabella 8.1. Proprietà di una regola

Campo Descrizione
role
Limits the rule to apply only when the resource is in that role. Allowed values: Started, Slave, and Master. NOTE: A rule with role="Master" can not determine the initial location of a clone instance. It will only affect which of the active instances will be promoted.
score
The score to apply if the rule evaluates to true. Limited to use in rules that are part of location constraints.
score-attribute
The node attribute to look up and use as a score if the rule evaluates to true. Limited to use in rules that are part of location constraints.
boolean-op
How to combine the result of multiple expression objects. Allowed values: and and or.

8.1. Espressioni relative agli attributi del nodo

Gli oggetti espressione sono utilizzati per controllare una risorsa basata sugli attributi definiti da uno o più nodi. In aggiunta a qualsiasi attributo aggiunto dall'amministratore, ogni nodo possiede un attributo predefinito che può essere utilizzato chiamato #uname.

Tabella 8.2. Proprietà di un'espressione

Campo Descrizione
value
User supplied value for comparison
attribute
The node attribute to test
type
Determines how the value(s) should be tested. Allowed values: string, integer, version
operation
Il confronto da effettuare. Valori permessi:
* lt - True if the node attribute’s value is less than value
* gt - True if the node attribute’s value is greater than value
* lte - True if the node attribute’s value is less than or equal to value
* gte - True if the node attribute’s value is greater than or equal to value
* eq - True if the node attribute’s value is equal to value
* ne - True if the node attribute’s value is not equal to value
* defined - True if the node has the named attribute
* not_defined - True if the node does not have the named attribute

8.2. Espressioni basate su Ora/Data

As the name suggests, date_expressions are used to control a resource or cluster option based on the current date/time. They can contain an optional date_spec and/or duration object depending on the context.

Tabella 8.3. Proprietà di un'espressione basata sulla data

Campo Descrizione
start
A date/time conforming to the ISO8601 specification.
end
A date/time conforming to the ISO8601 specification. Can be inferred by supplying a value for start and a duration.
operation
Confronta la data/ora attuale con la data/ora indicata nei parametri start ed end, dipendentemente dal contesto. Valori permessi:
* gt - True if the current date/time is after start
* lt - True if the current date/time is before end
* in-range - True if the current date/time is after start and before end
* date-spec - performs a cron-like comparison to the current date/time

Nota

As these comparisons (except for date_spec) include the time, the eq, neq, gte and lte operators have not been implemented since they would only be valid for a single second.

8.2.1. Dichiarare date

gli oggetti di tipo date_spec sono utilizzati per creare espressioni simili a quelle cron. Ogi campo contiene un singolo numero ed un singolo range Anziché impostare per default zero, ogni campo non difinito viene ignorato.
For example, monthdays="1" matches the first day of every month and hours="09-17" matches the hours between 9am and 5pm (inclusive). However, at this time one cannot specify weekdays="1,2" or weekdays="1-2,5-6" since they contain multiple ranges. Depending on demand, this may be implemented in a future release.

Tabella 8.4. Prorpietà di una specifica data

Campo Descrizione
id
A unique name for the date
hours
Allowed values: 0-23
monthdays
Allowed values: 0-31 (depending on month and year)
weekdays
Allowed values: 1-7 (1=Monday, 7=Sunday)
yeardays
Allowed values: 1-366 (depending on the year)
months
Allowed values: 1-12
weeks
Allowed values: 1-53 (depending on weekyear)
years
Year according the Gregorian calendar
weekyears
May differ from Gregorian years; Eg. 2005-001 Ordinal is also 2005-01-01 Gregorian is also 2004-W53-6 Weekly
moon
Allowed values: 0-7 (0 is new, 4 is full moon). Seriously, you can use this. This was implemented to demonstrate the ease with which new comparisons could be added.

8.2.2. Durate

Durations are used to calculate a value for end when one is not supplied to in_range operations. They contain the same fields as date_spec objects but without the limitations (ie. you can have a duration of 19 months). Like date_specs, any field not supplied is ignored.

8.3. Espressioni temporali di esempio

A small sample of how time based expressions can be used.

Esempio 8.1. Vero se "now" è un qualsiasi momento nell'anno 2005

<rule id="rule1">
   <date_expression id="date_expr1" start="2005-001" operation="in_range">
    <duration years="1"/>
   </date_expression>
</rule>

Esempio 8.2. Equivalent expression

<rule id="rule2">
   <date_expression id="date_expr2" operation="date_spec">
    <date_spec years="2005"/>
   </date_expression>
</rule>

Esempio 8.3. 9:00-17:00, lunedì-venerdì

<rule id="rule3">
   <date_expression id="date_expr3" operation="date_spec">
    <date_spec hours="9-16" days="1-5"/>
   </date_expression>
</rule>

Please note that the 16 matches up to 16:59:59, as the numeric value (hour) still matches!

Esempio 8.4. 9:00-18:00, lunedì-venerdì, o qualsiasi ora di sabato

<rule id="rule4" boolean_op="or">
   <date_expression id="date_expr4-1" operation="date_spec">
    <date_spec hours="9-16" days="1-5"/>
   </date_expression>
   <date_expression id="date_expr4-2" operation="date_spec">
    <date_spec days="6"/>
   </date_expression>
</rule>

Esempio 8.5. 9:00-17:00 o 21:00-24:00, lunedì-venerdì

<rule id="rule5" boolean_op="and">
   <rule id="rule5-nested1" boolean_op="or">
    <date_expression id="date_expr5-1" operation="date_spec">
     <date_spec hours="9-16"/>
    </date_expression>
    <date_expression id="date_expr5-2" operation="date_spec">
     <date_spec hours="21-23"/>
    </date_expression>
   </rule>
   <date_expression id="date_expr5-3" operation="date_spec">
    <date_spec days="1-5"/>
   </date_expression>
  </rule>

Esempio 8.6. Tutti i lunedì del mese di marzo 2005

<rule id="rule6" boolean_op="and">
   <date_expression id="date_expr6-1" operation="date_spec">
    <date_spec weekdays="1"/>
   </date_expression>
   <date_expression id="date_expr6-2" operation="in_range"
     start="2005-03-01" end="2005-04-01"/>
  </rule>

Nota

Because no time is specified, 00:00:00 is implied.
This means that the range includes all of 2005-03-01 but none of 2005-04-01. You may wish to write end="2005-03-31T23:59:59" to avoid confusion.

Esempio 8.7. In luna piena di venerdì 13

<rule id="rule7" boolean_op="and">
   <date_expression id="date_expr7" operation="date_spec">
    <date_spec weekdays="5" monthdays="13" moon="4"/>
   </date_expression>
</rule>

8.4. Utilizzare regole per determinare il posizionamento delle risorse

If the constraint’s outer-most rule evaluates to false, the cluster treats the constraint as if it was not there. When the rule evaluates to true, the node’s preference for running the resource is updated with the score associated with the rule.
Se questo suona familiare è perché sono state già utilizzate sintassi semplificate per le constraint di tipo location. Considerata la seguente location constraint:

Esempio 8.8. Impedisci a myApacheRsc di essere eseguita su c001n03

<rsc_location id="dont-run-apache-on-c001n03" rsc="myApacheRsc"
              score="-INFINITY" node="c001n03"/>

Questa constraint potrebbe essere scritta più verbosamente come:

Esempio 8.9. Impedisci a myApacheRsc di essere eseguita su c001n03 - versione estesa

<rsc_location id="dont-run-apache-on-c001n03" rsc="myApacheRsc">
    <rule id="dont-run-apache-rule" score="-INFINITY">
      <expression id="dont-run-apache-expr" attribute="#uname"
        operation="eq" value="c00n03"/>
    </rule>
</rsc_location>

Il vantaggio di usare la versione estesa risiede nel fatto che è possibile aggiungere clausole extra nella regola, come limitarla affinché venga applicata solo in determinati orari del giorno o giorni sella settimana (il tema viene affrontato nelle sezioni sottostanti).
It also allows us to match on node properties other than its name. If we rated each machine’s CPU power such that the cluster had the following nodes section:

Esempio 8.10. Una sezione nodi di esempio da utilizzare con score-attribute

<nodes>
   <node id="uuid1" uname="c001n01" type="normal">
      <instance_attributes id="uuid1-custom_attrs">
        <nvpair id="uuid1-cpu_mips" name="cpu_mips" value="1234"/>
      </instance_attributes>
   </node>
   <node id="uuid2" uname="c001n02" type="normal">
      <instance_attributes id="uuid2-custom_attrs">
        <nvpair id="uuid2-cpu_mips" name="cpu_mips" value="5678"/>
      </instance_attributes>
   </node>
</nodes>

allora è possibile prevenire le risorse dall'essere eseguite in macchine meno potenti, mediante la regola
<rule id="need-more-power-rule" score="-INFINITY">
   <expression id=" need-more-power-expr" attribute="cpu_mips"
               operation="lt" value="3000"/>
</rule>

8.4.1. Utilizzo di score-attribute invece di score

When using score-attribute instead of score, each node matched by the rule has its score adjusted differently, according to its value for the named node attribute. Thus, in the previous example, if a rule used score-attribute="cpu_mips", c001n01 would have its preference to run the resource increased by 1234 whereas c001n02 would have its preference increased by 5678.

8.5. Utilizzare regole per controllare le opzioni delle risorse

Often some cluster nodes will be different from their peers; sometimes these differences (the location of a binary or the names of network interfaces) require resources to be configured differently depending on the machine they’re hosted on.
E' possibile gestire facilmente questi casi speciali definendo oggetti instance_attributes multipli per le risorse ed aggiungendo una regola per ognuno.
In the example below, mySpecialRsc will use eth1 and port 9999 when run on node1, eth2 and port 8888 on node2 and default to eth0 and port 9999 for all other nodes.

Esempio 8.11. Definire opzioni per le risorse differenti in base al nome del nodo

<primitive id="mySpecialRsc" class="ocf" type="Special" provider="me">
   <instance_attributes id="special-node1" score="3">
    <rule id="node1-special-case" score="INFINITY" >
     <expression id="node1-special-case-expr" attribute="#uname"
       operation="eq" value="node1"/>
    </rule>
    <nvpair id="node1-interface" name="interface" value="eth1"/>
   </instance_attributes>
   <instance_attributes id="special-node2" score="2" >
    <rule id="node2-special-case" score="INFINITY">
     <expression id="node2-special-case-expr" attribute="#uname"
       operation="eq" value="node2"/>
    </rule>
    <nvpair id="node2-interface" name="interface" value="eth2"/>
    <nvpair id="node2-port" name="port" value="8888"/>
   </instance_attributes>
   <instance_attributes id="defaults" score="1" >
    <nvpair id="default-interface" name="interface" value="eth0"/>
    <nvpair id="default-port" name="port" value="9999"/>
   </instance_attributes>
</primitive>

L'ordine in cui gli oggetti instance_attributes sono valutati è determinato dal loro peso (dal più alto al più basso). Se non è fornito il punteggio di default è zero e gli oggetti con lo stesso punteggio vengono processati nell'ordine della lista. Se l'oggetto instance_attributes non ha una rule o ha una rule che risulta in true, allora la risorsa non avrà ancora un valore per qualsiasi parametro ed utilizzerà quindi il valore fornito dall'oggetto instance_attributes.

8.6. Utilizzare le regole per controllare le opzioni del cluster

E' possibile controllare le opzioni del cluster mediante le stesse modalità utilizzate per specificare opzioni differenti per le risorse in nodi differenti.
The difference is that because they are cluster options, one cannot (or should not, because they won’t work) use attribute based expressions. The following example illustrates how to set a different resource-stickiness value during and outside of work hours. This allows resources to automatically move back to their most preferred hosts, but at a time that (in theory) does not interfere with business activities.

Esempio 8.12. Change resource-stickiness during working hours

<rsc_defaults>
   <meta_attributes id="core-hours" score="2">
      <rule id="core-hour-rule" score="0">
        <date_expression id="nine-to-five-Mon-to-Fri" operation="date_spec">
          <date_spec id="nine-to-five-Mon-to-Fri-spec" hours="9-16" weekdays="1-5"/>
        </date_expression>
      </rule>
      <nvpair id="core-stickiness" name="resource-stickiness" value="INFINITY"/>
   </meta_attributes>
   <meta_attributes id="after-hours" score="1" >
      <nvpair id="after-stickiness" name="resource-stickiness" value="0"/>
   </meta_attributes>
</rsc_defaults>

8.7. Assicurarsi che le regole basate sugli orari abbiano effetto

A Pacemaker cluster is an event driven system. As such, it won’t recalculate the best place for resources to run in unless something (like a resource failure or configuration change) happens. This can mean that a location constraint that only allows resource X to run between 9am and 5pm is not enforced.
If you rely on time based rules, it is essential that you set the cluster-recheck-interval option. This tells the cluster to periodically recalculate the ideal state of the cluster. For example, if you set cluster-recheck-interval=5m, then sometime between 9:00 and 9:05 the cluster would notice that it needs to start resource X, and between 17:00 and 17:05 it would realize that X needed to be stopped.
Note that the timing of the actual start and stop actions depends on what else needs to be performed first .

Capitolo 9. Configurazione avanzata

9.1. Connecting from a Remote Machine

Provided Pacemaker is installed on a machine, it is possible to connect to the cluster even if the machine itself is not in the same cluster. To do this, one simply sets up a number of environment variables and runs the same commands as when working on a cluster node.

Tabella 9.1. Variabili d'ambiente utilizzate per connettersi ad istanze remote del CIB

Variabile d'ambiente Descrizione
CIB_user
The user to connect as. Needs to be part of the hacluster group on the target host. Defaults to $USER.
CIB_passwd
The user’s password. Read from the command line if unset.
CIB_server
The host to contact. Defaults to localhost.
CIB_port
The port on which to contact the server; required.
CIB_encrypted
Encrypt network traffic; defaults to true.

So, if c001n01 is an active cluster node and is listening on 1234 for connections, and someguy is a member of the hacluster group, then the following would prompt for someguy's password and return the cluster’s current configuration:
# export CIB_port=1234; export CIB_server=c001n01; export CIB_user=someguy;
# cibadmin -Q
For security reasons, the cluster does not listen for remote connections by default. If you wish to allow remote access, you need to set the remote-tls-port (encrypted) or remote-clear-port (unencrypted) top-level options (ie., those kept in the cib tag, like num_updates and epoch).

Tabella 9.2. Opzioni top-level extra per l'accesso remoto

Campo Descrizione
remote-tls-port
Listen for encrypted remote connections on this port. Default: none
remote-clear-port
Listen for plaintext remote connections on this port. Default: none

9.2. Specificare tempistiche per le azioni ricorrenti

Per default, le operazioni ricorrenti vengono schedulate quando le risorse relative sono avviate. Quindi se una risorsa è stata avviata l'ultima volta alle 14:32 ed è stata dichiarata un'operazione di backup che deve essere eseguita ogni 24 ore, allora tale backup verrà eseguito sempre nel mezzo di un giorno lavorativo, il che non è particolarmente desiderabile...
To specify a date/time that the operation should be relative to, set the operation’s interval-origin. The cluster uses this point to calculate the correct start-delay such that the operation will occur at origin + (interval * N).
So, if the operation’s interval is 24h, it’s interval-origin is set to 02:00 and it is currently 14:32, then the cluster would initiate the operation with a start delay of 11 hours and 28 minutes. If the resource is moved to another node before 2am, then the operation is of course cancelled.
Il valore specificato per interval e interval-origin può essere un qualsiasi date/time conforme allo standard ISO8601. Facendo un esempio, per dichiarare un'operazione che verrà eseguita il primo lunedì del 2009 ed ogni lunedì successivo bisognerà aggiungere:

Esempio 9.1. Specificare una base di partenza per gli intervalli relativi alle azioni ricorrenti

<op id="my-weekly-action" name="custom-action" interval="P7D" interval-origin="2009-W01-1"/>

9.3. Spostare le risorse

9.3.1. Intervenire manualmente

There are primarily two occasions when you would want to move a resource from it’s current location: when the whole node is under maintenance, and when a single resource needs to be moved.
Since everything eventually comes down to a score, you could create constraints for every resource to prevent them from running on one node. While the configuration can seem convoluted at times, not even we would require this of administrators.
Instead one can set a special node attribute which tells the cluster "don’t let anything run here". There is even a helpful tool to help query and set it, called crm_standby. To check the standby status of the current machine, simply run:
# crm_standby --get-value
A value of true indicates that the node is NOT able to host any resources, while a value of false says that it CAN.
You can also check the status of other nodes in the cluster by specifying the --node-uname option:
# crm_standby --get-value --node-uname sles-2
To change the current node’s standby status, use --attr-value instead of --get-value.
# crm_standby --attr-value
Again, you can change another host’s value by supplying a host name with --node-uname.
When only one resource is required to move, we do this by creating location constraints. However, once again we provide a user friendly shortcut as part of the crm_resource command, which creates and modifies the extra constraints for you. If Email was running on sles-1 and you wanted it moved to a specific location, the command would look something like:
# crm_resource -M -r Email -H sles-2
Dietro le quinte il comando creerà la seguente location constraint:
<rsc_location rsc="Email" node="sles-2" score="INFINITY"/>
It is important to note that subsequent invocations of crm_resource -M are not cumulative. So, if you ran these commands
# crm_resource -M -r Email -H sles-2
# crm_resource -M -r Email -H sles-3
allora risulterà come se il primo comando non fosse mai stato eseguito.
Per permettere ad una risorsa di essere nuovamente spostata è possibile utilizzare:
# crm_resource -U -r Email
Note the use of the word allow. The resource can move back to its original location but, depending on resource-stickiness, it might stay where it is. To be absolutely certain that it moves back to sles-1, move it there before issuing the call to crm_resource -U:
# crm_resource -M -r Email -H sles-1
# crm_resource -U -r Email
Alternativamente, se l'unica esigenza è quella di spostare la risorsa dalla posizione attuale si può provare con
# crm_resource -M -r Email`
Which will instead create a negative constraint, like
<rsc_location rsc="Email" node="sles-1" score="-INFINITY"/>
This will achieve the desired effect, but will also have long-term consequences. As the tool will warn you, the creation of a -INFINITY constraint will prevent the resource from running on that node until crm_resource -U is used. This includes the situation where every other cluster node is no longer available!
In some cases, such as when resource-stickiness is set to INFINITY, it is possible that you will end up with the problem described in Sezione 6.2.4, «What if Two Nodes Have the Same Score». The tool can detect some of these cases and deals with them by also creating both a positive and negative constraint. Eg.
Email prefers sles-1 with a score of -INFINITY
Email prefers sles-2 with a score of INFINITY
che ha lo stesso effetto a lungo termine discusso in precedenza.

9.3.2. Spostare risorse in seguito ad un fallimento

New in 1.0 is the concept of a migration threshold. [13]
Simply define migration-threshold=N for a resource and it will migrate to a new node after N failures. There is no threshold defined by default. To determine the resource’s current failure status and limits, use crm_mon --failcounts.
By default, once the threshold has been reached, this node will no longer be allowed to run the failed resource until the administrator manually resets the resource’s failcount using crm_failcount (after hopefully first fixing the failure’s cause). However it is possible to expire them by setting the resource’s failure-timeout option.
So a setting of migration-threshold=2 and failure-timeout=60s would cause the resource to move to a new node after 2 failures, and allow it to move back (depending on the stickiness and constraint scores) after one minute.
There are two exceptions to the migration threshold concept; they occur when a resource either fails to start or fails to stop. Start failures cause the failcount to be set to INFINITY and thus always cause the resource to move immediately.
I fallimenti in fase di stop sono leggermente differenti e cruciali. Se una risorsa fallisce lo stop e STONITH è abilitato, allora il cluster effettuerà un fence del nodo in modo da essere in grado di avviare la risorsa altrove. Se STONITH non è abilitato, allora il cluster non ha modo di continuare e non cercherà di avviare la risorsa altrove, ma continuerà a tentare di stopparla superato il failure timeout.

Importante

Prima di abilitare questa opzione, si prega di leggere Sezione 8.7, «Assicurarsi che le regole basate sugli orari abbiano effetto».

9.3.3. Spostare le risorse in base a variazioni della connettività

Setting up the cluster to move resources when external connectivity is lost is a two-step process.

9.3.3.1. Comunicare a Pacemaker di controllare la connettività

To do this, you need to add a ping resource to the cluster. The ping resource uses the system utility of the same name to a test if list of machines (specified by DNS hostname or IPv4/IPv6 address) are reachable and uses the results to maintain a node attribute normally called pingd. [14]

Nota

Older versions of Heartbeat required users to add ping nodes to ha.cf - this is no longer required.

Importante

Older versions of Pacemaker used a custom binary called pingd for this functionality; this is now deprecated in favor of ping.
If your version of Pacemaker does not contain the ping agent, you can download the latest version from https://github.com/ClusterLabs/pacemaker/tree/master/extra/resources/ping
Normally the resource will run on all cluster nodes, which means that you’ll need to create a clone. A template for this can be found below along with a description of the most interesting parameters.

Tabella 9.3. Common Options for a ping Resource

Campo Descrizione
dampen
The time to wait (dampening) for further changes to occur. Use this to prevent a resource from bouncing around the cluster when cluster nodes notice the loss of connectivity at slightly different times.
multiplier
The number of connected ping nodes gets multiplied by this value to get a score. Useful when there are multiple ping nodes configured.
host_list
The machines to contact in order to determine the current connectivity status. Allowed values include resolvable DNS host names, IPv4 and IPv6 addresses.

Esempio 9.2. An example ping cluster resource that checks node connectivity once every minute

<clone id="Connected">
   <primitive id="ping" provider="pacemaker" class="ocf" type="ping">
    <instance_attributes id="ping-attrs">
      <nvpair id="pingd-dampen" name="dampen" value="5s"/>
      <nvpair id="pingd-multiplier" name="multiplier" value="1000"/>
      <nvpair id="pingd-hosts" name="host_list" value="my.gateway.com www.bigcorp.com"/>
    </instance_attributes>
    <operations>
      <op id="ping-monitor-60s" interval="60s" name="monitor"/>
    </operations>
   </primitive>
</clone>

Importante

You’re only half done. The next section deals with telling Pacemaker how to deal with the connectivity status that ocf:pacemaker:ping is recording.

9.3.3.2. Specificare a Pacemaker come intepretare i dati di connettività

Nota

Before reading the following, please make sure you have read and understood Chapter 8, Rules above.
There are a number of ways to use the connectivity data provided by Heartbeat. The most common setup is for people to have a single ping node, to prevent the cluster from running a resource on any unconnected node.

Esempio 9.3. Don’t run on unconnected nodes

<rsc_location id="WebServer-no-connectivity" rsc="Webserver">
   <rule id="ping-exclude-rule" score="-INFINITY" >
    <expression id="ping-exclude" attribute="pingd" operation="not_defined"/>
   </rule>
</rsc_location>

A more complex setup is to have a number of ping nodes configured. You can require the cluster to only run resources on nodes that can connect to all (or a minimum subset) of them.

Esempio 9.4. Run only on nodes connected to three or more ping nodes; this assumes multiplier is set to 1000:

<rsc_location id="WebServer-connectivity" rsc="Webserver">
   <rule id="ping-prefer-rule" score="-INFINITY" >
    <expression id="ping-prefer" attribute="pingd" operation="lt" value="3000"/>
   </rule>
</rsc_location>

Instead you can tell the cluster only to prefer nodes with the best connectivity. Just be sure to set multiplier to a value higher than that of resource-stickiness (and don’t set either of them to INFINITY).

Esempio 9.5. Prediligi il nodo che il maggior numero di nodi ping

<rsc_location id="WebServer-connectivity" rsc="Webserver">
   <rule id="ping-prefer-rule" score-attribute="pingd" >
    <expression id="ping-prefer" attribute="pingd" operation="defined"/>
   </rule>
</rsc_location>

It is perhaps easier to think of this in terms of the simple constraints that the cluster translates it into. For example, if sles-1 is connected to all 5 ping nodes but sles-2 is only connected to 2, then it would be as if you instead had the following constraints in your configuration:

Esempio 9.6. Come il cluster traduce le constraint pingd

<rsc_location id="ping-1" rsc="Webserver" node="sles-1" score="5000"/>
<rsc_location id="ping-2" rsc="Webserver" node="sles-2" score="2000"/>

The advantage is that you don’t have to manually update any constraints whenever your network connectivity changes.
You can also combine the concepts above into something even more complex. The example below shows how you can prefer the node with the most connected ping nodes provided they have connectivity to at least three (again assuming that multiplier is set to 1000).

Esempio 9.7. Un esempio più complesso di location basata sui valori di connettività

<rsc_location id="WebServer-connectivity" rsc="Webserver">
   <rule id="ping-exclude-rule" score="-INFINITY" >
    <expression id="ping-exclude" attribute="pingd" operation="lt" value="3000"/>
   </rule>
   <rule id="ping-prefer-rule" score-attribute="pingd" >
    <expression id="ping-prefer" attribute="pingd" operation="defined"/>
   </rule>
</rsc_location>

9.3.4. Migrazione delle risorse

Some resources, such as Xen virtual guests, are able to move to another location without loss of state. We call this resource migration; this is different from the normal practice of stopping the resource on the first machine and starting it elsewhere.
Not all resources are able to migrate, see the Migration Checklist below, and those that can, won’t do so in all situations. Conceptually there are two requirements from which the other prerequisites follow:
  • la risorsa deve essere attiva e funzionante nella locazione originale
  • quanto necessario alla risorsa per funzionare deve essere disponibile sulla locazione originale e futura.
Il cluster supporta sia la migrazione "da" che quella "verso" richiedendo al resource agent di supportare due nuove azioni:migrate_to (eseguita sulla locazione attuale) e migrate_from (eseguita sulla destinazione).
In push migration, the process on the current location transfers the resource to the new location where is it later activated. In this scenario, most of the work would be done in the migrate_to action and, if anything, the activation would occur during migrate_from.
Al contrario per l'azione "a" l'azione migrate_to è praticamente nulla mentre la maggior parte del lavoro è svoloto durante migrate_from, che estrae lo stato rilevante della risorsa nella vecchia locazione e lo attiva.
Non esiste una via giusta o sbagliata di implementare la migrazione di un servizio, finché questa funziona.

9.3.4.1. Lista di controllo della migrazione

  • La risorsa potrebbe non essere un clone
  • La risorsa deve usare un agent di tipo OCF
  • La risorsa non deve essere in stato failed o degraded.
  • La risorsa non deve, direttamente o indirettamente, dipendere da una primitiva o da un gruppo di risorse.
  • The resource must support two new actions: migrate_to and migrate_from, and advertise them in its metadata.
  • The resource must have the allow-migrate meta-attribute set to true (which is not the default).
Se la risorsa dipende da un clone e, nel momento in cui questa deve essere spostata, il clone ha istanze che stanno partendo o fermandos, allora la risorsa verrà spostata in maniera tradizionale. Il Policy Engine (motore delle politiche di spostamento) non è ancora in grado di modellare questa situazione correttamente e quindi prende la via più sicura (e meno ottimale).

9.4. Riutilizzare regole, opzioni e set di operazioni

Sometimes a number of constraints need to use the same set of rules, and resources need to set the same options and parameters. To simplify this situation, you can refer to an existing object using an id-ref instead of an id.
Quindi data una risorsa
<rsc_location id="WebServer-connectivity" rsc="Webserver">
   <rule id="ping-prefer-rule" score-attribute="pingd" >
    <expression id="ping-prefer" attribute="pingd" operation="defined"/>
   </rule>
</rsc_location>
Then instead of duplicating the rule for all your other resources, you can instead specify:

Esempio 9.8. Referenziare regole da altre constraint

<rsc_location id="WebDB-connectivity" rsc="WebDB">
      <rule id-ref="ping-prefer-rule"/>
</rsc_location>

Importante

Il cluster insisterà sul fatto che la rule esiste da qualche parte. Cercare di aggiungere una referenza ad una regola inesistente provocherà problemi nella validazione, in quanto seguirà un tentativo di rimuovere una rule referenziata altrove.
The same principle applies for meta_attributes and instance_attributes as illustrated in the example below:

Esempio 9.9. Referencing attributes, options, and operations from other resources

<primitive id="mySpecialRsc" class="ocf" type="Special" provider="me">
   <instance_attributes id="mySpecialRsc-attrs" score="1" >
     <nvpair id="default-interface" name="interface" value="eth0"/>
     <nvpair id="default-port" name="port" value="9999"/>
   </instance_attributes>
   <meta_attributes id="mySpecialRsc-options">
     <nvpair id="failure-timeout" name="failure-timeout" value="5m"/>
     <nvpair id="migration-threshold" name="migration-threshold" value="1"/>
     <nvpair id="stickiness" name="resource-stickiness" value="0"/>
   </meta_attributes>
   <operations id="health-checks">
     <op id="health-check" name="monitor" interval="60s"/>
     <op id="health-check" name="monitor" interval="30min"/>
   </operations>
</primitive>
<primitive id="myOtherlRsc" class="ocf" type="Other" provider="me">
   <instance_attributes id-ref="mySpecialRsc-attrs"/>
   <meta_attributes id-ref="mySpecialRsc-options"/>
   <operations id-ref="health-checks"/>
</primitive>

9.5. Effettuare il reload dei servizi dopo una variazione della definizione

The cluster automatically detects changes to the definition of services it manages. However, the normal response is to stop the service (using the old definition) and start it again (with the new definition). This works well, but some services are smarter and can be told to use a new set of options without restarting.
Per trarre beneficio da questa abilità il proprio resource agent dovrà
  1. Accept the reload operation and perform any required actions. The steps required here depend completely on your application!

    Esempio 9.10. The DRBD Agent’s Control logic for Supporting the reload Operation

    case $1 in
        start)
            drbd_start
            ;;
        stop)
            drbd_stop
            ;;
        reload)
            drbd_reload
            ;;
        monitor)
            drbd_monitor
            ;;
        *)
            drbd_usage
            exit $OCF_ERR_UNIMPLEMENTED
            ;;
    esac
    exit $?

  2. Promuovere l'operazione di reload nella sezione actions dei metadata

    Esempio 9.11. La logica di controllo dell'operazione di reload implementata dall'agente DRBD

    <?xml version="1.0"?>
      <!DOCTYPE resource-agent SYSTEM "ra-api-1.dtd">
      <resource-agent name="drbd">
        <version>1.1</version>
    
        <longdesc>
          Master/Slave OCF Resource Agent for DRBD
        </longdesc>
    
        ...
    
        <actions>
          <action name="start"   timeout="240" />
          <action name="reload"  timeout="240" />
          <action name="promote" timeout="90" />
          <action name="demote"  timeout="90" />
          <action name="notify"  timeout="90" />
          <action name="stop"    timeout="100" />
          <action name="meta-data"    timeout="5" />
          <action name="validate-all" timeout="30" />
        </actions>
      </resource-agent>

  3. Promuove uno o più paramtri che vengono attivati utilizzando reload.
    Any parameter with the unique set to 0 is eligible to be used in this way.

    Esempio 9.12. Paramtro modificabile utilizzando reload

    <parameter name="drbdconf" unique="0">
        <longdesc>Full path to the drbd.conf file.</longdesc>
        <shortdesc>Path to drbd.conf</shortdesc>
        <content type="string" default="${OCF_RESKEY_drbdconf_default}"/>
    </parameter>

Once these requirements are satisfied, the cluster will automatically know to reload the resource (instead of restarting) when a non-unique fields changes.

Nota

I metadata vengono nuovamente letti quando la risorsa viene avviata. Questo potrebbe significare che la risorsa verrà riavviata la prima volta, anche se è stato modificato un parametro con unique=0

Nota

If both a unique and non-unique field are changed simultaneously, the resource will still be restarted.


[13] The naming of this option was perhaps unfortunate as it is easily confused with true migration, the process of moving a resource from one node to another without stopping it. Xen virtual guests are the most common example of resources that can be migrated in this manner.
[14] The attribute name is customizable; that allows multiple ping groups to be defined.

Capitolo 10. Tipi di risorse avanzati

10.1. Gruppi - Una scorciatoia sintattica

One of the most common elements of a cluster is a set of resources that need to be located together, start sequentially, and stop in the reverse order. To simplify this configuration we support the concept of groups.

Esempio 10.1. Un esempio di gruppo

<group id="shortcut">
   <primitive id="Public-IP" class="ocf" type="IPaddr" provider="heartbeat">
    <instance_attributes id="params-public-ip">
       <nvpair id="public-ip-addr" name="ip" value="1.2.3.4"/>
    </instance_attributes>
   </primitive>
   <primitive id="Email" class="lsb" type="exim"/>
  </group>

Anche se l'esempio illustrato sopra contiene solo due risorse, non esiste limite al numero di risorse che un gruppo può contenere. L'esempio è comunque sufficiente per illustrare le proprietà fondamentali di un gruppo:
  • Resources are started in the order they appear in (Public-IP first, then Email)
  • Resources are stopped in the reverse order to which they appear in (Email first, then Public-IP)
If a resource in the group can’t run anywhere, then nothing after that is allowed to run, too.
  • If Public-IP can’t run anywhere, neither can Email;
  • but if Email can’t run anywhere, this does not affect Public-IP in any way
Il gruppo descritto è locicamente equivalente alla seguente definizione:

Esempio 10.2. Come il gruppo di risorse è visto dal cluster

<configuration>
   <resources>
    <primitive id="Public-IP" class="ocf" type="IPaddr" provider="heartbeat">
     <instance_attributes id="params-public-ip">
        <nvpair id="public-ip-addr" name="ip" value="1.2.3.4"/>
     </instance_attributes>
    </primitive>
    <primitive id="Email" class="lsb" type="exim"/>
   </resources>
   <constraints>
      <rsc_colocation id="xxx" rsc="Email" with-rsc="Public-IP" score="INFINITY"/>
      <rsc_order id="yyy" first="Public-IP" then="Email"/>
   </constraints>
</configuration>

Ovviamente a fronte di gruppi che crescono in grandezza, il risparmio di dichiarazioni in configurazione può diventare considerevole
Another (typical) example of a group is a DRBD volume, the filesystem mount, an IP address, and an application that uses them.

10.1.1. Group Properties

Tabella 10.1. Proprietà di un gruppo di risorse

Campo Descrizione
id
Your name for the group

10.1.2. Group Options

Options inherited from primitive resources: priority, target-role, is-managed

10.1.3. Group Instance Attributes

Groups have no instance attributes, however any that are set here will be inherited by the group’s children.

10.1.4. Group Contents

Groups may only contain a collection of Sezione 5.3, «Resource Properties» cluster resources. To refer to the child of a group resource, just use the child’s id instead of the group’s.

10.1.5. Group Constraints

Although it is possible to reference the group’s children in constraints, it is usually preferable to use the group’s name instead.

Esempio 10.3. Esempio di constraint che coinvolgono i gruppi

<constraints>
    <rsc_location id="group-prefers-node1" rsc="shortcut" node="node1" score="500"/>
    <rsc_colocation id="webserver-with-group" rsc="Webserver" with-rsc="shortcut"/>
    <rsc_order id="start-group-then-webserver" first="Webserver" then="shortcut"/>
</constraints>

10.1.6. Group Stickiness

Stickiness, the measure of how much a resource wants to stay where it is, is additive in groups. Every active resource of the group will contribute its stickiness value to the group’s total. So if the default resource-stickiness is 100, and a group has seven members, five of which are active, then the group as a whole will prefer its current location with a score of 500.

10.2. Clones - Resources That Get Active on Multiple Hosts

Clones were initially conceived as a convenient way to start N instances of an IP resource and have them distributed throughout the cluster for load balancing. They have turned out to quite useful for a number of purposes including integrating with Red Hat’s DLM, the fencing subsystem, and OCFS2.
You can clone any resource, provided the resource agent supports it.
Three types of cloned resources exist:
  • Anonymous
  • Globally Unique
  • Stateful
I cloni di tipo Anonymous sono il tipo più semplice. Queste risorse si comportano in maniera identica ovunque sono avviate. Per questo può esistere solo una copia attiva di un clone di tipo Anonymous per ciascuna macchina.
I cloni di tipo Globally unique sono entità distinte. Una copia del clone che funziona su una macchina non è equivalente ad un'altra istanza su un altro nodo. Due copie sullo stesso nodo non sarebbero comunque equivalenti.
I cloni di tipo Stateful sono descritti nella sezione Sezione 10.3, «Multi-state - Risorse con modalità multipla».

Esempio 10.4. Un esempio di risorsa clonata

<clone id="apache-clone">
    <meta_attributes id="apache-clone-meta">
       <nvpair id="apache-unique" name="globally-unique" value="false"/>
    </meta_attributes>
    <primitive id="apache" class="lsb" type="apache"/>
</clone>

10.2.1. Clone Properties

Tabella 10.2. Proprietà di una risorsa di tipo clone

Campo Descrizione
id
Your name for the clone

10.2.2. Clone Options

Options inherited from primitive resources: priority, target-role, is-managed

Tabella 10.3. Opzioni specifiche di configurazione per le risorse Clone

Campo Descrizione
clone-max
How many copies of the resource to start. Defaults to the number of nodes in the cluster.
clone-node-max
How many copies of the resource can be started on a single node; default 1.
notify
When stopping or starting a copy of the clone, tell all the other copies beforehand and when the action was successful. Allowed values: false, true
globally-unique
Does each copy of the clone perform a different function? Allowed values: false, true
ordered
Should the copies be started in series (instead of in parallel). Allowed values: false, true
interleave
Changes the behavior of ordering constraints (between clones/masters) so that instances can start/stop as soon as their peer instance has (rather than waiting for every instance of the other clone has). Allowed values: false, true

10.2.3. Clone Instance Attributes

Clones have no instance attributes; however, any that are set here will be inherited by the clone’s children.

10.2.4. Clone Contents

Le risorse clone devono contenere esattamente un gruppo od una risorsa regolare.

Avvertimento

You should never reference the name of a clone’s child. If you think you need to do this, you probably need to re-evaluate your design.

10.2.5. Clone Constraints

In most cases, a clone will have a single copy on each active cluster node. If this is not the case, you can indicate which nodes the cluster should preferentially assign copies to with resource location constraints. These constraints are written no differently to those for regular resources except that the clone’s id is used.
Ordering constraints behave slightly differently for clones. In the example below, apache-stats will wait until all copies of the clone that need to be started have done so before being started itself. Only if no copies can be started apache-stats will be prevented from being active. Additionally, the clone will wait for apache-stats to be stopped before stopping the clone.
Colocation of a regular (or group) resource with a clone means that the resource can run on any machine with an active copy of the clone. The cluster will choose a copy based on where the clone is running and the resource’s own location preferences.
Colocation between clones is also possible. In such cases, the set of allowed locations for the clone is limited to nodes on which the clone is (or will be) active. Allocation is then performed as normally.

Esempio 10.5. Esempi di constraint che coinvolgono cloni

<constraints>
    <rsc_location id="clone-prefers-node1" rsc="apache-clone" node="node1" score="500"/>
    <rsc_colocation id="stats-with-clone" rsc="apache-stats" with="apache-clone"/>
    <rsc_order id="start-clone-then-stats" first="apache-clone" then="apache-stats"/>
</constraints>

10.2.6. Clone Stickiness

Per fare in modo che abbiano una locazione stabile le risorse clone sono per default sticky (ossia collose). Se non viene specificato alcun valore relativo a resource-stickiness, la risorsa clone utilizzerà il valore di 1. Essendo un valore ridotto, esso causa il disturbo minimo nel calcolo del punteggio delle altre risorse, ma è sufficiente per prevenire Pacemaker dal muovere inutilmente copie delle risorse nel cluster.

10.2.7. Clone Resource Agent Requirements

Any resource can be used as an anonymous clone, as it requires no additional support from the resource agent. Whether it makes sense to do so depends on your resource and its resource agent.
Globally unique clones do require some additional support in the resource agent. In particular, it must only respond with other probes for instances of the clone should result in they should return one of the other OCF error codes.
Copies of a clone are identified by appending a colon and a numerical offset, eg. apache:2.
Resource agents can find out how many copies there are by examining the OCF_RESKEY_CRM_meta_clone_max environment variable and which copy it is by examining OCF_RESKEY_CRM_meta_clone.
You should not make any assumptions (based on OCF_RESKEY_CRM_meta_clone) about which copies are active. In particular, the list of active copies will not always be an unbroken sequence, nor always start at 0.

10.2.7.1. Clone Notifications

Il supporto alle notifiche comporta che l'azione 
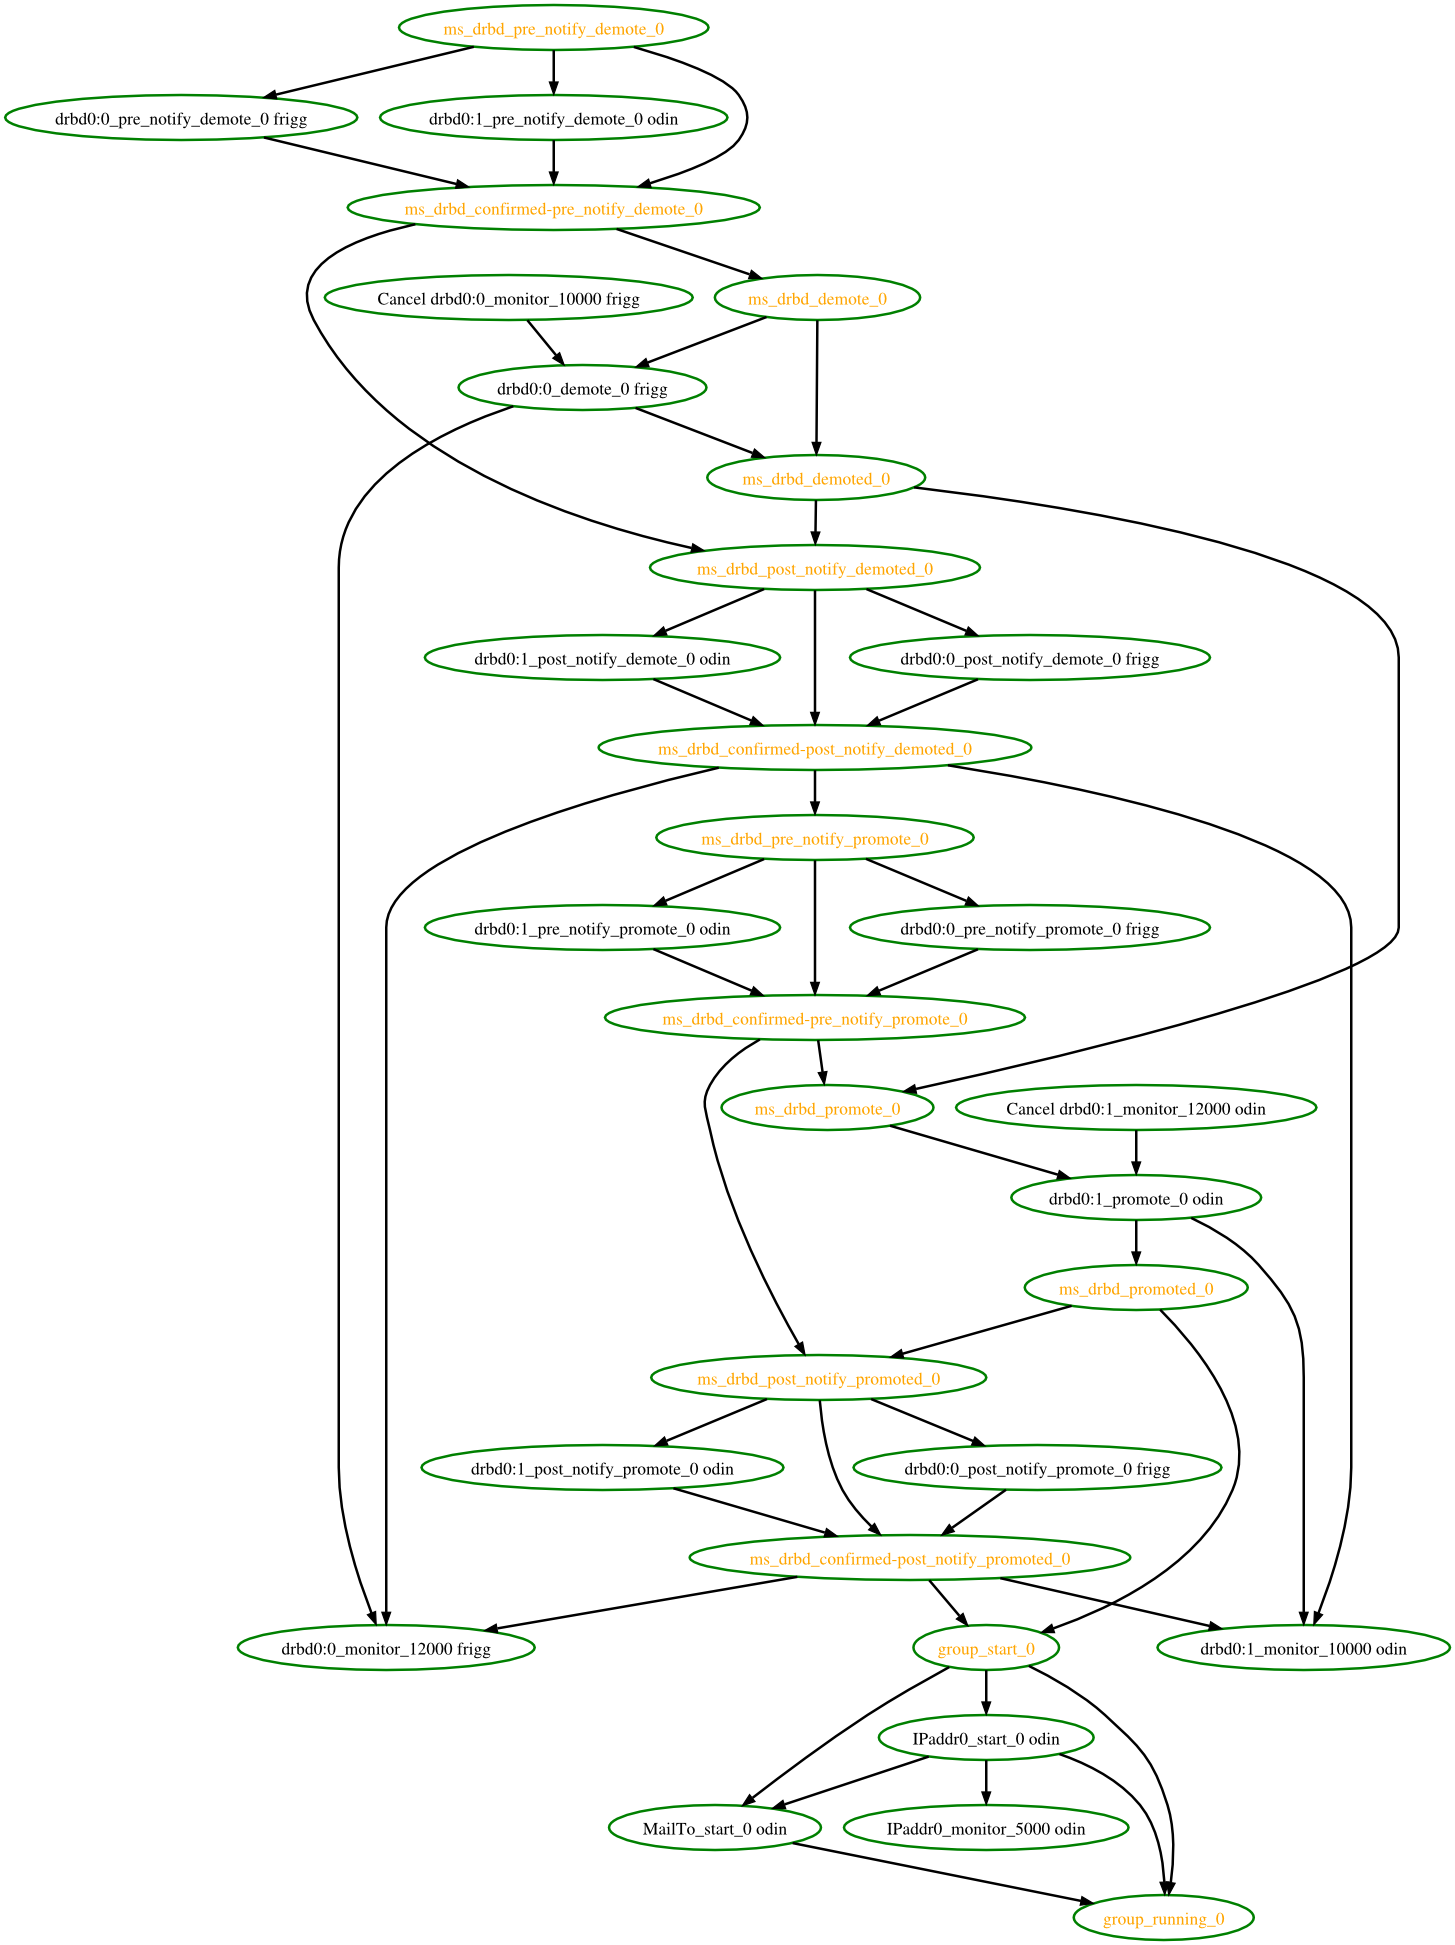
notify sia implementata. Una volta che questa è supportata all'azione notify verranno passate un numero di variabili extra che, quando combinate con le informazioni aggiuntive, potranno essere utilizzate per calcolare lo stato attuale del cluster e cosa sta per succedere ad esso.

Tabella 10.4. Variabili d'ambiente fornite alle azioni notify delle risorse clone

Variabile Descrizione
OCF_RESKEY_CRM_meta_notify_type
Allowed values: pre, post
OCF_RESKEY_CRM_meta_notify_operation
Allowed values: start, stop
OCF_RESKEY_CRM_meta_notify_start_resource
Resources to be started
OCF_RESKEY_CRM_meta_notify_stop_resource
Resources to be stopped
OCF_RESKEY_CRM_meta_notify_active_resource
Resources that are running
OCF_RESKEY_CRM_meta_notify_inactive_resource
Resources that are not running
OCF_RESKEY_CRM_meta_notify_start_uname
Nodes on which resources will be started
OCF_RESKEY_CRM_meta_notify_stop_uname
Nodes on which resources will be stopped
OCF_RESKEY_CRM_meta_notify_active_uname
Nodes on which resources are running
OCF_RESKEY_CRM_meta_notify_inactive_uname
Nodes on which resources are not running

The variables come in pairs, such as OCF_RESKEY_CRM_meta_notify_start_resource and OCF_RESKEY_CRM_meta_notify_start_uname and should be treated as an array of whitespace separated elements.
Thus in order to indicate that clone:0 will be started on sles-1, clone:2 will be started on sles-3, and clone:3 will be started on sles-2, the cluster would set

Esempio 10.6. Esempio di variabili notifica

OCF_RESKEY_CRM_meta_notify_start_resource="clone:0 clone:2 clone:3"
OCF_RESKEY_CRM_meta_notify_start_uname="sles-1 sles-3 sles-2"

10.2.7.2. Corretta interpretazione delle variabili di notifica d'ambiente

Pre-notification (stop):

  • Active resources: $OCF_RESKEY_CRM_meta_notify_active_resource
  • Inactive resources: $OCF_RESKEY_CRM_meta_notify_inactive_resource
  • Resources to be started: $OCF_RESKEY_CRM_meta_notify_start_resource
  • Resources to be stopped: $OCF_RESKEY_CRM_meta_notify_stop_resource

Post-notification (stop) / Pre-notification (start):

  • Active resources
    • $OCF_RESKEY_CRM_meta_notify_active_resource
    • minus $OCF_RESKEY_CRM_meta_notify_stop_resource
  • Inactive resources
    • $OCF_RESKEY_CRM_meta_notify_inactive_resource
    • plus $OCF_RESKEY_CRM_meta_notify_stop_resource
  • Resources that were started: $OCF_RESKEY_CRM_meta_notify_start_resource
  • Resources that were stopped: $OCF_RESKEY_CRM_meta_notify_stop_resource

Post-notification (start):

  • Risorse attive:
    • $OCF_RESKEY_CRM_meta_notify_active_resource
    • minus $OCF_RESKEY_CRM_meta_notify_stop_resource
    • plus $OCF_RESKEY_CRM_meta_notify_start_resource
  • Risorse inattive:
    • $OCF_RESKEY_CRM_meta_notify_inactive_resource
    • plus $OCF_RESKEY_CRM_meta_notify_stop_resource
    • minus $OCF_RESKEY_CRM_meta_notify_start_resource
  • Resources that were started: $OCF_RESKEY_CRM_meta_notify_start_resource
  • Resources that were stopped: $OCF_RESKEY_CRM_meta_notify_stop_resource

10.3. Multi-state - Risorse con modalità multipla

Multi-state resources are a specialization of Clone resources; please ensure you understand the section on clones before continuing! They allow the instances to be in one of two operating modes; these are called Master and Slave, but can mean whatever you wish them to mean. The only limitation is that when an instance is started, it must come up in the Slave state.

10.3.1. Multi-state Properties

Tabella 10.5. Proprietà delle risorse multi-state

Campo Descrizione
id
Your name for the multi-state resource

10.3.2. Multi-state Options

Options inherited from primitive resources: priority, target-role, is-managed
Options inherited from clone resources: clone-max, clone-node-max, notify, globally-unique, ordered, interleave

Tabella 10.6. Opzioni di configurazione specifiche alle risorse multi-state

Campo Descrizione
master-max
How many copies of the resource can be promoted to master status; default 1.
master-node-max
How many copies of the resource can be promoted to master status on a single node; default 1.

10.3.3. Multi-state Instance Attributes

Multi-state resources have no instance attributes; however, any that are set here will be inherited by master’s children.

10.3.4. Multi-state Contents

Le risorse master devono contenere esattamente un gruppo o una singola risorsa regolare.

Avvertimento

You should never reference the name of a master’s child. If you think you need to do this, you probably need to re-evaluate your design.

10.3.5. Monitoraggio delle risorse multi-state

The normal type of monitor actions are not sufficient to monitor a multi-state resource in the Master state. To detect failures of the Master instance, you need to define an additional monitor action with role="Master".

Importante

It is crucial that every monitor operation has a different interval!
This is because Pacemaker currently differentiates between operations only by resource and interval; so if eg. a master/slave resource has the same monitor interval for both roles, Pacemaker would ignore the role when checking the status - which would cause unexpected return codes, and therefore unnecessary complications.

Esempio 10.7. Monitorare entrambi gli stati di una risorsa multi-state

<master id="myMasterRsc">
   <primitive id="myRsc" class="ocf" type="myApp" provider="myCorp">
    <operations>
     <op id="public-ip-slave-check" name="monitor" interval="60"/>
     <op id="public-ip-master-check" name="monitor" interval="61" role="Master"/>
    </operations>
   </primitive>
</master>

10.3.6. Multi-state Constraints

In most cases, a multi-state resources will have a single copy on each active cluster node. If this is not the case, you can indicate which nodes the cluster should preferentially assign copies to with resource location constraints. These constraints are written no differently to those for regular resources except that the master’s id is used.
When considering multi-state resources in constraints, for most purposes it is sufficient to treat them as clones. The exception is when the rsc-role and/or with-rsc-role fields (for colocation constraints) and first-action and/or then-action fields (for ordering constraints) are used.

Tabella 10.7. Opzioni aggiuntive per le constraint relative alle risorse multi-state

Campo Descrizione
rsc-role
An additional attribute of colocation constraints that specifies the role that rsc must be in. Allowed values: Started, Master, Slave.
with-rsc-role
An additional attribute of colocation constraints that specifies the role that with-rsc must be in. Allowed values: Started, Master, Slave.
first-action
An additional attribute of ordering constraints that specifies the action that the first resource must complete before executing the specified action for the then resource. Allowed values: start, stop, promote, demote.
then-action
An additional attribute of ordering constraints that specifies the action that the then resource can only execute after the first-action on the first resource has completed. Allowed values: start, stop, promote, demote. Defaults to the value (specified or implied) of first-action.

In the example below, myApp will wait until one of the database copies has been started and promoted to master before being started itself. Only if no copies can be promoted will apache-stats be prevented from being active. Additionally, the database will wait for myApp to be stopped before it is demoted.

Esempio 10.8. Esempio di constraint che coinvolge risorse multi-state

<constraints>
   <rsc_location id="db-prefers-node1" rsc="database" node="node1" score="500"/>
   <rsc_colocation id="backup-with-db-slave" rsc="backup"
     with-rsc="database" with-rsc-role="Slave"/>
   <rsc_colocation id="myapp-with-db-master" rsc="myApp"
     with-rsc="database" with-rsc-role="Master"/>
   <rsc_order id="start-db-before-backup" first="database" then="backup"/>
   <rsc_order id="promote-db-then-app" first="database" first-action="promote"
     then="myApp" then-action="start"/>
</constraints>

Colocation of a regular (or group) resource with a multi-state resource means that it can run on any machine with an active copy of the multi-state resource that is in the specified state (Master or Slave). In the example, the cluster will choose a location based on where database is running as a Master, and if there are multiple Master instances it will also factor in myApp's own location preferences when deciding which location to choose.
Colocation with regular clones and other multi-state resources is also possible. In such cases, the set of allowed locations for the rsc clone is (after role filtering) limited to nodes on which the with-rsc multi-state resource is (or will be) in the specified role. Allocation is then performed as-per-normal.

10.3.7. Multi-state Stickiness

To achieve a stable allocation pattern, multi-state resources are slightly sticky by default. If no value for resource-stickiness is provided, the multi-state resource will use a value of 1. Being a small value, it causes minimal disturbance to the score calculations of other resources but is enough to prevent Pacemaker from needlessly moving copies around the cluster.

10.3.8. Quale istanza della risorsa è promossa

During the start operation, most Resource Agent scripts should call the crm_master utility. This tool automatically detects both the resource and host and should be used to set a preference for being promoted. Based on this, master-max, and master-node-max, the instance(s) with the highest preference will be promoted.
The other alternative is to create a location constraint that indicates which nodes are most preferred as masters.

Esempio 10.9. Specificare manualmente quale nodo dovrebbe essere promosso

<rsc_location id="master-location" rsc="myMasterRsc">
    <rule id="master-rule" score="100" role="Master">
      <expression id="master-exp" attribute="#uname" operation="eq" value="node1"/>
    </rule>
</rsc_location>

10.3.9. Multi-state Resource Agent Requirements

Since multi-state resources are an extension of cloned resources, all the requirements of Clones are also requirements of multi-state resources. Additionally, multi-state resources require two extra actions: demote and promote; these actions are responsible for changing the state of the resource. Like start and stop, they should return OCF_SUCCESS if they completed successfully or a relevant error code if they did not.
The states can mean whatever you wish, but when the resource is started, it must come up in the mode called Slave. From there the cluster will then decide which instances to promote to Master.
In aggiunta ai requisiti per le azioni di monitor relativi alle risorse clone, gli agent devono anche riportare accuratamente in quale stato essi si trovano. Il cluster si affida all'agent per riportare il proprio stato (incluso il ruolo) accuratamente e non indica all'agente in quale ruolo ritiene che la risorsa si trovi.

Tabella 10.8. Implicazioni dei ruoli nei return code OCF

Return code del monitor Descrizione
OCF_NOT_RUNNING
Stopped
OCF_SUCCESS
Running (Slave)
OCF_RUNNING_MASTER
Running (Master)
OCF_FAILED_MASTER
Failed (Master)
Atro
Fallito (Slave)

10.3.10. Multi-state Notifications

Like clones, supporting notifications requires the notify action to be implemented. Once supported the notify action will be passed a number of extra variables which, when combined with additional context, can be used to calculate the current state of the cluster and what is about to happen to it.

Tabella 10.9. Environment variables supplied with Master notify actions [a]

Variabile Descrizione
OCF_RESKEY_CRM_meta_notify_type
Allowed values: pre, post
OCF_RESKEY_CRM_meta_notify_operation
Allowed values: start, stop
OCF_RESKEY_CRM_meta_notify_active_resource
Resources the that are running
OCF_RESKEY_CRM_meta_notify_inactive_resource
Resources the that are not running
OCF_RESKEY_CRM_meta_notify_master_resource
Resources that are running in Master mode
OCF_RESKEY_CRM_meta_notify_slave_resource
Resources that are running in Slave mode
OCF_RESKEY_CRM_meta_notify_start_resource
Resources to be started
OCF_RESKEY_CRM_meta_notify_stop_resource
La risorsa da stoppare
OCF_RESKEY_CRM_meta_notify_promote_resource
Resources to be promoted
OCF_RESKEY_CRM_meta_notify_demote_resource
Resources to be demoted
OCF_RESKEY_CRM_meta_notify_start_uname
Nodes on which resources will be started
OCF_RESKEY_CRM_meta_notify_stop_uname
Nodes on which resources will be stopped
OCF_RESKEY_CRM_meta_notify_promote_uname
Nodes on which resources will be promote
OCF_RESKEY_CRM_meta_notify_demote_uname
Nodes on which resources will be demoted
OCF_RESKEY_CRM_meta_notify_active_uname
Nodes on which resources are running
OCF_RESKEY_CRM_meta_notify_inactive_uname
Nodes on which resources are not running
OCF_RESKEY_CRM_meta_notify_master_uname
Nodes on which resources are running in Master mode
OCF_RESKEY_CRM_meta_notify_slave_uname
Nodes on which resources are running in Slave mode

10.3.11. Multi-state - Proper Interpretation of Notification Environment Variables

Pre-notification (demote):

  • Active resources: $OCF_RESKEY_CRM_meta_notify_active_resource
  • Master resources: $OCF_RESKEY_CRM_meta_notify_master_resource
  • Slave resources: $OCF_RESKEY_CRM_meta_notify_slave_resource
  • Inactive resources: $OCF_RESKEY_CRM_meta_notify_inactive_resource
  • Resources to be started: $OCF_RESKEY_CRM_meta_notify_start_resource
  • Resources to be promoted: $OCF_RESKEY_CRM_meta_notify_promote_resource
  • Resources to be demoted: $OCF_RESKEY_CRM_meta_notify_demote_resource
  • Resources to be stopped: $OCF_RESKEY_CRM_meta_notify_stop_resource

Post-notification (demote) / Pre-notification (stop):

  • Active resources: $OCF_RESKEY_CRM_meta_notify_active_resource
  • Master resources:
    • $OCF_RESKEY_CRM_meta_notify_master_resource
    • minus $OCF_RESKEY_CRM_meta_notify_demote_resource
  • Slave resources: $OCF_RESKEY_CRM_meta_notify_slave_resource
  • Inactive resources: $OCF_RESKEY_CRM_meta_notify_inactive_resource
  • Resources to be started: $OCF_RESKEY_CRM_meta_notify_start_resource
  • Resources to be promoted: $OCF_RESKEY_CRM_meta_notify_promote_resource
  • Resources to be demoted: $OCF_RESKEY_CRM_meta_notify_demote_resource
  • Resources to be stopped: $OCF_RESKEY_CRM_meta_notify_stop_resource
  • Resources that were demoted: $OCF_RESKEY_CRM_meta_notify_demote_resource

Post-notification (stop) / Pre-notification (start)

  • Active resources:
    • $OCF_RESKEY_CRM_meta_notify_active_resource
    • minus $OCF_RESKEY_CRM_meta_notify_stop_resource
  • Master resources:
    • $OCF_RESKEY_CRM_meta_notify_master_resource
    • minus $OCF_RESKEY_CRM_meta_notify_demote_resource
  • Slave resources:
    • $OCF_RESKEY_CRM_meta_notify_slave_resource
    • minus $OCF_RESKEY_CRM_meta_notify_stop_resource
  • Risorse inattive:
    • $OCF_RESKEY_CRM_meta_notify_inactive_resource
    • plus $OCF_RESKEY_CRM_meta_notify_stop_resource
  • Resources to be started: $OCF_RESKEY_CRM_meta_notify_start_resource
  • Resources to be promoted: $OCF_RESKEY_CRM_meta_notify_promote_resource
  • Resources to be demoted: $OCF_RESKEY_CRM_meta_notify_demote_resource
  • Resources to be stopped: $OCF_RESKEY_CRM_meta_notify_stop_resource
  • Resources that were demoted: $OCF_RESKEY_CRM_meta_notify_demote_resource
  • Resources that were stopped: $OCF_RESKEY_CRM_meta_notify_stop_resource

Post-notification (start) / Pre-notification (promote)

  • Active resources:
    • $OCF_RESKEY_CRM_meta_notify_active_resource
    • minus $OCF_RESKEY_CRM_meta_notify_stop_resource
    • plus $OCF_RESKEY_CRM_meta_notify_start_resource
  • Master resources:
    • $OCF_RESKEY_CRM_meta_notify_master_resource
    • minus $OCF_RESKEY_CRM_meta_notify_demote_resource
  • Slave resources:
    • $OCF_RESKEY_CRM_meta_notify_slave_resource
    • minus $OCF_RESKEY_CRM_meta_notify_stop_resource
    • plus $OCF_RESKEY_CRM_meta_notify_start_resource
  • Risorse inattive:
    • $OCF_RESKEY_CRM_meta_notify_inactive_resource
    • plus $OCF_RESKEY_CRM_meta_notify_stop_resource
    • minus $OCF_RESKEY_CRM_meta_notify_start_resource
  • Resources to be started: $OCF_RESKEY_CRM_meta_notify_start_resource
  • Resources to be promoted: $OCF_RESKEY_CRM_meta_notify_promote_resource
  • Resources to be demoted: $OCF_RESKEY_CRM_meta_notify_demote_resource
  • Resources to be stopped: $OCF_RESKEY_CRM_meta_notify_stop_resource
  • Resources that were started: $OCF_RESKEY_CRM_meta_notify_start_resource
  • Resources that were demoted: $OCF_RESKEY_CRM_meta_notify_demote_resource
  • Resources that were stopped: $OCF_RESKEY_CRM_meta_notify_stop_resource

Post-notification (promote)

  • Active resources:
    • $OCF_RESKEY_CRM_meta_notify_active_resource
    • minus $OCF_RESKEY_CRM_meta_notify_stop_resource
    • plus $OCF_RESKEY_CRM_meta_notify_start_resource
  • Master resources:
    • $OCF_RESKEY_CRM_meta_notify_master_resource
    • minus $OCF_RESKEY_CRM_meta_notify_demote_resource
    • plus $OCF_RESKEY_CRM_meta_notify_promote_resource
  • Slave resources:
    • $OCF_RESKEY_CRM_meta_notify_slave_resource
    • minus $OCF_RESKEY_CRM_meta_notify_stop_resource
    • plus $OCF_RESKEY_CRM_meta_notify_start_resource
    • minus $OCF_RESKEY_CRM_meta_notify_promote_resource
  • Risorse inattive:
    • $OCF_RESKEY_CRM_meta_notify_inactive_resource
    • plus $OCF_RESKEY_CRM_meta_notify_stop_resource
    • minus $OCF_RESKEY_CRM_meta_notify_start_resource
  • Resources to be started: $OCF_RESKEY_CRM_meta_notify_start_resource
  • Resources to be promoted: $OCF_RESKEY_CRM_meta_notify_promote_resource
  • Resources to be demoted: $OCF_RESKEY_CRM_meta_notify_demote_resource
  • Resources to be stopped: $OCF_RESKEY_CRM_meta_notify_stop_resource
  • Resources that were started: $OCF_RESKEY_CRM_meta_notify_start_resource
  • Resources that were promoted: $OCF_RESKEY_CRM_meta_notify_promote_resource
  • Resources that were demoted: $OCF_RESKEY_CRM_meta_notify_demote_resource
  • Resources that were stopped: $OCF_RESKEY_CRM_meta_notify_stop_resource

Capitolo 11. Utilization and Placement Strategy

11.1. Background

Pacemaker decides where to place a resource according to the resource allocation scores on every node. The resource will be allocated to the node where the resource has the highest score. If the resource allocation scores on all the nodes are equal, by the default placement strategy, Pacemaker will choose a node with the least number of allocated resources for balancing the load. If the number of resources on each node is equal, the first eligible node listed in cib will be chosen to run the resource.
Though resources are different. They may consume different amounts of the capacities of the nodes. Actually, we cannot ideally balance the load just according to the number of resources allocated to a node. Besides, if resources are placed such that their combined requirements exceed the provided capacity, they may fail to start completely or run with degraded performance.
To take these into account, Pacemaker allows you to specify the following configurations:
  1. The capacity a certain node provides.
  2. The capacity a certain resource requires.
  3. An overall strategy for placement of resources.

11.2. Utilization attributes

To configure the capacity a node provides and the resource’s requirements, use utilization attributes. You can name the utilization attributes according to your preferences and define as many name/value pairs as your configuration needs. However, the attribute’s values must be integers.
First, specify the capacities the nodes provide:
<node id="node1" type="normal" uname="node1">
  <utilization id="node1-utilization">
    <nvpair id="node1-utilization-cpu" name="cpu" value="2"/>
    <nvpair id="node1-utilization-memory" name="memory" value="2048"/>
  </utilization>
</node>
<node id="node2" type="normal" uname="node2">
  <utilization id="node2-utilization">
    <nvpair id="node2-utilization-cpu" name="cpu" value="4"/>
    <nvpair id="node2-utilization-memory" name="memory" value="4096"/>
  </utilization>
</node>
Then, specify the capacities the resources require:
<primitive id="rsc-small" class="ocf" provider="pacemaker" type="Dummy">
  <utilization id="rsc-small-utilization">
    <nvpair id="rsc-small-utilization-cpu" name="cpu" value="1"/>
    <nvpair id="rsc-small-utilization-memory" name="memory" value="1024"/>
  </utilization>
</primitive>
<primitive id="rsc-medium" class="ocf" provider="pacemaker" type="Dummy">
  <utilization id="rsc-medium-utilization">
    <nvpair id="rsc-medium-utilization-cpu" name="cpu" value="2"/>
    <nvpair id="rsc-medium-utilization-memory" name="memory" value="2048"/>
  </utilization>
</primitive>
<primitive id="rsc-large" class="ocf" provider="pacemaker" type="Dummy">
  <utilization id="rsc-large-utilization">
    <nvpair id="rsc-large-utilization-cpu" name="cpu" value="3"/>
    <nvpair id="rsc-large-utilization-memory" name="memory" value="3072"/>
  </utilization>
</primitive>
A node is considered eligible for a resource if it has sufficient free capacity to satisfy the resource’s requirements. The nature of the required or provided capacities is completely irrelevant for Pacemaker, it just makes sure that all capacity requirements of a resource are satisfied before placing a resource to a node.

11.3. Placement Strategy

After you have configured the capacities your nodes provide and the capacities your resources require, you need to set the placement-strategy in the global cluster options, otherwise the capacity configurations have no effect.
Four values are available for the placement-strategy:
default
Utilization values are not taken into account at all, per default. Resources are allocated according to allocation scores. If scores are equal, resources are evenly distributed across nodes.
utilization
Utilization values are taken into account when deciding whether a node is considered eligible if it has sufficient free capacity to satisfy the resource’s requirements. However, load-balancing is still done based on the number of resources allocated to a node.
balanced
Utilization values are taken into account when deciding whether a node is eligible to serve a resource; an attempt is made to spread the resources evenly, optimizing resource performance.
minimal
Utilization values are taken into account when deciding whether a node is eligible to serve a resource; an attempt is made to concentrate the resources on as few nodes as possible, thereby enabling possible power savings on the remaining nodes.
Set placement-strategy with crm_attribute:
# crm_attribute --attr-name placement-strategy --attr-value balanced
Now Pacemaker will ensure the load from your resources will be distributed evenly throughout the cluster - without the need for convoluted sets of colocation constraints.

11.4. Allocation Details

11.4.1. Which node is preferred to be chosen to get consumed first on allocating resources?

  • The node that is most healthy (which has the highest node weight) gets consumed first.
  • If their weights are equal:
    • If placement-strategy="default|utilization", the node that has the least number of allocated resources gets consumed first.
      • If their numbers of allocated resources are equal, the first eligible node listed in cib gets consumed first.
    • If placement-strategy="balanced", the node that has more free capacity gets consumed first.
      • If the free capacities of the nodes are equal, the node that has the least number of allocated resources gets consumed first.
        • If their numbers of allocated resources are equal, the first eligible node listed in cib gets consumed first.
    • If placement-strategy="minimal", the first eligible node listed in cib gets consumed first.

11.4.1.1. Which node has more free capacity?

This will be quite clear if we only define one type of capacity. While if we define multiple types of capacity, for example:
  • If nodeA has more free cpus, nodeB has more free memory, their free capacities are equal.
  • If nodeA has more free cpus, while nodeB has more free memory and storage, nodeB has more free capacity.

11.4.2. Which resource is preferred to be chosen to get assigned first?

  • The resource that has the highest priority gets allocated first.
  • If their priorities are equal, check if they are already running. The resource that has the highest score on the node where it’s running gets allocated first (to prevent resource shuffling).
  • If the scores above are equal or they are not running, the resource has the highest score on the preferred node gets allocated first.
  • If the scores above are equal, the first runnable resource listed in cib gets allocated first.

11.5. Limitations

This type of problem Pacemaker is dealing with here is known as the knapsack problem and falls into the NP-complete category of computer science problems - which is fancy way of saying "it takes a really long time to solve".
Clearly in a HA cluster, it’s not acceptable to spend minutes, let alone hours or days, finding an optional solution while services remain unavailable.
So instead of trying to solve the problem completely, Pacemaker uses a best effort algorithm for determining which node should host a particular service. This means it arrives at a solution much faster than traditional linear programming algorithms, but by doing so at the price of leaving some services stopped.
In the contrived example above:
  • rsc-small would be allocated to node1
  • rsc-medium would be allocated to node2
  • rsc-large would remain inactive
Which is not ideal.

11.6. Strategies for Dealing with the Limitations

  • Ensure you have sufficient physical capacity. It might sounds obvious, but if the physical capacity of your nodes is (close to) maxed out by the cluster under normal conditions, then failover isn’t going to go well. Even without the Utilization feature, you’ll start hitting timeouts and getting secondary failures'.
  • Build some buffer into the capabilities advertised by the nodes. Advertise slightly more resources than we physically have on the (usually valid) assumption that a resource will not use 100% of the configured number of cpu/memory/etc all the time. This practice is also known as over commit.
  • Specify resource priorities. If the cluster is going to sacrifice services, it should be the ones you care (comparatively) about the least. Ensure that resource priorities are properly set so that your most important resources are scheduled first.

Capitolo 12. Resource Templates

12.1. Abstract

If you want to create lots of resources with similar configurations, defining a resource template simplifies the task. Once defined, it can be referenced in primitives or in certain types of constraints.

12.2. Configuring Resources with Templates

The primitives referencing the template will inherit all meta attributes, instance attributes, utilization attributes and operations defined in the template. And you can define specific attributes and operations for any of the primitives. If any of these are defined in both the template and the primitive, the values defined in the primitive will take precedence over the ones defined in the template.
Hence, resource templates help to reduce the amount of configuration work. If any changes are needed, they can be done to the template definition and will take effect globally in all resource definitions referencing that template.
Resource templates have a similar syntax like primitives. For example:
<template id="vm-template" class="ocf" provider="heartbeat" type="Xen">
  <meta_attributes id="vm-template-meta_attributes">
    <nvpair id="vm-template-meta_attributes-allow-migrate" name="allow-migrate" value="true"/>
  </meta_attributes>
  <utilization id="vm-template-utilization">
    <nvpair id="vm-template-utilization-memory" name="memory" value="512"/>
  </utilization>
  <operations>
    <op id="vm-template-monitor-15s" interval="15s" name="monitor" timeout="60s"/>
    <op id="vm-template-start-0" interval="0" name="start" timeout="60s"/>
  </operations>
</template>
Once you defined the new resource template, you can use it in primitives:
<primitive id="vm1" template="vm-template">
  <instance_attributes id="vm1-instance_attributes">
    <nvpair id="vm1-instance_attributes-name" name="name" value="vm1"/>
    <nvpair id="vm1-instance_attributes-xmfile" name="xmfile" value="/etc/xen/shared-vm/vm1"/>
  </instance_attributes>
</primitive>
The new primitive vm1 is going to inherit everything from the vm-template. For example, the equivalent of the above two would be:
<primitive id="vm1" class="ocf" provider="heartbeat" type="Xen">
  <meta_attributes id="vm-template-meta_attributes">
    <nvpair id="vm-template-meta_attributes-allow-migrate" name="allow-migrate" value="true"/>
  </meta_attributes>
  <utilization id="vm-template-utilization">
    <nvpair id="vm-template-utilization-memory" name="memory" value="512"/>
  </utilization>
  <operations>
    <op id="vm-template-monitor-15s" interval="15s" name="monitor" timeout="60s"/>
    <op id="vm-template-start-0" interval="0" name="start" timeout="60s"/>
  </operations>
  <instance_attributes id="vm1-instance_attributes">
    <nvpair id="vm1-instance_attributes-name" name="name" value="vm1"/>
    <nvpair id="vm1-instance_attributes-xmfile" name="xmfile" value="/etc/xen/shared-vm/vm1"/>
  </instance_attributes>
</primitive>
If you want to overwrite some attributes or operations, add them to the particular primitive’s definition.
For instance, the following new primitive vm2 has special attribute values. Its monitor operation has a longer timeout and interval, and the primitive has an additional stop operation.
<primitive id="vm2" template="vm-template">
  <meta_attributes id="vm2-meta_attributes">
    <nvpair id="vm2-meta_attributes-allow-migrate" name="allow-migrate" value="false"/>
  </meta_attributes>
  <utilization id="vm2-utilization">
    <nvpair id="vm2-utilization-memory" name="memory" value="1024"/>
  </utilization>
  <instance_attributes id="vm2-instance_attributes">
    <nvpair id="vm2-instance_attributes-name" name="name" value="vm2"/>
    <nvpair id="vm2-instance_attributes-xmfile" name="xmfile" value="/etc/xen/shared-vm/vm2"/>
  </instance_attributes>
  <operations>
    <op id="vm2-monitor-30s" interval="30s" name="monitor" timeout="120s"/>
    <op id="vm2-stop-0" interval="0" name="stop" timeout="60s"/>
  </operations>
</primitive>
The following command shows the resulting definition of a resource:
# crm_resource --query-xml --resource vm2
The following command shows its raw definition in cib:
# crm_resource --query-xml-raw --resource vm2

12.3. Referencing Templates in Constraints

A resource template can be referenced in the following types of constraints:
  • order constraints
  • colocation constraints,
  • rsc_ticket constraints (for multi-site clusters).
Resource templates referenced in constraints stand for all primitives which are derived from that template. This means, the constraint applies to all primitive resources referencing the resource template. Referencing resource templates in constraints is an alternative to resource sets and can simplify the cluster configuration considerably.
For example:
<rsc_colocation id="vm-template-colo-base-rsc" rsc="vm-template" rsc-role="Started" with-rsc="base-rsc" score="INFINITY"/>
is the equivalent of the following constraint configuration:
<rsc_colocation id="vm-colo-base-rsc" score="INFINITY">
  <resource_set id="vm-colo-base-rsc-0" sequential="false" role="Started">
    <resource_ref id="vm1"/>
    <resource_ref id="vm2"/>
  </resource_set>
  <resource_set id="vm-colo-base-rsc-1">
    <resource_ref id="base-rsc"/>
  </resource_set>
</rsc_colocation>

Nota

In a colocation constraint, only one template may be referenced from either rsc or with-rsc, and the other reference must be a regular resource.
Resource templates can also be referenced in resource sets.
For example:
<rsc_order id="order1" score="INFINITY">
  <resource_set id="order1-0">
    <resource_ref id="base-rsc"/>
    <resource_ref id="vm-template"/>
    <resource_ref id="top-rsc"/>
  </resource_set>
</rsc_order>
is the equivalent of the following constraint configuration:
<rsc_order id="order1" score="INFINITY">
  <resource_set id="order1-0">
    <resource_ref id="base-rsc"/>
    <resource_ref id="vm1"/>
    <resource_ref id="vm2"/>
    <resource_ref id="top-rsc"/>
  </resource_set>
</rsc_order>
If the resources referencing the template can run in parallel:
<rsc_order id="order2" score="INFINITY">
  <resource_set id="order2-0">
    <resource_ref id="base-rsc"/>
  </resource_set>
  <resource_set id="order2-1" sequential="false">
    <resource_ref id="vm-template"/>
  </resource_set>
  <resource_set id="order2-2">
    <resource_ref id="top-rsc"/>
  </resource_set>
</rsc_order>
is the equivalent of the following constraint configuration:
<rsc_order id="order2" score="INFINITY">
  <resource_set id="order2-0">
    <resource_ref id="base-rsc"/>
  </resource_set>
  <resource_set id="order2-1" sequential="false">
    <resource_ref id="vm1"/>
    <resource_ref id="vm2"/>
  </resource_set>
  <resource_set id="order2-2">
    <resource_ref id="top-rsc"/>
  </resource_set>
</rsc_order>

Capitolo 13. Configure STONITH

13.1. What Is STONITH

STONITH is an acronym for Shoot-The-Other-Node-In-The-Head and it protects your data from being corrupted by rogue nodes or concurrent access.
Just because a node is unresponsive, this doesn’t mean it isn’t accessing your data. The only way to be 100% sure that your data is safe, is to use STONITH so we can be certain that the node is truly offline, before allowing the data to be accessed from another node.
STONITH ha un ruolo da gionare anche nel caso in cui i servizi clusterizzati non possono essere stoppati. In questi casi, il cluster utilizza STONITH per spegnere forzatamente l'intero nodo, ed essere quindi certo che il servizio possa essere avviato altrove in sicurezza.

13.2. Quale STONITH device si dovrebbe usare

E' cruciale che il device STONITH consenta al cluster di differenziare tra un'anomalia del nodo ed una di rete.
Il più grande errore generalmente commesso nella scelta del device STONITH è quello di usare un remote power switch (come molti on-board IMPI controller) che condividono l'alimentazione con il nodo che controllano. In questi casi, il cluster non può essere certo del fatto che il nodo sia realmente offline, oppure attivo, ma con problemi di rete.
Likewise, any device that relies on the machine being active (such as SSH-based "devices" used during testing) are inappropriate.

13.3. Configurare STONITH

  1. Find the correct driver: stonith_admin --list-installed
  2. Since every device is different, the parameters needed to configure it will vary. To find out the parameters associated with the device, run: stonith_admin --metadata --agent type
    The output should be XML formatted text containing additional
    parameter descriptions. We will endevor to make the output more
    friendly in a later version.
  3. Enter the shell crm Create an editable copy of the existing configuration cib new stonith Create a fencing resource containing a primitive resource with a class of stonith, a type of type and a parameter for each of the values returned in step 2: configure primitive …
  4. If the device does not know how to fence nodes based on their uname, you may also need to set the special pcmk_host_map parameter. See man stonithd for details.
  5. If the device does not support the list command, you may also need to set the special pcmk_host_list and/or pcmk_host_check parameters. See man stonithd for details.
  6. If the device does not expect the victim to be specified with the port parameter, you may also need to set the special pcmk_host_argument parameter. See man stonithd for details.
  7. Upload it into the CIB from the shell: cib commit stonith
  8. Once the stonith resource is running, you can test it by executing: stonith_admin --reboot nodename. Although you might want to stop the cluster on that machine first.

13.4. Esempio

Assuming we have an chassis containing four nodes and an IPMI device active on 10.0.0.1, then we would chose the fence_ipmilan driver in step 2 and obtain the following list of parameters
Ottenere la lista dei parametri STONITH
# stonith_admin --metadata -a fence_ipmilan
<?xml version="1.0" ?>
<resource-agent name="fence_ipmilan" shortdesc="Fence agent for IPMI over LAN">
<longdesc>
fence_ipmilan is an I/O Fencing agent which can be used with machines controlled by IPMI. This agent calls support software using ipmitool (http://ipmitool.sf.net/).

To use fence_ipmilan with HP iLO 3 you have to enable lanplus option (lanplus / -P) and increase wait after operation to 4 seconds (power_wait=4 / -T 4)</longdesc>
<parameters>
        <parameter name="auth" unique="1">
                <getopt mixed="-A" />
                <content type="string" />
                <shortdesc>IPMI Lan Auth type (md5, password, or none)</shortdesc>
        </parameter>
        <parameter name="ipaddr" unique="1">
                <getopt mixed="-a" />
                <content type="string" />
                <shortdesc>IPMI Lan IP to talk to</shortdesc>
        </parameter>
        <parameter name="passwd" unique="1">
                <getopt mixed="-p" />
                <content type="string" />
                <shortdesc>Password (if required) to control power on IPMI device</shortdesc>
        </parameter>
        <parameter name="passwd_script" unique="1">
                <getopt mixed="-S" />
                <content type="string" />
                <shortdesc>Script to retrieve password (if required)</shortdesc>
        </parameter>
        <parameter name="lanplus" unique="1">
                <getopt mixed="-P" />
                <content type="boolean" />
                <shortdesc>Use Lanplus</shortdesc>
        </parameter>
        <parameter name="login" unique="1">
                <getopt mixed="-l" />
                <content type="string" />
                <shortdesc>Username/Login (if required) to control power on IPMI device</shortdesc>
        </parameter>
        <parameter name="action" unique="1">
                <getopt mixed="-o" />
                <content type="string" default="reboot"/>
                <shortdesc>Operation to perform. Valid operations: on, off, reboot, status, list, diag, monitor or metadata</shortdesc>
        </parameter>
        <parameter name="timeout" unique="1">
                <getopt mixed="-t" />
                <content type="string" />
                <shortdesc>Timeout (sec) for IPMI operation</shortdesc>
        </parameter>
        <parameter name="cipher" unique="1">
                <getopt mixed="-C" />
                <content type="string" />
                <shortdesc>Ciphersuite to use (same as ipmitool -C parameter)</shortdesc>
        </parameter>
        <parameter name="method" unique="1">
                <getopt mixed="-M" />
                <content type="string" default="onoff"/>
                <shortdesc>Method to fence (onoff or cycle)</shortdesc>
        </parameter>
        <parameter name="power_wait" unique="1">
                <getopt mixed="-T" />
                <content type="string" default="2"/>
                <shortdesc>Wait X seconds after on/off operation</shortdesc>
        </parameter>
        <parameter name="delay" unique="1">
                <getopt mixed="-f" />
                <content type="string" />
                <shortdesc>Wait X seconds before fencing is started</shortdesc>
        </parameter>
        <parameter name="verbose" unique="1">
                <getopt mixed="-v" />
                <content type="boolean" />
                <shortdesc>Verbose mode</shortdesc>
        </parameter>
</parameters>
<actions>
        <action name="on" />
        <action name="off" />
        <action name="reboot" />
        <action name="status" />
        <action name="diag" />
        <action name="list" />
        <action name="monitor" />
        <action name="metadata" />
</actions>
</resource-agent>
da cui sarà possibile creare una risorsa STONITH che assomigli alla seguente
Esempio di risorsa STONITH
# crm crm(live)# cib new stonith
INFO: stonith shadow CIB created
crm(stonith)# configure primitive impi-fencing stonith::fence_ipmilan \
 params pcmk_host_list="pcmk-1 pcmk-2" ipaddr=10.0.0.1 login=testuser passwd=abc123 \
 op monitor interval="60s"
And finally, since we disabled it earlier, we need to re-enable STONITH. At this point we should have the following configuration.
Now push the configuration into the cluster.
crm(stonith)# configure property stonith-enabled="true"
crm(stonith)# configure shownode pcmk-1
node pcmk-2
primitive WebData ocf:linbit:drbd \
    params drbd_resource="wwwdata" \
    op monitor interval="60s"
primitive WebFS ocf:heartbeat:Filesystem \
    params device="/dev/drbd/by-res/wwwdata" directory="/var/www/html" fstype="gfs2"
primitive WebSite ocf:heartbeat:apache \
    params configfile="/etc/httpd/conf/httpd.conf" \
    op monitor interval="1min"
primitive ClusterIP ocf:heartbeat:IPaddr2 \
    params ip="192.168.122.101" cidr_netmask="32" clusterip_hash="sourceip" \
    op monitor interval="30s"primitive ipmi-fencing stonith::fence_ipmilan \ params pcmk_host_list="pcmk-1 pcmk-2" ipaddr=10.0.0.1 login=testuser passwd=abc123 \ op monitor interval="60s"ms WebDataClone WebData \
    meta master-max="2" master-node-max="1" clone-max="2" clone-node-max="1" notify="true"
clone WebFSClone WebFS
clone WebIP ClusterIP \
    meta globally-unique="true" clone-max="2" clone-node-max="2"
clone WebSiteClone WebSite
colocation WebSite-with-WebFS inf: WebSiteClone WebFSClone
colocation fs_on_drbd inf: WebFSClone WebDataClone:Master
colocation website-with-ip inf: WebSiteClone WebIP
order WebFS-after-WebData inf: WebDataClone:promote WebFSClone:start
order WebSite-after-WebFS inf: WebFSClone WebSiteClone
order apache-after-ip inf: WebIP WebSiteClone
property $id="cib-bootstrap-options" \
    dc-version="1.1.5-bdd89e69ba545404d02445be1f3d72e6a203ba2f" \
    cluster-infrastructure="openais" \
    expected-quorum-votes="2" \
    stonith-enabled="true" \
    no-quorum-policy="ignore"
rsc_defaults $id="rsc-options" \
    resource-stickiness="100"
crm(stonith)# cib commit stonithINFO: commited 'stonith' shadow CIB to the cluster
crm(stonith)# quit
bye

Capitolo 14. Status - Here be dragons

Most users never need to understand the contents of the status section and can be happy with the output from crm_mon.
However for those with a curious inclination, this section attempts to provide an overview of its contents.

14.1. Stato dei nodi

In addition to the cluster’s configuration, the CIB holds an up-to-date representation of each cluster node in the status section.

Esempio 14.1. A bare-bones status entry for a healthy node called cl-virt-1

  <node_state id="cl-virt-1" uname="cl-virt-2" ha="active" in_ccm="true" crmd="online" join="member" expected="member" crm-debug-origin="do_update_resource">
   <transient_attributes id="cl-virt-1"/>
   <lrm id="cl-virt-1"/>
  </node_state>

Users are highly recommended not to modify any part of a node’s state directly. The cluster will periodically regenerate the entire section from authoritative sources. So any changes should be done with the tools for those subsystems.

Tabella 14.1. Sorgenti autoritative per le informazioni di stato

Dataset Sorgente autoritativa
node_state fields
crmd
transient_attributes tag
attrd
lrm tag
lrmd

The fields used in the node_state objects are named as they are largely for historical reasons and are rooted in Pacemaker’s origins as the Heartbeat resource manager.
They have remained unchanged to preserve compatibility with older versions.

Tabella 14.2. Campi relativi allo status dei nodi

Campo Descrizione
id
Unique identifier for the node. Corosync based clusters use the uname of the machine, Heartbeat clusters use a human-readable (but annoying) UUID.
uname
The node’s machine name (output from uname -n).
ha
Flag specifying whether the cluster software is active on the node. Allowed values: active, dead.
in_ccm
Flag for cluster membership; allowed values: true, false.
crmd
Flag: is the crmd process active on the node? One of online, offline.
join
Flag saying whether the node participates in hosting resources. Possible values: down, pending, member, banned.
expected
Expected value for join.
crm-debug-origin
Diagnostic indicator: the origin of the most recent change(s).

Il cluster utilizza questi campi per determinare se, a livello di nodo, il nodo è sano o in uno stato fallito e necessita di essere ucciso (fenced).

14.2. Attributi dei nodi transitori

Like regular node attributes, the name/value pairs listed here also help to describe the node. However they are forgotten by the cluster when the node goes offline. This can be useful, for instance, when you want a node to be in standby mode (not able to run resources) until the next reboot.
In aggiunta a qualsiasi valore impostato dall'amministratore, il cluster registrerà informazioni a proposito di azioni fallite.

Esempio 14.2. Example set of transient node attributes for node "cl-virt-1"

  <transient_attributes id="cl-virt-1">
    <instance_attributes id="status-cl-virt-1">
       <nvpair id="status-cl-virt-1-pingd" name="pingd" value="3"/>
       <nvpair id="status-cl-virt-1-probe_complete" name="probe_complete" value="true"/>
       <nvpair id="status-cl-virt-1-fail-count-pingd:0" name="fail-count-pingd:0" value="1"/>
       <nvpair id="status-cl-virt-1-last-failure-pingd:0" name="last-failure-pingd:0" value="1239009742"/>
    </instance_attributes>
  </transient_attributes>

In the above example, we can see that the pingd:0 resource has failed once, at Mon Apr 6 11:22:22 2009. [15] We also see that the node is connected to three "pingd" peers and that all known resources have been checked for on this machine (probe_complete).

14.3. Storico delle operazioni

A node’s resource history is held in the lrm_resources tag (a child of the lrm tag). The information stored here includes enough information for the cluster to stop the resource safely if it is removed from the configuration section. Specifically the resource’s id, class, type and provider are stored.

Esempio 14.3. Un record della risorsa apcstonith

<lrm_resource id="apcstonith" type="apcmastersnmp" class="stonith"/>

In aggiunta, viene registrato l'ultimo job per ciascuna combinazione di resource, action e interval. La concatenazione di valori in questa tupla viene usata per creare l'id dell'oggetto lrm_rsc_op.

Tabella 14.3. Contents of an lrm_rsc_op job

Campo Descrizione
id
Identifier for the job constructed from the resource’s id, operation and interval.
call-id
The job’s ticket number. Used as a sort key to determine the order in which the jobs were executed.
operation
L'azione con cui il resource agent è stato invocato.
interval
The frequency, in milliseconds, at which the operation will be repeated. A one-off job is indicated by 0.
op-status
The job’s status. Generally this will be either 0 (done) or -1 (pending). Rarely used in favor of rc-code.
rc-code
The job’s result. Refer to Sezione B.4, «OCF Return Codes» for details on what the values here mean and how they are interpreted.
last-run
Indicatore diagnostico. Data/ora locale della macchina in cui il job è stato eseguito, in secondi da epoch (00:00:00 UTC on 1 January 1970).
last-rc-change
Diagnostic indicator. Machine local date/time, in seconds since epoch, at which the job first returned the current value of rc-code.
exec-time
Diagnostic indicator. Time, in milliseconds, that the job was running for.
queue-time
Diagnostic indicator. Time, in seconds, that the job was queued for in the LRMd.
crm_feature_set
The version which this job description conforms to. Used when processing op-digest.
transition-key
A concatenation of the job’s graph action number, the graph number, the expected result and the UUID of the crmd instance that scheduled it. This is used to construct transition-magic (below).
transition-magic
A concatenation of the job’s op-status, rc-code and transition-key. Guaranteed to be unique for the life of the cluster (which ensures it is part of CIB update notifications) and contains all the information needed for the crmd to correctly analyze and process the completed job. Most importantly, the decomposed elements tell the crmd if the job entry was expected and whether it failed.
op-digest
An MD5 sum representing the parameters passed to the job. Used to detect changes to the configuration, to restart resources if necessary.
crm-debug-origin
Indicatore diagnostico. L'originie degli attuali valori.

14.3.1. Un semplice esempio

Esempio 14.4. A monitor operation (determines current state of the apcstonith resource)

<lrm_resource id="apcstonith" type="apcmastersnmp" class="stonith">
  <lrm_rsc_op id="apcstonith_monitor_0" operation="monitor" call-id="2"
    rc-code="7" op-status="0" interval="0"
    crm-debug-origin="do_update_resource" crm_feature_set="3.0.1"
    op-digest="2e3da9274d3550dc6526fb24bfcbcba0"
    transition-key="22:2:7:2668bbeb-06d5-40f9-936d-24cb7f87006a"
    transition-magic="0:7;22:2:7:2668bbeb-06d5-40f9-936d-24cb7f87006a"
    last-run="1239008085" last-rc-change="1239008085" exec-time="10" queue-time="0"/>
</lrm_resource>

In the above example, the job is a non-recurring monitor operation often referred to as a "probe" for the apcstonith resource.
The cluster schedules probes for every configured resource on when a new node starts, in order to determine the resource’s current state before it takes any further action.
From the transition-key, we can see that this was the 22nd action of the 2nd graph produced by this instance of the crmd (2668bbeb-06d5-40f9-936d-24cb7f87006a).
The third field of the transition-key contains a 7, this indicates that the job expects to find the resource inactive.
By looking at the rc-code property, we see that this was the case.
As that is the only job recorded for this node we can conclude that the cluster started the resource elsewhere.

14.3.2. Un complesso esempio di storico per risorsa

Esempio 14.5. Storico di una risorsa clone pingd con job multipli

<lrm_resource id="pingd:0" type="pingd" class="ocf" provider="pacemaker">
  <lrm_rsc_op id="pingd:0_monitor_30000" operation="monitor" call-id="34"
    rc-code="0" op-status="0" interval="30000"
    crm-debug-origin="do_update_resource" crm_feature_set="3.0.1"
    transition-key="10:11:0:2668bbeb-06d5-40f9-936d-24cb7f87006a"
    ...
    last-run="1239009741" last-rc-change="1239009741" exec-time="10" queue-time="0"/>
  <lrm_rsc_op id="pingd:0_stop_0" operation="stop"
    crm-debug-origin="do_update_resource" crm_feature_set="3.0.1" call-id="32"
    rc-code="0" op-status="0" interval="0"
    transition-key="11:11:0:2668bbeb-06d5-40f9-936d-24cb7f87006a"
    ...
    last-run="1239009741" last-rc-change="1239009741" exec-time="10" queue-time="0"/>
  <lrm_rsc_op id="pingd:0_start_0" operation="start" call-id="33"
    rc-code="0" op-status="0" interval="0"
    crm-debug-origin="do_update_resource" crm_feature_set="3.0.1"
    transition-key="31:11:0:2668bbeb-06d5-40f9-936d-24cb7f87006a"
    ...
    last-run="1239009741" last-rc-change="1239009741" exec-time="10" queue-time="0" />
  <lrm_rsc_op id="pingd:0_monitor_0" operation="monitor" call-id="3"
    rc-code="0" op-status="0" interval="0"
    crm-debug-origin="do_update_resource" crm_feature_set="3.0.1"
    transition-key="23:2:7:2668bbeb-06d5-40f9-936d-24cb7f87006a"
    ...
    last-run="1239008085" last-rc-change="1239008085" exec-time="20" queue-time="0"/>
  </lrm_resource>

When more than one job record exists, it is important to first sort them by call-id before interpreting them.
Once sorted, the above example can be summarized as:
  1. A non-recurring monitor operation returning 7 (not running), with a call-id of 3
  2. A stop operation returning 0 (success), with a call-id of 32
  3. A start operation returning 0 (success), with a call-id of 33
  4. A recurring monitor returning 0 (success), with a call-id of 34
The cluster processes each job record to build up a picture of the resource’s state. After the first and second entries, it is considered stopped and after the third it considered active.
Based on the last operation, we can tell that the resource is currently active.
Additionally, from the presence of a stop operation with a lower call-id than that of the start operation, we can conclude that the resource has been restarted. Specifically this occurred as part of actions 11 and 31 of transition 11 from the crmd instance with the key 2668bbeb…. This information can be helpful for locating the relevant section of the logs when looking for the source of a failure.


[15] You can use the standard date command to print a human readable of any seconds-since-epoch value: # date -d @<parameter>number</parameter>

Capitolo 15. Multi-Site Clusters and Tickets

15.1. Abstract

Apart from local clusters, Pacemaker also supports multi-site clusters. That means you can have multiple, geographically dispersed sites with a local cluster each. Failover between these clusters can be coordinated by a higher level entity, the so-called CTR (Cluster Ticket Registry).

15.2. Challenges for Multi-Site Clusters

Typically, multi-site environments are too far apart to support synchronous communication between the sites and synchronous data replication. That leads to the following challenges:
  • How to make sure that a cluster site is up and running?
  • How to make sure that resources are only started once?
  • How to make sure that quorum can be reached between the different sites and a split brain scenario can be avoided?
  • How to manage failover between the sites?
  • How to deal with high latency in case of resources that need to be stopped?
In the following sections, learn how to meet these challenges.

15.3. Conceptual Overview

Multi-site clusters can be considered as “overlay” clusters where each cluster site corresponds to a cluster node in a traditional cluster. The overlay cluster can be managed by a CTR (Cluster Ticket Registry) mechanism. It guarantees that the cluster resources will be highly available across different cluster sites. This is achieved by using so-called tickets that are treated as failover domain between cluster sites, in case a site should be down.
The following list explains the individual components and mechanisms that were introduced for multi-site clusters in more detail.

15.3.1. Components and Concepts

15.3.1.1. Ticket

"Tickets" are, essentially, cluster-wide attributes. A ticket grants the right to run certain resources on a specific cluster site. Resources can be bound to a certain ticket by rsc_ticket dependencies. Only if the ticket is available at a site, the respective resources are started. Vice versa, if the ticket is revoked, the resources depending on that ticket need to be stopped.
The ticket thus is similar to a site quorum; i.e., the permission to manage/own resources associated with that site.
(One can also think of the current have-quorum flag as a special, cluster-wide ticket that is granted in case of node majority.)
These tickets can be granted/revoked either manually by administrators (which could be the default for the classic enterprise clusters), or via an automated CTR mechanism described further below.
A ticket can only be owned by one site at a time. Initially, none of the sites has a ticket. Each ticket must be granted once by the cluster administrator.
The presence or absence of tickets for a site is stored in the CIB as a cluster status. With regards to a certain ticket, there are only two states for a site: true (the site has the ticket) or false (the site does not have the ticket). The absence of a certain ticket (during the initial state of the multi-site cluster) is also reflected by the value false.

15.3.1.2. Dead Man Dependency

A site can only activate the resources safely if it can be sure that the other site has deactivated them. However after a ticket is revoked, it can take a long time until all resources depending on that ticket are stopped "cleanly", especially in case of cascaded resources. To cut that process short, the concept of a Dead Man Dependency was introduced:
  • If the ticket is revoked from a site, the nodes that are hosting dependent resources are fenced. This considerably speeds up the recovery process of the cluster and makes sure that resources can be migrated more quickly.
This can be configured by specifying a loss-policy="fence" in rsc_ticket constraints.

15.3.1.3. CTR (Cluster Ticket Registry)

This is for those scenarios where the tickets management is supposed to be automatic (instead of the administrator revoking the ticket somewhere, waiting for everything to stop, and then granting it on the desired site).
A CTR is a network daemon that handles granting, revoking, and timing out "tickets". The participating clusters would run the daemons that would connect to each other, exchange information on their connectivity details, and vote on which site gets which ticket(s).
A ticket would only be granted to a site once they can be sure that it has been relinquished by the previous owner, which would need to be implemented via a timer in most scenarios. If a site loses connection to its peers, its tickets time out and recovery occurs. After the connection timeout plus the recovery timeout has passed, the other sites are allowed to re-acquire the ticket and start the resources again.
This can also be thought of as a "quorum server", except that it is not a single quorum ticket, but several.

15.3.1.4. Configuration Replication

As usual, the CIB is synchronized within each cluster, but it is not synchronized across cluster sites of a multi-site cluster. You have to configure the resources that will be highly available across the multi-site cluster for every site accordingly.

15.4. Configuring Ticket Dependencies

The rsc_ticket constraint lets you specify the resources depending on a certain ticket. Together with the constraint, you can set a loss-policy that defines what should happen to the respective resources if the ticket is revoked.
The attribute loss-policy can have the following values:
fence
Fence the nodes that are running the relevant resources.
stop
Stop the relevant resources.
freeze
Do nothing to the relevant resources.
demote
Demote relevant resources that are running in master mode to slave mode.
An example to configure a rsc_ticket constraint:
<rsc_ticket id="rsc1-req-ticketA" rsc="rsc1" ticket="ticketA" loss-policy="fence"/>
This creates a constraint with the ID rsc1-req-ticketA. It defines that the resource rsc1 depends on ticketA and that the node running the resource should be fenced in case ticketA is revoked.
If resource rsc1 was a multi-state resource that can run in master or slave mode, you may want to configure that only rsc1's master mode depends on ticketA. With the following configuration, rsc1 will be demoted to slave mode if ticketA is revoked:
<rsc_ticket id="rsc1-req-ticketA" rsc="rsc1" rsc-role="Master" ticket="ticketA" loss-policy="demote"/>
You can create more rsc_ticket constraints to let multiple resources depend on the same ticket.
rsc_ticket also supports resource sets. So one can easily list all the resources in one rsc_ticket constraint. For example:
      <rsc_ticket id="resources-dep-ticketA" ticket="ticketA" loss-policy="fence">
        <resource_set id="resources-dep-ticketA-0" role="Started">
          <resource_ref id="rsc1"/>
          <resource_ref id="group1"/>
          <resource_ref id="clone1"/>
        </resource_set>
        <resource_set id="resources-dep-ticketA-1" role="Master">
          <resource_ref id="ms1"/>
        </resource_set>
      </rsc_ticket>
In the example, there are two resource sets for listing the resources with different roles in one rsc_ticket constraint. There’s no dependency between the two resource sets. And there’s no dependency among the resources within a resource set. Each of the resources just depends on ticketA.
Referencing resource templates in rsc_ticket constraints, and even referencing them within resource sets, is also supported.
If you want other resources to depend on further tickets, create as many constraints as necessary with rsc_ticket.

15.5. Managing Multi-Site Clusters

15.5.1. Granting and Revoking Tickets Manually

You can grant tickets to sites or revoke them from sites manually. Though if you want to re-distribute a ticket, you should wait for the dependent resources to cleanly stop at the previous site before you grant the ticket to another desired site.
Use the crm_ticket command line tool to grant and revoke tickets.
To grant a ticket to this site:
# crm_ticket --ticket ticketA --grant
To revoke a ticket from this site:
# crm_ticket --ticket ticketA --revoke

Importante

If you are managing tickets manually. Use the crm_ticket command with great care as they cannot help verify if the same ticket is already granted elsewhere.

15.5.2. Granting and Revoking Tickets via a Cluster Ticket Registry

15.5.2.1. Booth

Booth is an implementation of Cluster Ticket Registry or so-called Cluster Ticket Manager.
Booth is the instance managing the ticket distribution and thus, the failover process between the sites of a multi-site cluster. Each of the participating clusters and arbitrators runs a service, the boothd. It connects to the booth daemons running at the other sites and exchanges connectivity details. Once a ticket is granted to a site, the booth mechanism will manage the ticket automatically: If the site which holds the ticket is out of service, the booth daemons will vote which of the other sites will get the ticket. To protect against brief connection failures, sites that lose the vote (either explicitly or implicitly by being disconnected from the voting body) need to relinquish the ticket after a time-out. Thus, it is made sure that a ticket will only be re-distributed after it has been relinquished by the previous site. The resources that depend on that ticket will fail over to the new site holding the ticket. The nodes that have run the resources before will be treated according to the loss-policy you set within the rsc_ticket constraint.
Before the booth can manage a certain ticket within the multi-site cluster, you initially need to grant it to a site manually via booth client command. After you have initially granted a ticket to a site, the booth mechanism will take over and manage the ticket automatically.

Importante

The booth client command line tool can be used to grant, list, or revoke tickets. The booth client commands work on any machine where the booth daemon is running.
If you are managing tickets via Booth, only use booth client for manual intervention instead of crm_ticket. That can make sure the same ticket will only be owned by one cluster site at a time.
Booth includes an implementation of Paxos and Paxos Lease algorithm, which guarantees the distributed consensus among different cluster sites.

Nota

Arbitrator
Each site runs one booth instance that is responsible for communicating with the other sites. If you have a setup with an even number of sites, you need an additional instance to reach consensus about decisions such as failover of resources across sites. In this case, add one or more arbitrators running at additional sites. Arbitrators are single machines that run a booth instance in a special mode. As all booth instances communicate with each other, arbitrators help to make more reliable decisions about granting or revoking tickets.
An arbitrator is especially important for a two-site scenario: For example, if site A can no longer communicate with site B, there are two possible causes for that:
  • A network failure between A and B.
  • Site B is down.
However, if site C (the arbitrator) can still communicate with site B, site B must still be up and running.
15.5.2.1.1. Requirements
  • All clusters that will be part of the multi-site cluster must be based on Pacemaker.
  • Booth must be installed on all cluster nodes and on all arbitrators that will be part of the multi-site cluster.
The most common scenario is probably a multi-site cluster with two sites and a single arbitrator on a third site. However, technically, there are no limitations with regards to the number of sites and the number of arbitrators involved.
Nodes belonging to the same cluster site should be synchronized via NTP. However, time synchronization is not required between the individual cluster sites.

15.5.3. General Management of Tickets

Display the information of tickets:
# crm_ticket --info
Or you can monitor them with:
# crm_mon --tickets
Display the rsc_ticket constraints that apply to a ticket:
# crm_ticket --ticket ticketA --constraints
When you want to do maintenance or manual switch-over of a ticket, the ticket could be revoked from the site for any reason, which would trigger the loss-policies. If loss-policy="fence", the dependent resources could not be gracefully stopped/demoted, and even, other unrelated resources could be impacted.
The proper way is making the ticket standby first with:
# crm_ticket --ticket ticketA --standby
Then the dependent resources will be stopped or demoted gracefully without triggering the loss-policies.
If you have finished the maintenance and want to activate the ticket again, you can run:
# crm_ticket --ticket ticketA --activate

FAQ

A.1. Storia

Domanda:
Why is the Project Called Pacemaker?
Risposta:
First of all, the reason its not called the CRM is because of the abundance of terms[16] that are commonly abbreviated to those three letters.
The Pacemaker name came from Kham[17], a good friend of mine, and was originally used by a Java GUI that I was prototyping in early 2007. Alas other commitments have prevented the GUI from progressing much and, when it came time to choose a name for this project, Lars suggested it was an even better fit for an independent CRM.
L'idea su basa sull'analogia del ruolo di questo software con il piccolo dispositivo che mantiene il cuore umano in grado di pompare. Pacemaker controlla il cluster ed interviene quando necessario per assicurare il buon funzionamento dei servizi che fornisce.
There were a number of other names (and acronyms) tossed around, but suffice to say "Pacemaker" was the best
Domanda:
Perché è stato creato il progetto Pacemaker?
Risposta:
La decisione venne presa per slacciare il CRM in un progetto a se stante dopo la versione 2.1.3 di Heartbeat in modo da
  • supportare gli stack Corosync ed Heartbeat equamente
  • disaccoppiare i cicli di rilascio di due progetti in fasi molto diverse della loro crescita
  • definire meglio gli ambiti del progetto, in modo da avere
  • interfacci più stabili e migliori

A.2. Setup

Domanda:
What Messaging Layers are Supported?
Risposta:
Domanda:
E' possibile scegliere a runtime il Message Layer da usare?
Risposta:
Yes. The CRM will automatically detect which started it and behave accordingly.
Domanda:
E' possibile avere un cluster mixato Heartbeat-Corosync?
Risposta:
No.
Domanda:
Quale Message Layer si dovrebbe scegliere?
Risposta:
Questo viene discusso qui Appendice D, Installazione.
Domanda:
Dove si possono reperire pacchetti pre compilati?
Risposta:
Official packages for most major .rpm and based distributions are available from the ClusterLabs Website[18].
For Debian packages, building from source and details on using the above repositories, see our installation page[19].
Domanda:
Quali versioni di Pacemaker sono supportate?
Risposta:
Please refer to the Releases page[20] for an up-to-date list of versions supported directly by the project.
Quando si necessita di assistenza è ideale utilizzare una di queste versioni.

Maggiori informazioni sui Resource Agent OCF

B.1. Dove si trovano gli script personalizzati

OCF Resource Agents are found in /usr/lib/ocf/resource.d/provider.
When creating your own agents, you are encouraged to create a new directory under /usr/lib/ocf/resource.d/ so that they are not confused with (or overwritten by) the agents shipped with Heartbeat.
So, for example, if you chose the provider name of bigCorp and wanted a new resource named bigApp, you would create a script called /usr/lib/ocf/resource.d/bigCorp/bigApp and define a resource:
<primitive id="custom-app" class="ocf" provider="bigCorp" type="bigApp"/>

B.2. Azioni

Tutti i Resource Agent OCF devono implementare le seguenti azioni

Tabella B.1. Azioni richieste per gli agenti OCF

Azione Descrizione Istruzioni
start
Avvia la risorsa
Return 0 on success and an appropriate error code otherwise. Must not report success until the resource is fully active.
stop
Ferma la risorsa
Return 0 on success and an appropriate error code otherwise. Must not report success until the resource is fully stopped.
monitor
Check the resource’s state
Exit 0 if the resource is running, 7 if it is stopped, and anything else if it is failed.
NOTA: Lo script di monitor dovrebbe controllare lo stato della risorsa solo sulla macchina locale.
meta-data
Descrive la risorsa
Provide information about this resource as an XML snippet. Exit with 0.
NOTE: This is not performed as root.
validate-all
Verify the supplied parameters
Exit with 0 if parameters are valid, 2 if not valid, 6 if resource is not configured.

Requisiti aggiuntivi (che non fanno parte delle specifiche OCF) sono associati ad agenti che vengono utilizzati nell'ambito delle risorse clone e multi-state.

Tabella B.2. Azioni facoltative per gli agent OCF

Azione Descrizione Istruzioni
promote
Promote the local instance of a multi-state resource to the master/primary state.
Return 0 on success
demote
Demote the local instance of a multi-state resource to the slave/secondary state.
Return 0 on success
notify
Used by the cluster to send the agent pre and post notification events telling the resource what has happened and will happen.
Must not fail. Must exit with 0

One action specified in the OCF specs is not currently used by the cluster:
  • recover - a variant of the start action, this should try to recover a resource locally.
Remember to use ocf-tester to verify that your new agent complies with the OCF standard properly.

B.3. How are OCF Return Codes Interpreted?

The first thing the cluster does is to check the return code against the expected result. If the result does not match the expected value, then the operation is considered to have failed and recovery action is initiated.
Esistono tre tipi di ripristino da fallimenti:

Tabella B.3. Tipi di ripristino effettuati dal cluster

Type Descrizione Azione intrapresa dal cluster
soft
Si è verificato un errore transitorio
Restart the resource or move it to a new location
hard
Si è verificato un errore non transitorio che potrebbe essere specificamente correlato al nodo attuale
Move the resource elsewhere and prevent it from being retried on the current node
fatal
A non-transient error that will be common to all cluster nodes (eg. a bad configuration was specified)
Stop the resource and prevent it from being started on any cluster node

Assumendo che l'azione sia considerata fallita, la seguente tabella evidenzia i diversi codici di ritorno OCF ed i tipi di ripristino che il cluster avvierà di conseguenza.

B.4. OCF Return Codes

Tabella B.4. OCF Return Codes and their Recovery Types

RC OCF Alias Descrizione RT
0
OCF_SUCCESS
Success. The command completed successfully. This is the expected result for all start, stop, promote and demote commands.
soft
1
OCF_ERR_GENERIC
Generic "there was a problem" error code.
soft
2
OCF_ERR_ARGS
The resource’s configuration is not valid on this machine. Eg. refers to a location/tool not found on the node.
hard
3
OCF_ERR_UNIMPLEMENTED
The requested action is not implemented.
hard
4
OCF_ERR_PERM
The resource agent does not have sufficient privileges to complete the task.
hard
5
OCF_ERR_INSTALLED
The tools required by the resource are not installed on this machine.
hard
6
OCF_ERR_CONFIGURED
The resource’s configuration is invalid. Eg. required parameters are missing.
fatal
7
OCF_NOT_RUNNING
The resource is safely stopped. The cluster will not attempt to stop a resource that returns this for any action.
N/A
8
OCF_RUNNING_MASTER
The resource is running in Master mode.
soft
9
OCF_FAILED_MASTER
The resource is in Master mode but has failed. The resource will be demoted, stopped and then started (and possibly promoted) again.
soft
other
NA
Custom error code.
soft

Although counterintuitive, even actions that return 0 (aka. OCF_SUCCESS) can be considered to have failed.

B.5. Eccezioni

  • Azioni di monitor non ricorrenti (probes) che trovano una risorsa attiva (o in modalità Master) non forzeranno un ripristino a meno che non trovino la risorsa attiva altrove
  • The recovery action taken when a resource is found active more than once is determined by the multiple-active property of the resource
  • Recurring actions that return OCF_ERR_UNIMPLEMENTED do not cause any type of recovery

Cosa è cambiato nella versione 1.0

C.1. Nuovo

C.2. Modifiche

  • Sintassi
    • Tutte le risorse e le opzioni del cluster ora utilizzano trattini (-) invece di underscore (_)
    • master_slave è stato rinominato in master
    • Il tag contenitore attributes è stato rimosso
    • Il campo operazione pre-req è stato rinominato in requires
    • All operations must have an interval, start/stop must have it set to zero
  • L'opzione stonith-enabled ora per default è true
  • Il cluster rifiuterà di avviare risorse se stonith-enabled è true (o non valorizzato) e non è stata definita nessuna risorsa STONITH
  • Gli attributi dei vincoli colocation e ordering sono stati rinominati per chiarezza. Vedere Sezione 6.3, «Specifying in which Order Resources Should Start/Stop» e Sezione 6.4, «Placing Resources Relative to other Resources»
  • resource-failure-stickiness è stata rimpiazzata da migration-threshold. Vedere Sezione 9.3.2, «Spostare risorse in seguito ad un fallimento»
  • The parameters for command-line tools have been made consistent
  • Switched to RelaxNG schema validation and libxml2 parser
    • id fields are now XML IDs which have the following limitations:
      • id’s cannot contain colons (:)
      • id’s cannot begin with a number
      • id’s must be globally unique (not just unique for that tag)
    • Some fields (such as those in constraints that refer to resources) are IDREFs.
      This means that they must reference existing resources or objects in order for the configuration to be valid. Removing an object which is referenced elsewhere will therefore fail.
    • The CIB representation, from which a MD5 digest is calculated to verify CIBs on the nodes, has changed.
      This means that every CIB update will require a full refresh on any upgraded nodes until the cluster is fully upgraded to 1.0. This will result in significant performance degradation and it is therefore highly inadvisable to run a mixed 1.0/0.6 cluster for any longer than absolutely necessary.
  • Ping node information no longer needs to be added to ha.cf.
    Simply include the lists of hosts in your ping resource(s).

C.3. Rimozioni

Installazione

Avvertimento

The following text may no longer be accurate in some places.

D.1. Scegliere lo stack del cluster

Ultimately the choice of cluster stack is a personal decision that must be made in the context of you or your company’s needs and strategic direction. Pacemaker currently functions equally well with both stacks.
Here are some factors that may influence the decision:
  • SUSE/Novell, Red Hat ed Oracle stanno ponendo il proprio peso sulle spalle dello stack Corosync.
  • Utilizzare Corosync da accesso alle proprie applicazioni a questi servizi aggiuntivi
    • distributed locking service
    • extended virtual synchronization service
    • servizio cluster closed process group
  • E' verosimile pensare che Pacemaker, in futuro, possa utilizzare qualcuno di questi servizi aggiuntivi non forniti da Heartbeat

D.2. Abilitare Pacemaker

D.2.1. Per Corosync

The Corosync configuration is normally located in /etc/corosync/corosync.conf and an example for a machine with an address of 1.2.3.4 in a cluster communicating on port 1234 (without peer authentication and message encryption) is shown below.
Un esempio di un file di configurazione di Corosync
  totem {
      version: 2
      secauth: off
      threads: 0
      interface {
          ringnumber: 0
          bindnetaddr: 1.2.3.4
          mcastaddr: 239.255.1.1
          mcastport: 1234
      }
  }
  logging {
      fileline: off
      to_syslog: yes
      syslog_facility: daemon
  }
  amf {
      mode: disabled
  }
La sezione logging risulta piuttosto ovvia e la sezione amf si riferisce all'Availability Management Framework e non è affrontata in questo documento.
The interesting part of the configuration is the totem section. This is where we define how the node can communicate with the rest of the cluster and what protocol version and options (including encryption [21] ) it should use. Beginners are encouraged to use the values shown and modify the interface section based on their network.
It is also possible to configure Corosync for an IPv6 based environment. Simply configure bindnetaddr and mcastaddr with their IPv6 equivalents, eg.
Esempio di opzioni per un ambiente IPV6
  bindnetaddr: fec0::1:a800:4ff:fe00:20
  mcastaddr: ff05::1
Per indicare a Corosync di utilizzare il cluster manager Pacemaker è necessario aggiungere il seguente frammento ad una configurazione Corosync funzionante e riavviare il cluster.
Frammento di configurazione per abilitare Pacemaker in Corosync
aisexec {
    user:  root
    group: root
}
service {
    name: pacemaker
    ver: 0
}
The cluster needs to be run as root so that its child processes (the lrmd in particular) have sufficient privileges to perform the actions requested of it. After all, a cluster manager that can’t add an IP address or start apache is of little use.
La seconda direttiva istruisce il cluster nell'utilizzare Pacemaker.

D.2.2. Per Heartbeat

Add the following to a functional ha.cf configuration file and restart Heartbeat:
Frammento di configurazione per abilitare Pacemaker in Heartbeat
crm respawn


[21] Please consult the Corosync website (http://www.corosync.org/) and documentation for details on enabling encryption and peer authentication for the cluster.

Aggiornare il software del cluster

E.1. Compatibilità delle versioni

When releasing newer versions we take care to make sure we are backwards compatible with older versions. While you will always be able to upgrade from version x to x+1, in order to continue to produce high quality software it may occasionally be necessary to drop compatibility with older versions.
Ci sarà sempre percorso di aggiornamento da qualsiasi versione serie-2 a qualsiasi altra versione serie-2.
There are three approaches to upgrading your cluster software:
  • Completo spegnimento del cluster
  • Rolling (nodo dopo nodo)
  • Disconnessione e riaggancio
Ogni metodo ha vantaggi e svantaggi, alcuni dei quali sono elencati nella tabella sotto, ed è necessario scegliere l'approccio più adatto alle proprie esigenze.

Tabella E.1. Riepilogo delle metodologie di aggiornamento

Tipo Disponibile fra tutte le versioni del software Interruzione del servizio in fase di aggiornamento Ripristino del servizio in fase di aggiornamento Esercizi di Logica Di Failover/Configurazione Allows change of cluster stack type [a]
Shutdown
sempre
N/A
no
Rolling
no
sempre
no
Reattach
solo in seguito a fallimenti
no
no
[a] For example, switching from Heartbeat to Corosync. Consult the Heartbeat or Corosync documentation to see if upgrading them to a newer version is also supported.

E.2. Completo spegnimento del cluster

In questo scenario tutti i nodi del cluster e le risorse vengono spenti, vengono aggiornati tutti i nodi prima di riattivare il cluster.

E.2.1. Procedura

  1. Su ciascun nodo:
    1. Spegnimento dello stack del cluster (Heartbeat o Corosync)
    2. Aggiornamento del software Pacemaker. Questo potrebbe includere l'aggiornamento dello stack del cluster e/o del sistema operativo.
    3. Check the configuration manually or with the crm_verify tool if available.
  2. Su ciascun nodo:
    1. Avvio dello stack del cluster. Questo può essere Corosync o Heartbeat e non necessità di essere lo stesso stack precedentemente utilizzato.

E.3. Rolling (nodo dopo nodo)

In questo scenario ogni nodo viene rimosso dal cluster, aggiornato e riportato online finché tutti i nodi stanno funzionando con la nuova versione.

Importante

This method is currently broken between Pacemaker 0.6.x and 1.0.x.
Measures have been put into place to ensure rolling upgrades always work for versions after 1.0.0. Please try one of the other upgrade strategies. Detach/Reattach is a particularly good option for most people.

E.3.1. Procedura

On each node: . Shutdown the cluster stack (Heartbeat or Corosync) . Upgrade the Pacemaker software. This may also include upgrading the cluster stack and/or the underlying operating system. .. On the first node, check the configuration manually or with the crm_verify tool if available. .. Start the cluster stack.
+ This must be the same type of cluster stack (Corosync or Heartbeat) that the rest of the cluster is using. Upgrading Corosync/Heartbeat may also be possible, please consult the documentation for those projects to see if the two versions will be compatible.
+ .. Repeat for each node in the cluster.

E.3.2. Compatibilità delle versioni

Tabella E.2. Tabella della compatibilità delle versioni

Versione da installare Ultima versione compatibile
Pacemaker 1.0.x
Pacemaker 1.0.0
Pacemaker 0.7.x
Pacemaker 0.6 o Heartbeat 2.1.3
Pacemaker 0.6.x
Heartbeat 2.0.8
Heartbeat 2.1.3 (o precedenti)
Heartbeat 2.0.4
Heartbeat 2.0.4 (o precedenti)
Heartbeat 2.0.0
Heartbeat 2.0.0
Nessuna. Utilizzare una diversa strategia di aggiornamento.

E.3.3. Limiti di compatibilità

Aggiornamenti rolling che attraversano i limiti di compatibilità devono essere effettuati in diversi passi. Ad esempio, per effettuare un aggiornameno rolling da Heartbeat 2.0.1 a Pacemaker 0.6.6 i passi sono:
  1. Effettuare un aggiornamento rolling da Heartbeat 2.0.1 a Heartbeat 2.0.4
  2. Effettuare un aggiornamento rolling da Heartbeat 2.0.4 a Heartbeat 2.1.3
  3. Effettuare un aggiornamento rolling da Heartbeat 2.1.3 a Pacemaker 0.6.6

E.4. Disconnessione e riaggancio

A variant of a complete cluster shutdown, but the resources are left active and get re-detected when the cluster is restarted.

E.4.1. Procedura

  1. Tell the cluster to stop managing services.
    This is required to allow the services to remain active after the cluster shuts down.
    # crm_attribute -t crm_config -n is-managed-default -v false
  2. For any resource that has a value for is-managed, make sure it is set to false (so that the cluster will not stop it)
    # crm_resource -t primitive -r $rsc_id -p is-managed -v false
  3. Su ciascun nodo:
    1. Spegnimento dello stack del cluster (Heartbeat o Corosync)
    2. Programma di aggiornamento dello stack del Cluster - Questo potrebbe includere l'aggiornamento del sistema operativo.
  4. Check the configuration manually or with the crm_verify tool if available.
  5. Su ciascun nodo:
    1. Start the cluster stack.
      This can be either Corosync or Heartbeat and does not need to be the same as the previous cluster stack.
  6. Verify that the cluster re-detected all resources correctly.
  7. Allow the cluster to resume managing resources again:
    # crm_attribute -t crm_config -n is-managed-default -v true
  8. For any resource that has a value for is-managed reset it to true (so the cluster can recover the service if it fails) if desired:
    # crm_resource -t primitive -r $rsc_id -p is-managed -v true

E.4.2. Note

Importante

Controllare sempre che la propria configurazione sia sempre compatibile con la versione che si sta installando prima di avviare il cluster.

Nota

La versione più vecchia del CRM che supporta questo tipo di aggiornamento è presente in Heartbeat 2.0.4

Aggiornare la configurazione dalla versione 0.6

F.1. Preparazione

Download the latest DTD and ensure your configuration validates.

F.2. Effettuale l'aggiornamento

F.2.1. Aggiornamento del software

F.2.2. Aggiornare la configurazione

Dato che XM non è il più amichevole dei linguaggi è pratica comune per gli amministratori del cluster creare script per le proprie attività. In questi casi c'è da aspettarsi che tali script non funzionino con la sintassi della versione 1.0.
Al fine di supportare tali ambienti, è possibile continuare ad utilizzare la vecchia sintassi 0.6.
The downside is, however, that not all the new features will be available and there is a performance impact since the cluster must do a non-persistent configuration upgrade before each transition. So while using the old syntax is possible, it is not advisable to continue using it indefinitely.
Anche se il proprio desiderio è quello di utilizzare la vecchia sintassi, è consigliabile seguire la procedura di upgrade per assicurarsi che il cluster sia capace di utilizzare la configurazione attuale (visto che internamente effettuerà praticamente la stessa operazione).
  1. Creare di una copia shadow del proprio lavoro con
    # crm_shadow --create upgrade06
  2. Verify the configuration is valid
    # crm_verify --live-check
  3. Correggere eventuali errori o allerta
  4. Perform the upgrade:
    # cibadmin --upgrade
  5. If this step fails, there are three main possibilities:
    1. La configurazione non è valida per l'avvio - tornare al passo 2
    2. The transformation failed - report a bug or email the project
    3. The transformation was successful but produced an invalid result [22]
      If the result of the transformation is invalid, you may see a number of errors from the validation library. If these are not helpful, visit http://clusterlabs.org/wiki/Validation_FAQ and/or try the procedure described below under Sezione F.2.3, «Aggiornamento manuale della configurazione»
  6. Verificare le modifiche
    # crm_shadow --diff
    Se a questo punto si necessita di approfondire altro in merio all'aggioramento (ad esempio cambiare qualcuno degli ID automatici) questo è il momento. Dal momento che la configurazione shadow non è utilizzata dal cluster è possibile modificare il file manualmenee.
    # crm_shadow --edit
    This will open the configuration in your favorite editor (whichever is specified by the standard $EDITOR environment variable)
  7. Presenterà un'anteprima delle azioni del cluster
    Controlla quello che fa il cluster quando viene caricata la nuova configurazione
    # crm_simulate --live-check --save-dotfile upgrade06.dot -S
    # graphviz upgrade06.dot
    Verify that either no resource actions will occur or that you are happy with any that are scheduled. If the output contains actions you do not expect (possibly due to changes to the score calculations), you may need to make further manual changes. See Sezione 2.7, «Testare le proprie modifiche» for further details on how to interpret the output of crm_simulate
  8. Applicare le modifiche
    # crm_shadow --commit upgrade06 --force
Se il passo fallisce, p accaduto qualcosa di veramente strano. Biosgnerebbe quindi riportare un Bug

F.2.3. Aggiornamento manuale della configurazione

It is also possible to perform the configuration upgrade steps manually. To do this
Locate the upgrade06.xsl conversion script or download the latest version from Git
  1. Convert the XML blob:
    # xsltproc /path/to/upgrade06.xsl config06.xml > config10.xml
  2. Locate the pacemaker.rng script.
  3. Check the XML validity:
    # xmllint --relaxng /path/to/pacemaker.rng config10.xml
Il vantaggio di questo metodo è che può essere eseguito senza che il cluster sia attivo e qualsiasi errore di validazione dovrebbe risultare esplicativo (sebbene generato dalla stessa libreria!) dato che ciascuna riga è numerata.


[22] The most common reason is ID values being repeated or invalid. Pacemaker 1.0 is much stricter regarding this type of validation.

init-Script LSB Compliance

The relevant part of LSB spec includes a description of all the return codes listed here.
Assuming some_service is configured correctly and currently not active, the following sequence will help you determine if it is LSB compatible:
  1. Start (a servizio fermo):
    # /etc/init.d/some_service start ; echo "result: $?"
    1. Il servizio si è avviato?
    2. Il comando ha stampato il risultato: 0 (in aggiunta all'output classico)?
  2. Status (a servizio attivo):
    # /etc/init.d/some_service status ; echo "result: $?"
    1. Lo script ha accettato il comando?
    2. Lo script ha indicato che il servizio stava funzionando?
    3. Il comando ha stampato il risultato: 0 (in aggiunta all'output classico)?
  3. Start (a servizio attivo):
    # /etc/init.d/some_service start ; echo "result: $?"
    1. Il servizio è ancora attivo?
    2. Il comando ha stampato il risultato: 0 (in aggiunta all'output classico)?
  4. Stop (a servizio attivo):
    # /etc/init.d/some_service stop ; echo "result: $?"
    1. Il servizio è stato stoppato?
    2. Il comando ha stampato il risultato: 0 (in aggiunta all'output classico)?
  5. Status (a servizio fermo):
    # /etc/init.d/some_service status ; echo "result: $?"
    1. Lo script ha accettato il comando?
    2. Lo script ha indicato che il servizio non stava funzionando?
    3. Il comando ha restituito il risultato: 3 (in aggiunta all'ouput classico)?
  6. Stop (a servizio fermo):
    # /etc/init.d/some_service stop ; echo "result: $?"
    1. Il servizio è ancora stoppato?
    2. Il comando ha stampato il risultato: 0 (in aggiunta all'output classico)?
  7. Status (a servizio fallito):
    Questo passaggio non è facilmente verificabile e si basa sul controllo manuale dello script.
    Lo script può utilizzare un codice di errore (diverso da 3) elencato nelle specifiche LSB per indicare che è attivo ma fallito. Questo indica al cluster che prima di spostare una risorsa ad un altro nodo essa necessita di essere stoppata prima sul nodo attuale.
Se la risposta a qualsiasi delle domande elencate è no, allora lo script non è LSB compatibile. Le opzioni a questo punto sono di sistemare lo script o scrivere un agent OCF basato sullo script esistente.

Configurazioni di esempio

H.1. Empty

Esempio H.1. Una configurazione vuota

<cib admin_epoch="0" epoch="0" num_updates="0" have-quorum="false">
  <configuration>
    <crm_config/>
    <nodes/>
    <resources/>
    <constraints/>
  </configuration>
  <status/>
</cib>

H.2. Simple

Esempio H.2. Simple Configuration - 2 nodes, some cluster options and a resource

<cib admin_epoch="0" epoch="1" num_updates="0" have-quorum="false"
    validate-with="pacemaker-1.0">
  <configuration>
    <crm_config>
      <nvpair id="option-1" name="symmetric-cluster" value="true"/>
      <nvpair id="option-2" name="no-quorum-policy" value="stop"/>
    </crm_config>
    <op_defaults>
      <nvpair id="op-default-1" name="timeout" value="30s"/>
    </op_defaults>
    <rsc_defaults>
      <nvpair id="rsc-default-1" name="resource-stickiness" value="100"/>
      <nvpair id="rsc-default-2" name="migration-threshold" value="10"/>
    </rsc_defaults>
    <nodes>
      <node id="xxx" uname="c001n01" type="normal"/>
      <node id="yyy" uname="c001n02" type="normal"/>
    </nodes>
    <resources>
      <primitive id="myAddr" class="ocf" provider="heartbeat" type="IPaddr">
        <operations>
          <op id="myAddr-monitor" name="monitor" interval="300s"/>
        </operations>
        <instance_attributes>
          <nvpair name="ip" value="10.0.200.30"/>
        </instance_attributes>
      </primitive>
    </resources>
    <constraints>
      <rsc_location id="myAddr-prefer" rsc="myAddr" node="c001n01" score="INFINITY"/>
    </constraints>
  </configuration>
  <status/>
</cib>

In this example, we have one resource (an IP address) that we check every five minutes and will run on host c001n01 until either the resource fails 10 times or the host shuts down.

H.3. Advanced Configuration

Esempio H.3. Advanced configuration - groups and clones with stonith

<cib admin_epoch="0" epoch="1" num_updates="0" have-quorum="false"
    validate-with="pacemaker-1.0">
  <configuration>
    <crm_config>
      <nvpair id="option-1" name="symmetric-cluster" value="true"/>
      <nvpair id="option-2" name="no-quorum-policy" value="stop"/>
      <nvpair id="option-3" name="stonith-enabled" value="true"/>
    </crm_config>
    <op_defaults>
      <nvpair id="op-default-1" name="timeout" value="30s"/>
    </op_defaults>
    <rsc_defaults>
      <nvpair id="rsc-default-1" name="resource-stickiness" value="100"/>
      <nvpair id="rsc-default-2" name="migration-threshold" value="10"/>
    </rsc_defaults>
    <nodes>
      <node id="xxx" uname="c001n01" type="normal"/>
      <node id="yyy" uname="c001n02" type="normal"/>
      <node id="zzz" uname="c001n03" type="normal"/>
    </nodes>
    <resources>
      <primitive id="myAddr" class="ocf" provider="heartbeat" type="IPaddr">
        <operations>
          <op id="myAddr-monitor" name="monitor" interval="300s"/>
        </operations>
        <instance_attributes>
          <nvpair name="ip" value="10.0.200.30"/>
        </instance_attributes>
      </primitive>
      <group id="myGroup">
        <primitive id="database" class="lsb" type="oracle">
          <operations>
            <op id="database-monitor" name="monitor" interval="300s"/>
          </operations>
        </primitive>
        <primitive id="webserver" class="lsb" type="apache">
          <operations>
            <op id="webserver-monitor" name="monitor" interval="300s"/>
          </operations>
        </primitive>
      </group>
      <clone id="STONITH">
        <meta_attributes id="stonith-options">
          <nvpair id="stonith-option-1" name="globally-unique" value="false"/>
        </meta_attributes>
        <primitive id="stonithclone" class="stonith" type="external/ssh">
          <operations>
            <op id="stonith-op-mon" name="monitor" interval="5s"/>
          </operations>
          <instance_attributes id="stonith-attrs">
            <nvpair id="stonith-attr-1" name="hostlist" value="c001n01,c001n02"/>
          </instance_attributes>
        </primitive>
      </clone>
    </resources>
    <constraints>
      <rsc_location id="myAddr-prefer" rsc="myAddr" node="c001n01"
        score="INFINITY"/>
      <rsc_colocation id="group-with-ip" rsc="myGroup" with-rsc="myAddr"
        score="INFINITY"/>
    </constraints>
  </configuration>
  <status/>
</cib>

Approfondimenti

Revision History

Diario delle Revisioni
Revisione 1-119 Oct 2009Andrew Beekhof
Import da Pages.app
Revisione 2-126 Oct 2009Andrew Beekhof
Completata la pulizia e riformattazione dell'xml docbook
Revisione 3-1Tue Nov 12 2009Andrew Beekhof
Divisione del libro in capitoli e conferma validazione
Riorganizzazione del lbro per l'utilizzo di Publican
Revisione 4-1Mon Oct 8 2012Andrew Beekhof
Converted to asciidoc (which is converted to docbook for use with Publican)

Indice analitico

Simboli

0
OCF_SUCCESS, OCF Return Codes
1
OCF_ERR_GENERIC, OCF Return Codes
2
OCF_ERR_ARGS, OCF Return Codes
3
OCF_ERR_UNIMPLEMENTED, OCF Return Codes
4
OCF_ERR_PERM, OCF Return Codes
5
OCF_ERR_INSTALLED, OCF Return Codes
6
OCF_ERR_CONFIGURED, OCF Return Codes
7
OCF_NOT_RUNNING, OCF Return Codes
8
OCF_RUNNING_MASTER, OCF Return Codes
9
OCF_FAILED_MASTER, OCF Return Codes

A

Action, Operazioni sulle risorse
demote, Azioni
meta-data, Azioni
monitor, Azioni
notify, Azioni
promote, Azioni
Property
enabled, Monitoraggio di anomalie sulle risorse
id, Monitoraggio di anomalie sulle risorse
interval, Monitoraggio di anomalie sulle risorse
name, Monitoraggio di anomalie sulle risorse
on-fail, Monitoraggio di anomalie sulle risorse
timeout, Monitoraggio di anomalie sulle risorse
start, Azioni
Status
call-id, Storico delle operazioni
crm-debug-origin, Storico delle operazioni
crm_feature_set, Storico delle operazioni
exec-time, Storico delle operazioni
id, Storico delle operazioni
interval, Storico delle operazioni
last-rc-change, Storico delle operazioni
last-run, Storico delle operazioni
op-digest, Storico delle operazioni
op-status, Storico delle operazioni
operation, Storico delle operazioni
queue-time, Storico delle operazioni
rc-code, Storico delle operazioni
transition-key, Storico delle operazioni
transition-magic, Storico delle operazioni
stop, Azioni
validate-all, Azioni
Action Property, Monitoraggio di anomalie sulle risorse
Action Status, Storico delle operazioni
active_resource, Clone Notifications, Multi-state Notifications
Notification Environment Variable, Clone Notifications, Multi-state Notifications
active_uname, Clone Notifications, Multi-state Notifications
Notification Environment Variable, Clone Notifications, Multi-state Notifications
Add Cluster Node, Adding a New Corosync Node, Adding a New CMAN Node, Adding a New Heartbeat Node
CMAN, Adding a New CMAN Node
Corosync, Adding a New Corosync Node
Heartbeat, Adding a New Heartbeat Node
admin_epoch, Versione della configurazione
Cluster Option, Versione della configurazione
Asymmetrical Opt-In, Asymmetrical "Opt-In" Clusters
Asymmetrical Opt-In Clusters, Asymmetrical "Opt-In" Clusters
attribute, Descrivere un nodo del cluster, Espressioni relative agli attributi del nodo
Constraint Expression, Espressioni relative agli attributi del nodo
Attribute Expression, Espressioni relative agli attributi del nodo
attribute, Espressioni relative agli attributi del nodo
operation, Espressioni relative agli attributi del nodo
type, Espressioni relative agli attributi del nodo
value, Espressioni relative agli attributi del nodo

B

batch-limit, Opzioni disponibili nel cluster
Cluster Option, Opzioni disponibili nel cluster
boolean-op, Regole
Constraint Rule, Regole

C

call-id, Storico delle operazioni
Action Status, Storico delle operazioni
Changing Cluster Stack, Compatibilità delle versioni
Choosing Between Heartbeat and Corosync, Scegliere lo stack del cluster
cib-last-written, Campi gestiti dal cluster
Cluster Property, Campi gestiti dal cluster
CIB_encrypted, Connecting from a Remote Machine
CIB_passwd, Connecting from a Remote Machine
CIB_port, Connecting from a Remote Machine
CIB_server, Connecting from a Remote Machine
CIB_user, Connecting from a Remote Machine
class, Classi di risorse supportate, Resource Properties
Resource, Resource Properties
Clone
Option
clone-max, Clone Options
clone-node-max, Clone Options
globally-unique, Clone Options
interleave, Clone Options
notify, Clone Options
ordered, Clone Options
Property
id, Clone Properties
Clone Option, Clone Options
Clone Property, Clone Properties
Clone Resources, Clones - Resources That Get Active on Multiple Hosts
clone-max, Clone Options
Clone Option, Clone Options
clone-node-max, Clone Options
Clone Option, Clone Options
Clones, Clones - Resources That Get Active on Multiple Hosts, Clone Stickiness
Cluster, Versione della configurazione
Choosing Between Heartbeat and Corosync, Scegliere lo stack del cluster
Option
admin_epoch, Versione della configurazione
batch-limit, Opzioni disponibili nel cluster
cluster-delay, Opzioni disponibili nel cluster
Configuration Version, Versione della configurazione
epoch, Versione della configurazione
migration-limit, Opzioni disponibili nel cluster
no-quorum-policy, Opzioni disponibili nel cluster
num_updates, Versione della configurazione
pe-error-series-max, Opzioni disponibili nel cluster
pe-input-series-max, Opzioni disponibili nel cluster
pe-warn-series-max, Opzioni disponibili nel cluster
start-failure-is-fatal, Opzioni disponibili nel cluster
stonith-action, Opzioni disponibili nel cluster
stonith-enabled, Opzioni disponibili nel cluster
stop-orphan-actions, Opzioni disponibili nel cluster
stop-orphan-resources, Opzioni disponibili nel cluster
symmetric-cluster, Opzioni disponibili nel cluster
validate-with, Altri campi
Property
cib-last-written, Campi gestiti dal cluster
dc-uuid, Campi gestiti dal cluster
have-quorum, Campi gestiti dal cluster
Querying Options, Interrogare e valorizzare le opzioni del cluster
Remote administration, Connecting from a Remote Machine
Remote connection, Connecting from a Remote Machine
Setting Options, Interrogare e valorizzare le opzioni del cluster
Setting Options with Rules, Utilizzare le regole per controllare le opzioni del cluster
Switching between Stacks, Compatibilità delle versioni
Cluster Option, Versione della configurazione, Altri campi, Opzioni disponibili nel cluster, Interrogare e valorizzare le opzioni del cluster
Cluster Property, Campi gestiti dal cluster
Cluster Stack
Corosync, Scegliere lo stack del cluster
Heartbeat, Scegliere lo stack del cluster
Cluster Type
Asymmetrical Opt-In, Asymmetrical "Opt-In" Clusters
Symmetrical Opt-Out, Symmetrical "Opt-Out" Clusters
cluster-delay, Opzioni disponibili nel cluster
Cluster Option, Opzioni disponibili nel cluster
CMAN, Adding a New CMAN Node, Removing a CMAN Node
Add Cluster Node, Adding a New CMAN Node
Remove Cluster Node, Removing a CMAN Node
Colocation, Placing Resources Relative to other Resources
id, Opzioni
rsc, Opzioni
score, Opzioni
with-rsc, Opzioni
Colocation Constraints, Opzioni
Configuration, Configure STONITH, Aggiornare la configurazione
Upgrade manually, Aggiornamento manuale della configurazione
Upgrading, Preparazione
Validate XML, Aggiornamento manuale della configurazione
Verify, Aggiornare la configurazione
Configuration Version, Versione della configurazione
Cluster, Versione della configurazione
Constraint
Attribute Expression, Espressioni relative agli attributi del nodo
attribute, Espressioni relative agli attributi del nodo
operation, Espressioni relative agli attributi del nodo
type, Espressioni relative agli attributi del nodo
value, Espressioni relative agli attributi del nodo
Date Specification, Dichiarare date
hours, Dichiarare date
id, Dichiarare date
monthdays, Dichiarare date
months, Dichiarare date
moon, Dichiarare date
weekdays, Dichiarare date
weeks, Dichiarare date
weekyears, Dichiarare date
yeardays, Dichiarare date
years, Dichiarare date
Date/Time Expression, Espressioni basate su Ora/Data
end, Espressioni basate su Ora/Data
operation, Espressioni basate su Ora/Data
start, Espressioni basate su Ora/Data
Duration, Durate
Rule, Regole
boolean-op, Regole
role, Regole
score, Regole
score-attribute, Regole
Constraint Expression, Espressioni relative agli attributi del nodo, Espressioni basate su Ora/Data
Constraint Rule, Regole
Constraints, Vincoli delle risorse
Colocation, Placing Resources Relative to other Resources
id, Opzioni
rsc, Opzioni
score, Opzioni
with-rsc, Opzioni
Location, Decidere quale nodo può erogare una risorsa
id, Opzioni
node, Opzioni
rsc, Opzioni
score, Opzioni
Ordering, Specifying in which Order Resources Should Start/Stop
first, Specifying in which Order Resources Should Start/Stop
first-action, Multi-state Constraints
id, Specifying in which Order Resources Should Start/Stop
kind, Specifying in which Order Resources Should Start/Stop
rsc-role, Multi-state Constraints
then, Specifying in which Order Resources Should Start/Stop
then-action, Multi-state Constraints
with-rsc-role, Multi-state Constraints
Controlling Cluster Options, Utilizzare le regole per controllare le opzioni del cluster
Convert, Aggiornamento manuale della configurazione
Corosync, Adding a New Corosync Node, Removing a Corosync Node, Replacing a Corosync Node, Scegliere lo stack del cluster
Add Cluster Node, Adding a New Corosync Node
Remove Cluster Node, Removing a Corosync Node
Replace Cluster Node, Replacing a Corosync Node
crm-debug-origin, Stato dei nodi, Storico delle operazioni
Action Status, Storico delle operazioni
Node Status, Stato dei nodi
crmd, Stato dei nodi
Node Status, Stato dei nodi
crm_feature_set, Storico delle operazioni
Action Status, Storico delle operazioni
CRM_notify_desc, Configuring Notifications via External-Agent
CRM_notify_node, Configuring Notifications via External-Agent
CRM_notify_rc, Configuring Notifications via External-Agent
CRM_notify_recipient, Configuring Notifications via External-Agent
CRM_notify_rsc, Configuring Notifications via External-Agent
CRM_notify_target_rc, Configuring Notifications via External-Agent
CRM_notify_task, Configuring Notifications via External-Agent

E

enabled, Monitoraggio di anomalie sulle risorse
Action Property, Monitoraggio di anomalie sulle risorse
end, Espressioni basate su Ora/Data
Constraint Expression, Espressioni basate su Ora/Data
Environment Variable
CIB_encrypted, Connecting from a Remote Machine
CIB_passwd, Connecting from a Remote Machine
CIB_port, Connecting from a Remote Machine
CIB_server, Connecting from a Remote Machine
CIB_user, Connecting from a Remote Machine
CRM_notify_desc, Configuring Notifications via External-Agent
CRM_notify_node, Configuring Notifications via External-Agent
CRM_notify_rc, Configuring Notifications via External-Agent
CRM_notify_recipient, Configuring Notifications via External-Agent
CRM_notify_rsc, Configuring Notifications via External-Agent
CRM_notify_target_rc, Configuring Notifications via External-Agent
CRM_notify_task, Configuring Notifications via External-Agent
OCF_RESKEY_CRM_meta_notify_
active_resource, Clone Notifications, Multi-state Notifications
active_uname, Clone Notifications, Multi-state Notifications
demote_resource, Multi-state Notifications
demote_uname, Multi-state Notifications
inactive_resource, Clone Notifications, Multi-state Notifications
inactive_uname, Clone Notifications, Multi-state Notifications
master_resource, Multi-state Notifications
master_uname, Multi-state Notifications
operation, Clone Notifications, Multi-state Notifications
promote_resource, Multi-state Notifications
promote_uname, Multi-state Notifications
slave_resource, Multi-state Notifications
slave_uname, Multi-state Notifications
start_resource, Clone Notifications, Multi-state Notifications
start_uname, Clone Notifications, Multi-state Notifications
stop_resource, Clone Notifications, Multi-state Notifications
stop_uname, Clone Notifications, Multi-state Notifications
type, Clone Notifications, Multi-state Notifications
epoch, Versione della configurazione
Cluster Option, Versione della configurazione
error
fatal, How are OCF Return Codes Interpreted?
hard, How are OCF Return Codes Interpreted?
soft, How are OCF Return Codes Interpreted?
exec-time, Storico delle operazioni
Action Status, Storico delle operazioni
expected, Stato dei nodi
Node Status, Stato dei nodi

G

globally-unique, Clone Options
Clone Option, Clone Options
Group Property
id, Group Properties
Group Resource Property, Group Properties
Group Resources, Gruppi - Una scorciatoia sintattica
Groups, Gruppi - Una scorciatoia sintattica, Group Stickiness

J

join, Stato dei nodi
Node Status, Stato dei nodi

M

master-max, Multi-state Options
Multi-State Option, Multi-state Options
master-node-max, Multi-state Options
Multi-State Option, Multi-state Options
master_resource, Multi-state Notifications
Notification Environment Variable, Multi-state Notifications
master_uname, Multi-state Notifications
Notification Environment Variable, Multi-state Notifications
Messaging Layers , FAQ
meta-data, Azioni
OCF Action, Azioni
migration-limit, Opzioni disponibili nel cluster
Cluster Option, Opzioni disponibili nel cluster
migration-threshold, Opzioni delle risorse
Resource Option, Opzioni delle risorse
monitor, Azioni
OCF Action, Azioni
monthdays, Dichiarare date
Date Specification, Dichiarare date
months, Dichiarare date
Date Specification, Dichiarare date
moon, Dichiarare date
Date Specification, Dichiarare date
Moving, Spostare le risorse
Resources, Spostare le risorse
Multi-state, Multi-state - Risorse con modalità multipla
Multi-State, Multi-state Stickiness
Option
master-max, Multi-state Options
master-node-max, Multi-state Options
Property
id, Multi-state Properties
Multi-State Option, Multi-state Options
Multi-State Property, Multi-state Properties
Multi-state Resources, Multi-state - Risorse con modalità multipla
multiple-active, Opzioni delle risorse
Resource Option, Opzioni delle risorse
multiplier, Comunicare a Pacemaker di controllare la connettività
Ping Resource Option, Comunicare a Pacemaker di controllare la connettività

O

OCF, Open Cluster Framework
Action
demote, Azioni
meta-data, Azioni
monitor, Azioni
notify, Azioni
promote, Azioni
start, Azioni
stop, Azioni
validate-all, Azioni
error
fatal, How are OCF Return Codes Interpreted?
hard, How are OCF Return Codes Interpreted?
soft, How are OCF Return Codes Interpreted?
Resources, Open Cluster Framework
OCF Action, Azioni
OCF error, How are OCF Return Codes Interpreted?
OCF Resource Agents, Dove si trovano gli script personalizzati
ocf-tester, Azioni
OCF_ERR_ARGS, OCF Return Codes
OCF_ERR_CONFIGURED, OCF Return Codes
OCF_ERR_GENERIC, OCF Return Codes
OCF_ERR_INSTALLED, OCF Return Codes
OCF_ERR_PERM, OCF Return Codes
OCF_ERR_UNIMPLEMENTED, OCF Return Codes
OCF_FAILED_MASTER, Multi-state Resource Agent Requirements, OCF Return Codes
OCF_NOT_RUNNING, Multi-state Resource Agent Requirements, OCF Return Codes
OCF_RESKEY_CRM_meta_notify_
active_resource, Clone Notifications, Multi-state Notifications
active_uname, Clone Notifications, Multi-state Notifications
demote_resource, Multi-state Notifications
demote_uname, Multi-state Notifications
inactive_resource, Clone Notifications, Multi-state Notifications
inactive_uname, Clone Notifications, Multi-state Notifications
master_resource, Multi-state Notifications
master_uname, Multi-state Notifications
operation, Clone Notifications, Multi-state Notifications
promote_resource, Multi-state Notifications
promote_uname, Multi-state Notifications
slave_resource, Multi-state Notifications
slave_uname, Multi-state Notifications
start_resource, Clone Notifications, Multi-state Notifications
start_uname, Clone Notifications, Multi-state Notifications
stop_resource, Clone Notifications, Multi-state Notifications
stop_uname, Clone Notifications, Multi-state Notifications
type, Clone Notifications, Multi-state Notifications
OCF_RUNNING_MASTER, Multi-state Resource Agent Requirements, OCF Return Codes
OCF_SUCCESS, Multi-state Resource Agent Requirements, OCF Return Codes
on-fail, Monitoraggio di anomalie sulle risorse
Action Property, Monitoraggio di anomalie sulle risorse
op-digest, Storico delle operazioni
Action Status, Storico delle operazioni
op-status, Storico delle operazioni
Action Status, Storico delle operazioni
Open Cluster Framework
Resources, Open Cluster Framework
operation, Espressioni relative agli attributi del nodo, Espressioni basate su Ora/Data, Clone Notifications, Multi-state Notifications, Storico delle operazioni
Action Status, Storico delle operazioni
Constraint Expression, Espressioni relative agli attributi del nodo, Espressioni basate su Ora/Data
Notification Environment Variable, Clone Notifications, Multi-state Notifications
Operation History, Storico delle operazioni
Option
admin_epoch, Versione della configurazione
batch-limit, Opzioni disponibili nel cluster
clone-max, Clone Options
clone-node-max, Clone Options
cluster-delay, Opzioni disponibili nel cluster
Configuration Version, Versione della configurazione
dampen, Comunicare a Pacemaker di controllare la connettività
epoch, Versione della configurazione
failure-timeout, Opzioni delle risorse
globally-unique, Clone Options
host_list, Comunicare a Pacemaker di controllare la connettività
interleave, Clone Options
is-managed, Opzioni delle risorse
master-max, Multi-state Options
master-node-max, Multi-state Options
migration-limit, Opzioni disponibili nel cluster
migration-threshold, Opzioni delle risorse
multiple-active, Opzioni delle risorse
multiplier, Comunicare a Pacemaker di controllare la connettività
no-quorum-policy, Opzioni disponibili nel cluster
notify, Clone Options
num_updates, Versione della configurazione
ordered, Clone Options
pe-error-series-max, Opzioni disponibili nel cluster
pe-input-series-max, Opzioni disponibili nel cluster
pe-warn-series-max, Opzioni disponibili nel cluster
priority, Opzioni delle risorse
remote-clear-port, Connecting from a Remote Machine
remote-tls-port, Connecting from a Remote Machine
requires, Opzioni delle risorse
resource-stickiness, Opzioni delle risorse
start-failure-is-fatal, Opzioni disponibili nel cluster
stonith-action, Opzioni disponibili nel cluster
stonith-enabled, Opzioni disponibili nel cluster
stop-orphan-actions, Opzioni disponibili nel cluster
stop-orphan-resources, Opzioni disponibili nel cluster
symmetric-cluster, Opzioni disponibili nel cluster
target-role, Opzioni delle risorse
validate-with, Altri campi
ordered, Clone Options
Clone Option, Clone Options
Ordering, Specifying in which Order Resources Should Start/Stop
first, Specifying in which Order Resources Should Start/Stop
first-action, Multi-state Constraints
id, Specifying in which Order Resources Should Start/Stop
kind, Specifying in which Order Resources Should Start/Stop
rsc-role, Multi-state Constraints
then, Specifying in which Order Resources Should Start/Stop
then-action, Multi-state Constraints
with-rsc-role, Multi-state Constraints
Ordering Constraints, Specifying in which Order Resources Should Start/Stop, Multi-state Constraints
symmetrical, Specifying in which Order Resources Should Start/Stop
other, OCF Return Codes

P

Pacemaker
naming, FAQ
pe-error-series-max, Opzioni disponibili nel cluster
Cluster Option, Opzioni disponibili nel cluster
pe-input-series-max, Opzioni disponibili nel cluster
Cluster Option, Opzioni disponibili nel cluster
pe-warn-series-max, Opzioni disponibili nel cluster
Cluster Option, Opzioni disponibili nel cluster
Ping Resource
Option
dampen, Comunicare a Pacemaker di controllare la connettività
host_list, Comunicare a Pacemaker di controllare la connettività
multiplier, Comunicare a Pacemaker di controllare la connettività
Ping Resource Option, Comunicare a Pacemaker di controllare la connettività
priority, Opzioni delle risorse
Resource Option, Opzioni delle risorse
promote, Azioni
OCF Action, Azioni
promote_resource, Multi-state Notifications
Notification Environment Variable, Multi-state Notifications
promote_uname, Multi-state Notifications
Notification Environment Variable, Multi-state Notifications
Property
cib-last-written, Campi gestiti dal cluster
class, Resource Properties
dc-uuid, Campi gestiti dal cluster
enabled, Monitoraggio di anomalie sulle risorse
have-quorum, Campi gestiti dal cluster
id, Resource Properties, Monitoraggio di anomalie sulle risorse, Clone Properties, Multi-state Properties
interval, Monitoraggio di anomalie sulle risorse
name, Monitoraggio di anomalie sulle risorse
on-fail, Monitoraggio di anomalie sulle risorse
provider, Resource Properties
timeout, Monitoraggio di anomalie sulle risorse
type, Resource Properties
provider, Resource Properties
Resource, Resource Properties

R

rc-code, Storico delle operazioni
Action Status, Storico delle operazioni
Reattach, Compatibilità delle versioni
Reattach Upgrade, Compatibilità delle versioni
Remote administration, Connecting from a Remote Machine
Remote connection, Connecting from a Remote Machine
Remote Connection
Option
remote-clear-port, Connecting from a Remote Machine
remote-tls-port, Connecting from a Remote Machine
Remote Connection Option, Connecting from a Remote Machine
remote-clear-port, Connecting from a Remote Machine
Remote Connection Option, Connecting from a Remote Machine
remote-tls-port, Connecting from a Remote Machine
Remote Connection Option, Connecting from a Remote Machine
Remove Cluster Node, Removing a Corosync Node, Removing a CMAN Node, Removing a Heartbeat Node
CMAN, Removing a CMAN Node
Corosync, Removing a Corosync Node
Heartbeat, Removing a Heartbeat Node
Replace Cluster Node, Replacing a Corosync Node, Replacing a Heartbeat Node
Corosync, Replacing a Corosync Node
Heartbeat, Replacing a Heartbeat Node
requires, Opzioni delle risorse
Resource, Cos'è una risorsa del cluster, Resource Properties
Action, Operazioni sulle risorse
class, Classi di risorse supportate
Constraint
Attribute Expression, Espressioni relative agli attributi del nodo
Date Specification, Dichiarare date
Date/Time Expression, Espressioni basate su Ora/Data
Duration, Durate
Rule, Regole
Constraints, Vincoli delle risorse
Colocation, Placing Resources Relative to other Resources
Location, Decidere quale nodo può erogare una risorsa
Ordering, Specifying in which Order Resources Should Start/Stop
Group Property
id, Group Properties
Heartbeat, Classi di risorse supportate
Location
Determine by Rules, Utilizzare regole per determinare il posizionamento delle risorse
Location Relative to other Resources, Placing Resources Relative to other Resources
LSB, Linux Standard Base
Moving, Spostare le risorse
Notification, Receiving Notification for Cluster Events
SMTP, Configuring Email Notifications
SNMP, Configuring SNMP Notifications
OCF, Open Cluster Framework
Option
failure-timeout, Opzioni delle risorse
is-managed, Opzioni delle risorse
migration-threshold, Opzioni delle risorse
multiple-active, Opzioni delle risorse
priority, Opzioni delle risorse
requires, Opzioni delle risorse
resource-stickiness, Opzioni delle risorse
target-role, Opzioni delle risorse
Property
class, Resource Properties
id, Resource Properties
provider, Resource Properties
type, Resource Properties
Start Order, Specifying in which Order Resources Should Start/Stop
STONITH, STONITH
System Services, System Services
Systemd, Systemd
Upstart, Upstart
Resource Option, Opzioni delle risorse
resource-stickiness, Opzioni delle risorse
Clones, Clone Stickiness
Groups, Group Stickiness
Multi-State, Multi-state Stickiness
Resource Option, Opzioni delle risorse
Resources, Classi di risorse supportate, Open Cluster Framework, Linux Standard Base, Systemd, Upstart, System Services, STONITH, Spostare le risorse
Clones, Clones - Resources That Get Active on Multiple Hosts
Groups, Gruppi - Una scorciatoia sintattica
Multi-state, Multi-state - Risorse con modalità multipla
Return Code
0
OCF_SUCCESS, OCF Return Codes
1
OCF_ERR_GENERIC, OCF Return Codes
2
OCF_ERR_ARGS, OCF Return Codes
3
OCF_ERR_UNIMPLEMENTED, OCF Return Codes
4
OCF_ERR_PERM, OCF Return Codes
5
OCF_ERR_INSTALLED, OCF Return Codes
6
OCF_ERR_CONFIGURED, OCF Return Codes
7
OCF_NOT_RUNNING, OCF Return Codes
8
OCF_RUNNING_MASTER, OCF Return Codes
9
OCF_FAILED_MASTER, OCF Return Codes
OCF_ERR_ARGS, OCF Return Codes
OCF_ERR_CONFIGURED, OCF Return Codes
OCF_ERR_GENERIC, OCF Return Codes
OCF_ERR_INSTALLED, OCF Return Codes
OCF_ERR_PERM, OCF Return Codes
OCF_ERR_UNIMPLEMENTED, OCF Return Codes
OCF_FAILED_MASTER, Multi-state Resource Agent Requirements, OCF Return Codes
OCF_NOT_RUNNING, Multi-state Resource Agent Requirements, OCF Return Codes
OCF_RUNNING_MASTER, Multi-state Resource Agent Requirements, OCF Return Codes
OCF_SUCCESS, Multi-state Resource Agent Requirements, OCF Return Codes
other, OCF Return Codes
role, Regole
Constraint Rule, Regole
Rolling, Compatibilità delle versioni
Rolling Upgrade, Compatibilità delle versioni
rsc, Opzioni, Opzioni
Colocation Constraints, Opzioni
Location Constraints, Opzioni
rsc-role, Multi-state Constraints
Ordering Constraints, Multi-state Constraints
Rule, Regole
boolean-op, Regole
Controlling Cluster Options, Utilizzare le regole per controllare le opzioni del cluster
Determine Resource Location, Utilizzare regole per determinare il posizionamento delle risorse
role, Regole
score, Regole
score-attribute, Regole

S

score, Opzioni, Opzioni, Regole
Colocation Constraints, Opzioni
Constraint Rule, Regole
Location Constraints, Opzioni
score-attribute, Regole
Constraint Rule, Regole
Setting
Cluster Option, Interrogare e valorizzare le opzioni del cluster
Setting Options, Interrogare e valorizzare le opzioni del cluster
Setting Options with Rules, Utilizzare le regole per controllare le opzioni del cluster
Shutdown, Compatibilità delle versioni
Shutdown Upgrade, Compatibilità delle versioni
slave_resource, Multi-state Notifications
Notification Environment Variable, Multi-state Notifications
slave_uname, Multi-state Notifications
Notification Environment Variable, Multi-state Notifications
SMTP, Configuring Email Notifications
SNMP, Configuring SNMP Notifications
soft, How are OCF Return Codes Interpreted?
OCF error, How are OCF Return Codes Interpreted?
start, Espressioni basate su Ora/Data, Azioni
Constraint Expression, Espressioni basate su Ora/Data
OCF Action, Azioni
Start Order, Specifying in which Order Resources Should Start/Stop
start-failure-is-fatal, Opzioni disponibili nel cluster
Cluster Option, Opzioni disponibili nel cluster
start_resource, Clone Notifications, Multi-state Notifications
Notification Environment Variable, Clone Notifications, Multi-state Notifications
start_uname, Clone Notifications, Multi-state Notifications
Notification Environment Variable, Clone Notifications, Multi-state Notifications
Status, Stato dei nodi
call-id, Storico delle operazioni
crm-debug-origin, Stato dei nodi, Storico delle operazioni
crmd, Stato dei nodi
crm_feature_set, Storico delle operazioni
exec-time, Storico delle operazioni
expected, Stato dei nodi
ha, Stato dei nodi
id, Stato dei nodi, Storico delle operazioni
interval, Storico delle operazioni
in_ccm, Stato dei nodi
join, Stato dei nodi
last-rc-change, Storico delle operazioni
last-run, Storico delle operazioni
op-digest, Storico delle operazioni
op-status, Storico delle operazioni
operation, Storico delle operazioni
queue-time, Storico delle operazioni
rc-code, Storico delle operazioni
transition-key, Storico delle operazioni
transition-magic, Storico delle operazioni
uname, Stato dei nodi
Status of a Node, Stato dei nodi
STONITH, STONITH
Configuration, Configure STONITH
Resources, STONITH
stonith-action, Opzioni disponibili nel cluster
Cluster Option, Opzioni disponibili nel cluster
stonith-enabled, Opzioni disponibili nel cluster
Cluster Option, Opzioni disponibili nel cluster
stop, Azioni
OCF Action, Azioni
stop-orphan-actions, Opzioni disponibili nel cluster
Cluster Option, Opzioni disponibili nel cluster
stop-orphan-resources, Opzioni disponibili nel cluster
Cluster Option, Opzioni disponibili nel cluster
stop_resource, Clone Notifications, Multi-state Notifications
Notification Environment Variable, Clone Notifications, Multi-state Notifications
stop_uname, Clone Notifications, Multi-state Notifications
Notification Environment Variable, Clone Notifications, Multi-state Notifications
Switching between Stacks, Compatibilità delle versioni
symmetric-cluster, Opzioni disponibili nel cluster
Cluster Option, Opzioni disponibili nel cluster
symmetrical, Specifying in which Order Resources Should Start/Stop
Ordering Constraints, Specifying in which Order Resources Should Start/Stop
Symmetrical Opt-Out, Symmetrical "Opt-Out" Clusters
Symmetrical Opt-Out Clusters, Symmetrical "Opt-Out" Clusters
System Service
Resources, System Services
System Services, System Services
Systemd, Systemd
Resources, Systemd

U

uname, Stato dei nodi
Node Status, Stato dei nodi
Upgrade
Reattach, Compatibilità delle versioni
Rolling, Compatibilità delle versioni
Shutdown, Compatibilità delle versioni
Upgrade manually, Aggiornamento manuale della configurazione
Upgrading, Preparazione
Upgrading the Configuration, Preparazione
Upstart, Upstart
Resources, Upstart

W

weekdays, Dichiarare date
Date Specification, Dichiarare date
weeks, Dichiarare date
Date Specification, Dichiarare date
weekyears, Dichiarare date
Date Specification, Dichiarare date
with-rsc, Opzioni
Colocation Constraints, Opzioni
with-rsc-role, Multi-state Constraints
Ordering Constraints, Multi-state Constraints

Y

yeardays, Dichiarare date
Date Specification, Dichiarare date
years, Dichiarare date
Date Specification, Dichiarare date