Pacemaker Remote
Scaling High Availablity Clusters
Abstract
This document exists as both a reference and deployment guide for the Pacemaker Remote service.
The example commands in this document will use:
- AlmaLinux 9 as the host operating system
- Pacemaker Remote to perform resource management within guest nodes and remote nodes
- KVM for virtualization
- libvirt to manage guest nodes
- Corosync to provide messaging and membership services on cluster nodes
- Pacemaker 2 to perform resource management on cluster nodes
- pcs as the cluster configuration toolset
The concepts are the same for other distributions, virtualization platforms, toolsets, and messaging layers, and should be easily adaptable.
Table of Contents
1. Scaling a Pacemaker Cluster
1.1. Overview
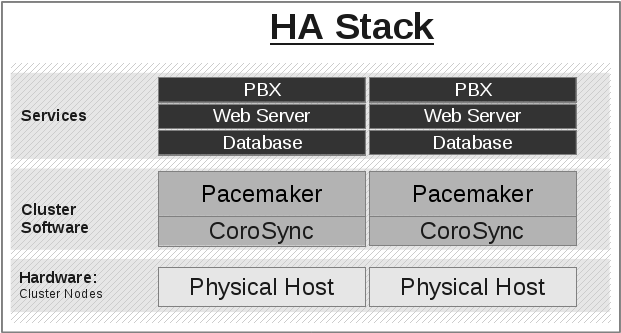
In a basic Pacemaker high-availability cluster [1] each node runs the full cluster stack of Corosync and all Pacemaker components. This allows great flexibility but limits scalability to around 32 nodes.
To allow for scalability to dozens or even hundreds of nodes, Pacemaker allows nodes not running the full cluster stack to integrate into the cluster and have the cluster manage their resources as if they were a cluster node.
1.2. Terms
- cluster node
- A node running the full high-availability stack of corosync and all
Pacemaker components. Cluster nodes may run cluster resources, run
all Pacemaker command-line tools (
crm_mon,crm_resourceand so on), execute fencing actions, count toward cluster quorum, and serve as the cluster’s Designated Controller (DC).
- pacemaker-remoted
- A small service daemon that allows a host to be used as a Pacemaker node
without running the full cluster stack. Nodes running
pacemaker-remotedmay run cluster resources and most command-line tools, but cannot perform other functions of full cluster nodes such as fencing execution, quorum voting, or DC eligibility. Thepacemaker-remoteddaemon is an enhanced version of Pacemaker’s local executor daemon (pacemaker-execd).
- pacemaker_remote
- The name of the systemd service that manages
pacemaker-remoted - Pacemaker Remote
- A way to refer to the general technology implementing nodes running
pacemaker-remoted, including the cluster-side implementation and the communication protocol between them. - remote node
- A physical host running
pacemaker-remoted. Remote nodes have a special resource that manages communication with the cluster. This is sometimes referred to as the bare metal case.
- guest node
- A virtual host running
pacemaker-remoted. Guest nodes differ from remote nodes mainly in that the guest node is itself a resource that the cluster manages.
Note
Remote in this document refers to the node not being a part of the underlying corosync cluster. It has nothing to do with physical proximity. Remote nodes and guest nodes are subject to the same latency requirements as cluster nodes, which means they are typically in the same data center.
Note
It is important to distinguish the various roles a virtual machine can serve in Pacemaker clusters:
- A virtual machine can run the full cluster stack, in which case it is a cluster node and is not itself managed by the cluster.
- A virtual machine can be managed by the cluster as a resource, without the cluster having any awareness of the services running inside the virtual machine. The virtual machine is opaque to the cluster.
- A virtual machine can be a cluster resource, and run
pacemaker-remotedto make it a guest node, allowing the cluster to manage services inside it. The virtual machine is transparent to the cluster.
1.3. Guest Nodes
“I want a Pacemaker cluster to manage virtual machine resources, but I also want Pacemaker to be able to manage the resources that live within those virtual machines.”
Without pacemaker-remoted, the possibilities for implementing the above use
case have significant limitations:
- The cluster stack could be run on the physical hosts only, which loses the ability to monitor resources within the guests.
- A separate cluster could be on the virtual guests, which quickly hits scalability issues.
- The cluster stack could be run on the guests using the same cluster as the physical hosts, which also hits scalability issues and complicates fencing.
With pacemaker-remoted:
- The physical hosts are cluster nodes (running the full cluster stack).
- The virtual machines are guest nodes (running
pacemaker-remoted). Nearly zero configuration is required on the virtual machine. - The cluster stack on the cluster nodes launches the virtual machines and
immediately connects to
pacemaker-remotedon them, allowing the virtual machines to integrate into the cluster.
The key difference here between the guest nodes and the cluster nodes is that the guest nodes do not run the cluster stack. This means they will never become the DC, initiate fencing actions or participate in quorum voting.
On the other hand, this also means that they are not bound to the scalability limits associated with the cluster stack (no 32-node corosync member limits to deal with). That isn’t to say that guest nodes can scale indefinitely, but it is known that guest nodes scale horizontally much further than cluster nodes.
Other than the quorum limitation, these guest nodes behave just like cluster
nodes with respect to resource management. The cluster is fully capable of
managing and monitoring resources on each guest node. You can build constraints
against guest nodes, put them in standby, or do whatever else you’d expect to
be able to do with cluster nodes. They even show up in crm_mon output as
nodes.
To solidify the concept, below is an example that is very similar to an actual deployment that we tested in a developer environment to verify guest node scalability:
- 16 cluster nodes running the full Corosync + Pacemaker stack
- 64 Pacemaker-managed virtual machine resources running
pacemaker-remotedconfigured as guest nodes - 64 Pacemaker-managed webserver and database resources configured to run on the 64 guest nodes
With this deployment, you would have 64 webservers and databases running on 64
virtual machines on 16 hardware nodes, all of which are managed and monitored by
the same Pacemaker deployment. It is known that pacemaker-remoted can scale
to these lengths and possibly much further depending on the specific scenario.
1.4. Remote Nodes
“I want my traditional high-availability cluster to scale beyond the limits imposed by the corosync messaging layer.”
Ultimately, the primary advantage of remote nodes over cluster nodes is scalability. There are likely some other use cases related to geographically distributed HA clusters that remote nodes may serve a purpose in, but those use cases are not well understood at this point.
Like guest nodes, remote nodes will never become the DC, initiate fencing actions or participate in quorum voting.
That is not to say, however, that fencing of a remote node works any differently than that of a cluster node. The Pacemaker scheduler understands how to fence remote nodes. As long as a fencing device exists, the cluster is capable of ensuring remote nodes are fenced in the exact same way as cluster nodes.
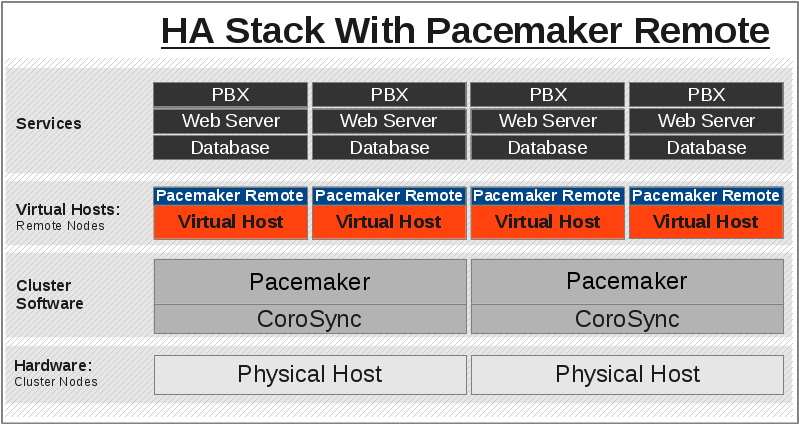
1.5. Expanding the Cluster Stack
With pacemaker-remoted, the traditional view of the high-availability stack
can be expanded to include a new layer:
1.5.1. Traditional HA Stack
1.5.2. HA Stack With Guest Nodes
| [1] | See the https://www.clusterlabs.org/doc/ Pacemaker documentation, especially Clusters From Scratch and Pacemaker Explained. |
2. Configuration Explained
The walk-through examples use some of these options, but don’t explain exactly what they mean or do. This section is meant to be the go-to resource for all the options available for configuring Pacemaker Remote.
2.1. Resource Meta-Attributes for Guest Nodes
When configuring a virtual machine as a guest node, the virtual machine is created using one of the usual resource agents for that purpose (for example, ocf:heartbeat:VirtualDomain or ocf:heartbeat:Xen), with additional meta-attributes.
No restrictions are enforced on what agents may be used to create a guest node, but obviously the agent must create a distinct environment capable of running the pacemaker_remote daemon and cluster resources. An additional requirement is that fencing the host running the guest node resource must be sufficient for ensuring the guest node is stopped. This means, for example, that not all hypervisors supported by VirtualDomain may be used to create guest nodes; if the guest can survive the hypervisor being fenced, it may not be used as a guest node.
Below are the meta-attributes available to enable a resource as a guest node and define its connection parameters.
| Option | Default | Description |
|---|---|---|
| remote-node | none | The node name of the guest node this resource defines. This both enables the resource as a guest node and defines the unique name used to identify the guest node. If no other parameters are set, this value will also be assumed as the hostname to use when connecting to pacemaker_remote on the VM. This value must not overlap with any resource or node IDs. |
| remote-port | 3121 | The port on the virtual machine that the cluster will use to connect to pacemaker_remote. |
| remote-addr | ‘value of’
remote-node |
The IP address or hostname to use when connecting to pacemaker_remote on the VM. |
| remote-connect-timeout | 60s | How long before a pending guest connection will time out. |
2.2. Connection Resources for Remote Nodes
A remote node is defined by a connection resource. That connection resource has instance attributes that define where the remote node is located on the network and how to communicate with it.
Descriptions of these instance attributes can be retrieved using the following
pcs command:
[root@pcmk-1 ~]# pcs resource describe remote
Assumed agent name 'ocf:pacemaker:remote' (deduced from 'remote')
ocf:pacemaker:remote - Pacemaker Remote connection

Resource options:
  server (unique group: address): Server location to connect to (IP address
                                  or resolvable host name)
  port (unique group: address): TCP port at which to contact Pacemaker
                                Remote executor
  reconnect_interval: If this is a positive time interval, the cluster will
                      attempt to reconnect to a remote node after an active
                      connection has been lost at this interval. Otherwise,
                      the cluster will attempt to reconnect immediately
                      (after any fencing needed).
When defining a remote node’s connection resource, it is common and recommended
to name the connection resource the same as the remote node’s hostname. By
default, if no server option is provided, the cluster will attempt to contact
the remote node using the resource name as the hostname.
2.3. Environment Variables for Daemon Start-up
Authentication and encryption of the connection between cluster nodes
and nodes running pacemaker_remote is achieved using
with TLS-PSK encryption/authentication
over TCP (port 3121 by default). This means that both the cluster node and
remote node must share the same private key. By default, this
key is placed at /etc/pacemaker/authkey on each node.
You can change the default port and/or key location for Pacemaker and
pacemaker_remoted via environment variables. How these variables are set
varies by OS, but usually they are set in the /etc/sysconfig/pacemaker or
/etc/default/pacemaker file.
#==#==# Pacemaker Remote
# Use the contents of this file as the authorization key to use with Pacemaker
# Remote connections. This file must be readable by Pacemaker daemons (that is,
# it must allow read permissions to either the hacluster user or the haclient
# group), and its contents must be identical on all nodes. The default is
# "/etc/pacemaker/authkey".
# PCMK_authkey_location=/etc/pacemaker/authkey

# If the Pacemaker Remote service is run on the local node, it will listen
# for connections on this address. The value may be a resolvable hostname or an
# IPv4 or IPv6 numeric address. When resolving names or using the default
# wildcard address (i.e. listen on all available addresses), IPv6 will be
# preferred if available. When listening on an IPv6 address, IPv4 clients will
# be supported (via IPv4-mapped IPv6 addresses).
# PCMK_remote_address="192.0.2.1"

# Use this TCP port number when connecting to a Pacemaker Remote node. This
# value must be the same on all nodes. The default is "3121".
# PCMK_remote_port=3121

# Use these GnuTLS cipher priorities for TLS connections. See:
#
#   https://gnutls.org/manual/html_node/Priority-Strings.html
#
# Pacemaker will append ":+ANON-DH" for remote CIB access (when enabled) and
# ":+DHE-PSK:+PSK" for Pacemaker Remote connections, as they are required for
# the respective functionality.
# PCMK_tls_priorities="NORMAL"

# Set bounds on the bit length of the prime number generated for Diffie-Hellman
# parameters needed by TLS connections. The default is not to set any bounds.
#
# If these values are specified, the server (Pacemaker Remote daemon, or CIB
# manager configured to accept remote clients) will use these values to provide
# a floor and/or ceiling for the value recommended by the GnuTLS library. The
# library will only accept a limited number of specific values, which vary by
# library version, so setting these is recommended only when required for
# compatibility with specific client versions.
#
# If PCMK_dh_min_bits is specified, the client (connecting cluster node or
# remote CIB command) will require that the server use a prime of at least this
# size. This is only recommended when the value must be lowered in order for
# the client's GnuTLS library to accept a connection to an older server.
# The client side does not use PCMK_dh_max_bits.
#
# PCMK_dh_min_bits=1024
# PCMK_dh_max_bits=2048
2.4. Removing Remote Nodes and Guest Nodes
If the resource creating a guest node, or the ocf:pacemaker:remote resource creating a connection to a remote node, is removed from the configuration, the affected node will continue to show up in output as an offline node.
If you want to get rid of that output, run (replacing $NODE_NAME
appropriately):
# crm_node --force --remove $NODE_NAME
Warning
Be absolutely sure that there are no references to the node’s resource in the configuration before running the above command.
3. Guest Node Walk-through
What this tutorial is: An in-depth walk-through of how to get Pacemaker to manage a KVM guest instance and integrate that guest into the cluster as a guest node.
What this tutorial is not: A realistic deployment scenario. The steps shown here are meant to get users familiar with the concept of guest nodes as quickly as possible.
3.1. Configure Cluster Nodes
This walk-through assumes you already have a Pacemaker cluster configured. For examples, we will use a cluster with two cluster nodes named pcmk-1 and pcmk-2. You can substitute whatever your node names are, for however many nodes you have. If you are not familiar with setting up basic Pacemaker clusters, follow the walk-through in the Clusters From Scratch document before attempting this one.
3.1.1. Install Virtualization Software
On each node within your cluster, install virt-install, libvirt, and qemu-kvm.
Start and enable virtnetworkd.
# dnf install -y virt-install libvirt qemu-kvm
# systemctl start virtnetworkd
# systemctl enable virtnetworkd
Reboot the host.
Note
While KVM is used in this example, any virtualization platform with a Pacemaker resource agent can be used to create a guest node. The resource agent needs only to support usual commands (start, stop, etc.); Pacemaker implements the remote-node meta-attribute, independent of the agent.
3.2. Configure the KVM guest
3.2.1. Create Guest
Create a KVM guest to use as a guest node. Be sure to configure the guest with a hostname and a static IP address (as an example here, we will use guest1 and 192.168.122.10). Here’s an example way to create a guest:
Download an .iso file from the AlmaLinux 9 mirrors list into a directory on your cluster node.
Run the following command, using your own path for the location flag:
[root@pcmk-1 ~]# virt-install \
  --name vm-guest1 \
  --memory 1536 \
  --disk path=/var/lib/libvirt/images/vm-guest1.qcow2,size=4 \
  --vcpus 2 \
  --os-variant almalinux9 \
  --network bridge=virbr0 \
  --graphics none \
  --console pty,target_type=serial \
  --location /tmp/AlmaLinux-9-latest-x86_64-dvd.iso \
  --extra-args 'console=ttyS0,115200n8'
Note
See the Clusters from Scratch document for more details about installing AlmaLinux 9. The above command will perform a text-based installation by default, but feel free to do a graphical installation, which exposes more options.
3.2.2. Configure Firewall on Guest
On each guest, allow cluster-related services through the local firewall. If
you’re using firewalld, run the following commands.
[root@guest1 ~]# firewall-cmd --permanent --add-service=high-availability
success
[root@guest1 ~]# firewall-cmd --reload
success
Note
If you are using some other firewall solution besides firewalld, simply open the following ports, which can be used by various clustering components: TCP ports 2224, 3121, and 21064.
If you run into any problems during testing, you might want to disable the firewall and SELinux entirely until you have everything working. This may create significant security issues and should not be performed on machines that will be exposed to the outside world, but may be appropriate during development and testing on a protected host.
To disable security measures:
[root@guest1 ~]# setenforce 0
[root@guest1 ~]# sed -i.bak "s/SELINUX=enforcing/SELINUX=permissive/g" \
    /etc/selinux/config
[root@guest1 ~]# systemctl mask firewalld.service
[root@guest1 ~]# systemctl stop firewalld.service
3.2.3. Configure /etc/hosts
You will need to add the remote node’s hostname (we’re using guest1 in
this tutorial) to the cluster nodes’ /etc/hosts files if you haven’t already.
This is required unless you have DNS set up in a way where guest1’s address can be
discovered.
For each guest, execute the following on each cluster node and on the guests, replacing the IP address with the actual IP address of the guest node.
# cat << END >> /etc/hosts
192.168.122.10  guest1
END
Also add entries for each cluster node to the /etc/hosts file on each guest.
For example:
# cat << END >> /etc/hosts
192.168.122.101  pcmk-1
192.168.122.102  pcmk-2
END
3.2.4. Verify Connectivity
At this point, you should be able to ping and ssh into guests from hosts, and vice versa.
Depending on your installation method, you may have to perform an additional
step to make SSH work. The simplest approach is to open the
/etc/ssh/sshd_config file and set PermitRootLogin yes. Then to make the
change take effect, run the following command.
[root@guest1 ~]# systemctl restart sshd
3.2.5. Configure pacemaker_remote on Guest Node
Install the pacemaker_remote daemon on the guest node. We’ll also install the
pacemaker package. It isn’t required for a guest node to run, but it
provides the crm_attribute tool, which many resource agents use.
[root@guest1 ~]# dnf config-manager --set-enabled highavailability
[root@guest1 ~]# dnf install -y pacemaker-remote resource-agents pcs \
    pacemaker
3.3. Integrate Guest into Cluster
Now the fun part, integrating the virtual machine you’ve just created into the cluster. It is incredibly simple.
3.3.1. Start the Cluster
On the host, start Pacemaker if it’s not already running.
# pcs cluster start
3.3.2. Create a VirtualDomain Resource for the Guest VM
For this simple walk-through, we have created the VM and made its disk
available only on node pcmk-1, so that’s the only node where the VM is
capable of running. In a more realistic scenario, you’ll probably want to have
multiple nodes that are capable of running the VM.
Next we’ll assign an attribute to node 1 that denotes its eligibility to host
vm-guest1. If other nodes are capable of hosting your guest VM, then add the
attribute to each of those nodes as well.
[root@pcmk-1 ~]# pcs node attribute pcmk-1 can-host-vm-guest1=1
Then we’ll create a VirtualDomain resource so that Pacemaker can manage
vm-guest1. Be sure to replace the XML file path below with your own if it
differs. We’ll also create a rule to prevent Pacemaker from trying to start the
resource or probe its status on any node that isn’t capable of running the VM.
We’ll save the CIB to a file, make both of these edits, and push them
simultaneously.
[root@pcmk-1 ~]# pcs cluster cib vm_cfg
[root@pcmk-1 ~]# pcs -f vm_cfg resource create vm-guest1 VirtualDomain \
    hypervisor="qemu:///system" config="/etc/libvirt/qemu/vm-guest1.xml"
Assumed agent name 'ocf:heartbeat:VirtualDomain' (deduced from 'VirtualDomain')
[root@pcmk-1 ~]# pcs -f vm_cfg constraint location vm-guest1 rule \
    resource-discovery=never score=-INFINITY can-host-vm-guest1 ne 1
[root@pcmk-1 ~]# pcs cluster cib-push --config vm_cfg --wait
Note
If all nodes in your cluster are capable of hosting the VM that you’ve
created, then you can skip the pcs node attribute and pcs constraint
location commands.
Note
The ID of the resource managing the virtual machine (vm-guest1 in the
above example) must be different from the virtual machine’s node name
(guest1 in the above example). Pacemaker will create an implicit
internal resource for the Pacemaker Remote connection to the guest. This
implicit resource will be named with the value of the VirtualDomain
resource’s remote-node meta attribute, which will be set by pcs to
the guest node’s node name. Therefore, that value cannot be used as the name
of any other resource.
Now we can confirm that the VirtualDomain resource is running on pcmk-1.
[root@pcmk-1 ~]# pcs resource status
  * vm-guest1       (ocf:heartbeat:VirtualDomain):   Started pcmk-1
3.3.3. Prepare pcsd
Now we need to prepare pcsd on the guest so that we can use pcs commands
to communicate with it.
Start and enable the pcsd daemon on the guest.
[root@guest1 ~]# systemctl start pcsd
[root@guest1 ~]# systemctl enable pcsd
Created symlink /etc/systemd/system/multi-user.target.wants/pcsd.service → /usr/lib/systemd/system/pcsd.service.
Next, set a password for the hacluster user on the guest.
[root@guest1 ~]# echo MyPassword | passwd --stdin hacluster
Changing password for user hacluster.
passwd: all authentication tokens updated successfully.
Now authenticate the existing cluster nodes to pcsd on the guest. The below
command only needs to be run from one cluster node.
[root@pcmk-1 ~]# pcs host auth guest1 -u hacluster
Password:
guest1: Authorized
3.3.4. Integrate Guest Node into Cluster
We’re finally ready to integrate the VM into the cluster as a guest node. Run
the following command, which will create a guest node from the VirtualDomain
resource and take care of all the remaining steps. Note that the format is pcs
cluster node add-guest <guest_name> <vm_resource_name>.
[root@pcmk-1 ~]# pcs cluster node add-guest guest1 vm-guest1
No addresses specified for host 'guest1', using 'guest1'
Sending 'pacemaker authkey' to 'guest1'
guest1: successful distribution of the file 'pacemaker authkey'
Requesting 'pacemaker_remote enable', 'pacemaker_remote start' on 'guest1'
guest1: successful run of 'pacemaker_remote enable'
guest1: successful run of 'pacemaker_remote start'
You should soon see guest1 appear in the pcs status output as a node.
The output should look something like this:
[root@pcmk-1 ~]# pcs status
Cluster name: mycluster
Cluster Summary:
  * Stack: corosync
  * Current DC: pcmk-1 (version 2.1.2-4.el9-ada5c3b36e2) - partition with quorum
  * Last updated: Wed Aug 10 00:08:58 2022
  * Last change:  Wed Aug 10 00:02:37 2022 by root via cibadmin on pcmk-1
  * 3 nodes configured
  * 3 resource instances configured

Node List:
  * Online: [ pcmk-1 pcmk-2 ]
  * GuestOnline: [ guest1@pcmk-1 ]

Full List of Resources:
  * xvm     (stonith:fence_xvm):     Started pcmk-1
  * vm-guest1       (ocf:heartbeat:VirtualDomain):   Started pcmk-1

Daemon Status:
  corosync: active/disabled
  pacemaker: active/disabled
  pcsd: active/enabled
The resulting configuration should look something like the following:
[root@pcmk-1 ~]# pcs resource config
 Resource: vm-guest1 (class=ocf provider=heartbeat type=VirtualDomain)
  Attributes: config=/etc/libvirt/qemu/vm-guest1.xml hypervisor=qemu:///system
  Meta Attrs: remote-addr=guest1 remote-node=guest1
  Operations: migrate_from interval=0s timeout=60s (vm-guest1-migrate_from-interval-0s)
              migrate_to interval=0s timeout=120s (vm-guest1-migrate_to-interval-0s)
              monitor interval=10s timeout=30s (vm-guest1-monitor-interval-10s)
              start interval=0s timeout=90s (vm-guest1-start-interval-0s)
              stop interval=0s timeout=90s (vm-guest1-stop-interval-0s)
3.3.5. How pcs Configures the Guest
Let’s take a closer look at what the pcs cluster node add-guest command is
doing. There is no need to run any of the commands in this section.
First, pcs copies the Pacemaker authkey file to the VM that will become the
guest. If an authkey is not already present on the cluster nodes, this command
creates one and distributes it to the existing nodes and to the guest.
If you want to do this manually, you can run a command like the following to
generate an authkey in /etc/pacemaker/authkey, and then distribute the key
to the rest of the nodes and to the new guest.
[root@pcmk-1 ~]# dd if=/dev/urandom of=/etc/pacemaker/authkey bs=4096 count=1
Then pcs starts and enables the pacemaker_remote service on the guest.
If you want to do this manually, run the following commands.
[root@guest1 ~]# systemctl start pacemaker_remote
[root@guest1 ~]# systemctl enable pacemaker_remote
Finally, pcs creates a guest node from the VirtualDomain resource by
adding remote-addr and remote-node meta attributes to the resource. If
you want to do this manually, you can run the following command if you’re using
pcs. Alternativately, run an equivalent command if you’re using another
cluster shell, or edit the CIB manually.
[root@pcmk-1 ~]# pcs resource update vm-guest1 meta remote-addr='guest1' \
    remote-node='guest1' --force
3.4. Starting Resources on KVM Guest
The following example demonstrates that resources can be run on the guest node in the exact same way as on the cluster nodes.
Create a few Dummy resources. A Dummy resource is a real resource that
actually executes operations on its assigned node. However, these operations are
trivial (creating, deleting, or checking the existence of an empty or small
file), so Dummy resources are ideal for testing purposes. Dummy
resources use the ocf:heartbeat:Dummy or ocf:pacemaker:Dummy resource
agent.
# for i in {1..5}; do pcs resource create FAKE${i} ocf:heartbeat:Dummy; done
Now run pcs resource status. You should see something like the following,
where some of the resources are started on the cluster nodes, and some are
started on the guest node.
[root@pcmk-1 ~]# pcs resource status
  * vm-guest1       (ocf:heartbeat:VirtualDomain):   Started pcmk-1
  * FAKE1   (ocf:heartbeat:Dummy):   Started guest1
  * FAKE2   (ocf:heartbeat:Dummy):   Started pcmk-2
  * FAKE3   (ocf:heartbeat:Dummy):   Started guest1
  * FAKE4   (ocf:heartbeat:Dummy):   Started pcmk-2
  * FAKE5   (ocf:heartbeat:Dummy):   Started guest1
The guest node, guest1, behaves just like any other node in the cluster with
respect to resources. For example, choose a resource that is running on one of
your cluster nodes. We’ll choose FAKE2 from the output above. It’s currently
running on pcmk-2. We can force FAKE2 to run on guest1 in the exact
same way as we could force it to run on any particular cluster node. We do this
by creating a location constraint:
# pcs constraint location FAKE2 prefers guest1
Now the pcs resource status output shows that FAKE2 is on guest1.
[root@pcmk-1 ~]# pcs resource status
  * vm-guest1       (ocf:heartbeat:VirtualDomain):   Started pcmk-1
  * FAKE1   (ocf:heartbeat:Dummy):   Started guest1
  * FAKE2   (ocf:heartbeat:Dummy):   Started guest1
  * FAKE3   (ocf:heartbeat:Dummy):   Started guest1
  * FAKE4   (ocf:heartbeat:Dummy):   Started pcmk-2
  * FAKE5   (ocf:heartbeat:Dummy):   Started guest1
3.5. Testing Recovery and Fencing
Pacemaker’s scheduler is smart enough to know fencing guest nodes associated with a virtual machine means shutting off/rebooting the virtual machine. No special configuration is necessary to make this happen. If you are interested in testing this functionality out, trying stopping the guest’s pacemaker_remote daemon. This would be equivalent of abruptly terminating a cluster node’s corosync membership without properly shutting it down.
ssh into the guest and run this command.
[root@guest1 ~]# kill -9 $(pidof pacemaker-remoted)
Within a few seconds, your pcs status output will show a monitor failure,
and the guest1 node will not be shown while it is being recovered.
[root@pcmk-1 ~]# pcs status
Cluster name: mycluster
Cluster Summary:
  * Stack: corosync
  * Current DC: pcmk-1 (version 2.1.2-4.el9-ada5c3b36e2) - partition with quorum
  * Last updated: Wed Aug 10 01:39:40 2022
  * Last change:  Wed Aug 10 01:34:55 2022 by root via cibadmin on pcmk-1
  * 3 nodes configured
  * 8 resource instances configured

Node List:
  * Online: [ pcmk-1 pcmk-2 ]

Full List of Resources:
  * xvm     (stonith:fence_xvm):     Started pcmk-1
  * vm-guest1       (ocf:heartbeat:VirtualDomain):   FAILED pcmk-1
  * FAKE1   (ocf:heartbeat:Dummy):   FAILED guest1
  * FAKE2   (ocf:heartbeat:Dummy):   FAILED guest1
  * FAKE3   (ocf:heartbeat:Dummy):   FAILED guest1
  * FAKE4   (ocf:heartbeat:Dummy):   Started pcmk-2
  * FAKE5   (ocf:heartbeat:Dummy):   FAILED guest1

Failed Resource Actions:
  * guest1 30s-interval monitor on pcmk-1 could not be executed (Error) because 'Lost connection to remote executor' at Wed Aug 10 01:39:38 2022

Daemon Status:
  corosync: active/disabled
  pacemaker: active/disabled
  pcsd: active/enabled
Note
A guest node involves two resources: an explicitly configured resource that
you create, which manages the virtual machine (the VirtualDomain
resource in our example); and an implicit resource that Pacemaker creates,
which manages the pacemaker-remoted connection to the guest. The
implicit resource’s name is the value of the explicit resource’s
remote-node meta attribute. When we killed pacemaker-remoted, the
implicit resource is what failed. That’s why the failed action starts
with guest1 and not vm-guest1.
Once recovery of the guest is complete, you’ll see it automatically get
re-integrated into the cluster. The final pcs status output should look
something like this.
[root@pcmk-1 ~]# pcs status
Cluster name: mycluster
Cluster Summary:
  * Stack: corosync
  * Current DC: pcmk-1 (version 2.1.2-4.el9-ada5c3b36e2) - partition with quorum
  * Last updated: Wed Aug 10 01:40:05 2022
  * Last change:  Wed Aug 10 01:34:55 2022 by root via cibadmin on pcmk-1
  * 3 nodes configured
  * 8 resource instances configured

Node List:
  * Online: [ pcmk-1 pcmk-2 ]
  * GuestOnline: [ guest1@pcmk-1 ]

Full List of Resources:
  * xvm     (stonith:fence_xvm):     Started pcmk-1
  * vm-guest1       (ocf:heartbeat:VirtualDomain):   Started pcmk-1
  * FAKE1   (ocf:heartbeat:Dummy):   Started guest1
  * FAKE2   (ocf:heartbeat:Dummy):   Started guest1
  * FAKE3   (ocf:heartbeat:Dummy):   Started pcmk-2
  * FAKE4   (ocf:heartbeat:Dummy):   Started pcmk-2
  * FAKE5   (ocf:heartbeat:Dummy):   Started guest1

Failed Resource Actions:
  * guest1 30s-interval monitor on pcmk-1 could not be executed (Error) because 'Lost connection to remote executor' at Wed Aug 10 01:39:38 2022

Daemon Status:
  corosync: active/disabled
  pacemaker: active/disabled
  pcsd: active/enabled
Normally, once you’ve investigated and addressed a failed action, you can clear the failure. However Pacemaker does not yet support cleanup for the implicitly created connection resource while the explicit resource is active. If you want to clear the failed action from the status output, stop the guest resource before clearing it. For example:
# pcs resource disable vm-guest1 --wait
# pcs resource cleanup guest1
# pcs resource enable vm-guest1
3.6. Accessing Cluster Tools from Guest Node
Besides allowing the cluster to manage resources on a guest node,
pacemaker_remote has one other trick. The pacemaker_remote daemon allows
nearly all the pacemaker tools (crm_resource, crm_mon, crm_attribute,
etc.) to work on guest nodes natively.
Try it: Run crm_mon on the guest after pacemaker has
integrated the guest node into the cluster. These tools just work. This
means resource agents such as promotable resources (which need access to tools
like crm_attribute) work seamlessly on the guest nodes.
Higher-level command shells such as pcs may have partial support
on guest nodes, but it is recommended to run them from a cluster node.
3.7. Troubleshooting a Remote Connection
If connectivity issues occur, it’s worth verifying that the cluster nodes can
communicate with the guest node on TCP port 3121. We can use the nc command
to test the connection.
On the cluster nodes, install the package that provides the nc command. The
package name may vary by distribution; on AlmaLinux 9
it’s nmap-ncat.
Now connect using nc from each of the cluster nodes to the guest and run a
/bin/true command that does nothing except return success. No output
indicates that the cluster node is able to communicate with the guest on TCP
port 3121. An error indicates that the connection failed. This could be due to
a network issue or because pacemaker-remoted is not currently running on
the guest node.
Example of success:
[root@pcmk-1 ~]# nc guest1 3121 --sh-exec /bin/true
[root@pcmk-1 ~]#
Examples of failure:
[root@pcmk-1 ~]# nc guest1 3121 --sh-exec /bin/true
Ncat: Connection refused.
[root@pcmk-1 ~]# nc guest1 3121 --sh-exec /bin/true
Ncat: No route to host.
4. Remote Node Walk-through
What this tutorial is: An in-depth walk-through of how to get Pacemaker to integrate a remote node into the cluster as a node capable of running cluster resources.
What this tutorial is not: A realistic deployment scenario. The steps shown here are meant to get users familiar with the concept of remote nodes as quickly as possible.
4.1. Configure Cluster Nodes
This walk-through assumes you already have a Pacemaker cluster configured. For examples, we will use a cluster with two cluster nodes named pcmk-1 and pcmk-2. You can substitute whatever your node names are, for however many nodes you have. If you are not familiar with setting up basic Pacemaker clusters, follow the walk-through in the Clusters From Scratch document before attempting this one.
4.2. Configure Remote Node
4.2.1. Configure Firewall on Remote Node
Allow cluster-related services through the local firewall:
# firewall-cmd --permanent --add-service=high-availability
success
# firewall-cmd --reload
success
Note
If you are using some other firewall solution besides firewalld, simply open the following ports, which can be used by various clustering components: TCP ports 2224, 3121, and 21064.
If you run into any problems during testing, you might want to disable the firewall and SELinux entirely until you have everything working. This may create significant security issues and should not be performed on machines that will be exposed to the outside world, but may be appropriate during development and testing on a protected host.
To disable security measures:
# setenforce 0
# sed -i.bak "s/SELINUX=enforcing/SELINUX=permissive/g" \
    /etc/selinux/config
# systemctl mask firewalld.service
# systemctl stop firewalld.service
4.2.2. Configure /etc/hosts
You will need to add the remote node’s hostname (we’re using remote1 in
this tutorial) to the cluster nodes’ /etc/hosts files if you haven’t already.
This is required unless you have DNS set up in a way where remote1’s address can be
discovered.
For each remote node, execute the following on each cluster node and on the remote nodes, replacing the IP address with the actual IP address of the remote node.
# cat << END >> /etc/hosts
192.168.122.10  remote1
END
Also add entries for each cluster node to the /etc/hosts file on each
remote node. For example:
# cat << END >> /etc/hosts
192.168.122.101  pcmk-1
192.168.122.102  pcmk-2
END
4.2.3. Configure pacemaker_remote on Remote Node
Install the pacemaker_remote daemon on the remote node.
[root@remote1 ~]# dnf config-manager --set-enabled highavailability
[root@remote1 ~]# dnf install -y pacemaker-remote resource-agents pcs
4.2.4. Prepare pcsd
Now we need to prepare pcsd on the remote node so that we can use pcs
commands to communicate with it.
Start and enable the pcsd daemon on the remote node.
[root@remote1 ~]# systemctl start pcsd
[root@remote1 ~]# systemctl enable pcsd
Created symlink /etc/systemd/system/multi-user.target.wants/pcsd.service → /usr/lib/systemd/system/pcsd.service.
Next, set a password for the hacluster user on the remote node
[root@remote ~]# echo MyPassword | passwd --stdin hacluster
Changing password for user hacluster.
passwd: all authentication tokens updated successfully.
Now authenticate the existing cluster nodes to pcsd on the remote node. The
below command only needs to be run from one cluster node.
[root@pcmk-1 ~]# pcs host auth remote1 -u hacluster
Password:
remote1: Authorized
4.2.5. Integrate Remote Node into Cluster
Integrating a remote node into the cluster is achieved through the
creation of a remote node connection resource. The remote node connection
resource both establishes the connection to the remote node and defines that
the remote node exists. Note that this resource is actually internal to
Pacemaker’s controller. The metadata for this resource can be found in
the /usr/lib/ocf/resource.d/pacemaker/remote file. The metadata in this file
describes what options are available, but there is no actual
ocf:pacemaker:remote resource agent script that performs any work.
Define the remote node connection resource to our remote node,
remote1, using the following command on any cluster node. This
command creates the ocf:pacemaker:remote resource; creates the authkey if it
does not exist already and distributes it to the remote node; and starts and
enables pacemaker-remoted on the remote node.
[root@pcmk-1 ~]# pcs cluster node add-remote remote1
No addresses specified for host 'remote1', using 'remote1'
Sending 'pacemaker authkey' to 'remote1'
remote1: successful distribution of the file 'pacemaker authkey'
Requesting 'pacemaker_remote enable', 'pacemaker_remote start' on 'remote1'
remote1: successful run of 'pacemaker_remote enable'
remote1: successful run of 'pacemaker_remote start'
That’s it. After a moment you should see the remote node come online. The final pcs status output should look something like this, and you can see that it
created the ocf:pacemaker:remote resource:
[root@pcmk-1 ~]# pcs status
Cluster name: mycluster
Cluster Summary:
  * Stack: corosync
  * Current DC: pcmk-1 (version 2.1.2-4.el9-ada5c3b36e2) - partition with quorum
  * Last updated: Wed Aug 10 05:17:28 2022
  * Last change:  Wed Aug 10 05:17:26 2022 by root via cibadmin on pcmk-1
  * 3 nodes configured
  * 2 resource instances configured

Node List:
  * Online: [ pcmk-1 pcmk-2 ]
  * RemoteOnline: [ remote1 ]

Full List of Resources:
  * xvm     (stonith:fence_xvm):     Started pcmk-1
  * remote1 (ocf:pacemaker:remote):  Started pcmk-1

Daemon Status:
  corosync: active/disabled
  pacemaker: active/disabled
  pcsd: active/enabled
4.3. How pcs Configures the Remote
Let’s take a closer look at what the pcs cluster node add-remote command is
doing. There is no need to run any of the commands in this section.
First, pcs copies the Pacemaker authkey file to the VM that will become the
guest. If an authkey is not already present on the cluster nodes, this command
creates one and distributes it to the existing nodes and to the guest.
If you want to do this manually, you can run a command like the following to
generate an authkey in /etc/pacemaker/authkey, and then distribute the key
to the rest of the nodes and to the new guest.
[root@pcmk-1 ~]# dd if=/dev/urandom of=/etc/pacemaker/authkey bs=4096 count=1
Then pcs starts and enables the pacemaker_remote service on the guest.
If you want to do this manually, run the following commands.
[root@guest1 ~]# systemctl start pacemaker_remote
[root@guest1 ~]# systemctl enable pacemaker_remote
4.4. Starting Resources on Remote Node
Once the remote node is integrated into the cluster, starting and managing resources on a remote node is the exact same as on cluster nodes. Refer to the Clusters from Scratch document for examples of resource creation.
Warning
Never involve a remote node connection resource in a resource group, colocation constraint, or order constraint.
4.5. Fencing Remote Nodes
Remote nodes are fenced the same way as cluster nodes. No special considerations are required. Configure fencing resources for use with remote nodes the same as you would with cluster nodes.
Note, however, that remote nodes can never ‘initiate’ a fencing action. Only cluster nodes are capable of actually executing a fencing operation against another node.
4.6. Accessing Cluster Tools from a Remote Node
Besides allowing the cluster to manage resources on a remote node,
pacemaker_remote has one other trick. The pacemaker_remote daemon allows
nearly all the pacemaker tools (crm_resource, crm_mon,
crm_attribute, etc.) to work on remote nodes natively.
Try it: Run crm_mon on the remote node after pacemaker has
integrated it into the cluster. These tools just work. These means resource
agents such as promotable resources (which need access to tools like
crm_attribute) work seamlessly on the remote nodes.
Higher-level command shells such as pcs may have partial support
on remote nodes, but it is recommended to run them from a cluster node.
4.7. Troubleshooting a Remote Connection
If connectivity issues occur, it’s worth verifying that the cluster nodes can
communicate with the remote node on TCP port 3121. We can use the nc command
to test the connection.
On the cluster nodes, install the package that provides the nc command. The
package name may vary by distribution; on AlmaLinux 9
it’s nmap-ncat.
Now connect using nc from each of the cluster nodes to the remote node and
run a /bin/true command that does nothing except return success. No output
indicates that the cluster node is able to communicate with the remote node on
TCP port 3121. An error indicates that the connection failed. This could be due
to a network issue or because pacemaker-remoted is not currently running on
the remote node.
Example of success:
[root@pcmk-1 ~]# nc remote1 3121 --sh-exec /bin/true
[root@pcmk-1 ~]#
Examples of failure:
[root@pcmk-1 ~]# nc remote1 3121 --sh-exec /bin/true
Ncat: Connection refused.
[root@pcmk-1 ~]# nc remote1 3121 --sh-exec /bin/true
Ncat: No route to host.
5. Alternative Configurations
These alternative configurations may be appropriate in limited cases, such as a test cluster, but are not the best method in most situations. They are presented here for completeness and as an example of Pacemaker’s flexibility to suit your needs.
5.1. Virtual Machines as Cluster Nodes
The preferred use of virtual machines in a Pacemaker cluster is as a cluster resource, whether opaque or as a guest node. However, it is possible to run the full cluster stack on a virtual node instead.
This is commonly used to set up test environments; a single physical host (that does not participate in the cluster) runs two or more virtual machines, all running the full cluster stack. This can be used to simulate a larger cluster for testing purposes.
In a production environment, fencing becomes more complicated, especially if the underlying hosts run any services besides the clustered VMs. If the VMs are not guaranteed a minimum amount of host resources, CPU and I/O contention can cause timing issues for cluster components.
Another situation where this approach is sometimes used is when the cluster owner leases the VMs from a provider and does not have direct access to the underlying host. The main concerns in this case are proper fencing (usually via a custom resource agent that communicates with the provider’s APIs) and maintaining a static IP address between reboots, as well as resource contention issues.
5.2. Virtual Machines as Remote Nodes
Virtual machines may be configured following the process for remote nodes rather than guest nodes (i.e., using an ocf:pacemaker:remote resource rather than letting the cluster manage the VM directly).
This is mainly useful in testing, to use a single physical host to simulate a larger cluster involving remote nodes. Pacemaker’s Cluster Test Suite (CTS) uses this approach to test remote node functionality.
5.3. Containers as Guest Nodes
Containers and in particular Linux containers (LXC) and Docker, have become a popular method of isolating services in a resource-efficient manner.
The preferred means of integrating containers into Pacemaker is as a
cluster resource, whether opaque or using Pacemaker’s bundle resource type.
However, it is possible to run pacemaker_remote inside a container,
following the process for guest nodes. This is not recommended but can
be useful, for example, in testing scenarios, to simulate a large number of
guest nodes.
The configuration process is very similar to that described for guest nodes using virtual machines. Key differences:
- The underlying host must install the libvirt driver for the desired container
technology – for example, the
libvirt-daemon-lxcpackage to get the libvirt-lxc driver for LXC containers. - Libvirt XML definitions must be generated for the containers. You can create XML definitions manually, following the appropriate libvirt driver documentation.
- To share the authentication key, either share the host’s
/etc/pacemakerdirectory with the container, or copy the key into the container’s filesystem. - The VirtualDomain resource for a container will need force_stop=”true” and an appropriate hypervisor option, for example hypervisor=”lxc:///” for LXC containers.