6. Using Pacemaker Command-Line Tools
6.1. Controlling Command Line Output
Some of the pacemaker command line utilities have been converted to a new
output system. Among these tools are crm_mon and stonith_admin. This
is an ongoing project, and more tools will be converted over time. This system
lets you control the formatting of output with --output-as= and the
destination of output with --output-to=.
The available formats vary by tool, but at least plain text and XML are supported by all tools that use the new system. The default format is plain text. The default destination is stdout but can be redirected to any file. Some formats support command line options for changing the style of the output. For instance:
# crm_mon --help-output
Usage:
  crm_mon [OPTION?]

Provides a summary of cluster's current state.

Outputs varying levels of detail in a number of different formats.

Output Options:
  --output-as=FORMAT                Specify output format as one of: console (default), html, text, xml
  --output-to=DEST                  Specify file name for output (or "-" for stdout)
  --html-cgi                        Add text needed to use output in a CGI program
  --html-stylesheet=URI             Link to an external CSS stylesheet
  --html-title=TITLE                Page title
  --text-fancy                      Use more highly formatted output
6.2. Monitor a Cluster with crm_mon
The crm_mon utility displays the current state of an active cluster. It can
show the cluster status organized by node or by resource, and can be used in
either single-shot or dynamically updating mode. It can also display operations
performed and information about failures.
Using this tool, you can examine the state of the cluster for irregularities, and see how it responds when you cause or simulate failures.
See the manual page or the output of crm_mon --help for a full description
of its many options.
Sample output from crm_mon -1
Cluster Summary:
  * Stack: corosync
  * Current DC: node2 (version 2.0.0-1) - partition with quorum
  * Last updated: Mon Jan 29 12:18:42 2018
  * Last change:  Mon Jan 29 12:18:40 2018 by root via crm_attribute      on node3
  * 5 nodes configured
  * 2 resources configured

Node List:
  * Online: [ node1 node2 node3 node4 node5 ]

* Active resources:
  * Fencing (stonith:fence_xvm):    Started node1
  * IP    (ocf:heartbeat:IPaddr2):        Started node2
Sample output from crm_mon -n -1
Cluster Summary:
  * Stack: corosync
  * Current DC: node2 (version 2.0.0-1) - partition with quorum
  * Last updated: Mon Jan 29 12:21:48 2018
  * Last change:  Mon Jan 29 12:18:40 2018 by root via crm_attribute      on node3
  * 5 nodes configured
  * 2 resources configured

* Node List:
  * Node node1: online
    * Fencing (stonith:fence_xvm):    Started
  * Node node2: online
    * IP  (ocf:heartbeat:IPaddr2):        Started
  * Node node3: online
  * Node node4: online
  * Node node5: online
As mentioned in an earlier chapter, the DC is the node is where decisions are made. The cluster elects a node to be DC as needed. The only significance of the choice of DC to an administrator is the fact that its logs will have the most information about why decisions were made.
6.2.1. Styling crm_mon HTML output
Various parts of crm_mon’s HTML output have a CSS class associated with
them. Not everything does, but some of the most interesting portions do. In
the following example, the status of each node has an online class and the
details of each resource have an rsc-ok class.
<h2>Node List</h2>
<ul>
<li>
<span>Node: cluster01</span><span class="online"> online</span>
</li>
<li><ul><li><span class="rsc-ok">ping   (ocf::pacemaker:ping):   Started</span></li></ul></li>
<li>
<span>Node: cluster02</span><span class="online"> online</span>
</li>
<li><ul><li><span class="rsc-ok">ping   (ocf::pacemaker:ping):   Started</span></li></ul></li>
</ul>
By default, a stylesheet for styling these classes is included in the head of the HTML output. The relevant portions of this stylesheet that would be used in the above example is:
<style>
.online { color: green }
.rsc-ok { color: green }
</style>
If you want to override some or all of the styling, simply create your own
stylesheet, place it on a web server, and pass --html-stylesheet=<URL>
to crm_mon. The link is added after the default stylesheet, so your
changes take precedence. You don’t need to duplicate the entire default.
Only include what you want to change.
6.3. Edit the CIB XML with cibadmin
The most flexible tool for modifying the configuration is Pacemaker’s
cibadmin command. With cibadmin, you can query, add, remove, update
or replace any part of the configuration. All changes take effect immediately,
so there is no need to perform a reload-like operation.
The simplest way of using cibadmin is to use it to save the current
configuration to a temporary file, edit that file with your favorite
text or XML editor, and then upload the revised configuration.
Safely using an editor to modify the cluster configuration
# cibadmin --query > tmp.xml
# vi tmp.xml
# cibadmin --replace --xml-file tmp.xml
Some of the better XML editors can make use of a RELAX NG schema to
help make sure any changes you make are valid. The schema describing
the configuration can be found in pacemaker.rng, which may be
deployed in a location such as /usr/share/pacemaker depending on your
operating system distribution and how you installed the software.
If you want to modify just one section of the configuration, you can query and replace just that section to avoid modifying any others.
Safely using an editor to modify only the resources section
# cibadmin --query --scope resources > tmp.xml
# vi tmp.xml
# cibadmin --replace --scope resources --xml-file tmp.xml
To quickly delete a part of the configuration, identify the object you wish to delete by XML tag and id. For example, you might search the CIB for all STONITH-related configuration:
Searching for STONITH-related configuration items
# cibadmin --query | grep stonith
 <nvpair id="cib-bootstrap-options-stonith-action" name="stonith-action" value="reboot"/>
 <nvpair id="cib-bootstrap-options-stonith-enabled" name="stonith-enabled" value="1"/>
 <primitive id="child_DoFencing" class="stonith" type="external/vmware">
 <lrm_resource id="child_DoFencing:0" type="external/vmware" class="stonith">
 <lrm_resource id="child_DoFencing:0" type="external/vmware" class="stonith">
 <lrm_resource id="child_DoFencing:1" type="external/vmware" class="stonith">
 <lrm_resource id="child_DoFencing:0" type="external/vmware" class="stonith">
 <lrm_resource id="child_DoFencing:2" type="external/vmware" class="stonith">
 <lrm_resource id="child_DoFencing:0" type="external/vmware" class="stonith">
 <lrm_resource id="child_DoFencing:3" type="external/vmware" class="stonith">
If you wanted to delete the primitive tag with id child_DoFencing,
you would run:
# cibadmin --delete --xml-text '<primitive id="child_DoFencing"/>'
See the cibadmin man page for more options.
Warning
Never edit the live cib.xml file directly. Pacemaker will detect such
changes and refuse to use the configuration.
6.4. Batch Configuration Changes with crm_shadow
Often, it is desirable to preview the effects of a series of configuration
changes before updating the live configuration all at once. For this purpose,
crm_shadow creates a “shadow” copy of the configuration and arranges for
all the command-line tools to use it.
To begin, simply invoke crm_shadow --create with a name of your choice,
and follow the simple on-screen instructions. Shadow copies are identified with
a name to make it possible to have more than one.
Warning
Read this section and the on-screen instructions carefully; failure to do so could result in destroying the cluster’s active configuration!
Creating and displaying the active sandbox
# crm_shadow --create test
Setting up shadow instance
Type Ctrl-D to exit the crm_shadow shell
shadow[test]:
shadow[test] # crm_shadow --which
test
From this point on, all cluster commands will automatically use the shadow copy
instead of talking to the cluster’s active configuration. Once you have
finished experimenting, you can either make the changes active via the
--commit option, or discard them using the --delete option. Again, be
sure to follow the on-screen instructions carefully!
For a full list of crm_shadow options and commands, invoke it with the
--help option.
Use sandbox to make multiple changes all at once, discard them, and verify real configuration is untouched
shadow[test] # crm_failcount -r rsc_c001n01 -G
scope=status  name=fail-count-rsc_c001n01 value=0
shadow[test] # crm_standby --node c001n02 -v on
shadow[test] # crm_standby --node c001n02 -G
scope=nodes  name=standby value=on

shadow[test] # cibadmin --erase --force
shadow[test] # cibadmin --query
<cib crm_feature_set="3.0.14" validate-with="pacemaker-3.0" epoch="112" num_updates="2" admin_epoch="0" cib-last-written="Mon Jan  8 23:26:47 2018" update-origin="rhel7-1" update-client="crm_node" update-user="root" have-quorum="1" dc-uuid="1">
  <configuration>
    <crm_config/>
    <nodes/>
    <resources/>
    <constraints/>
  </configuration>
  <status/>
</cib>
shadow[test] # crm_shadow --delete test --force
Now type Ctrl-D to exit the crm_shadow shell
shadow[test] # exit
# crm_shadow --which
No active shadow configuration defined
# cibadmin -Q
<cib crm_feature_set="3.0.14" validate-with="pacemaker-3.0" epoch="110" num_updates="2" admin_epoch="0" cib-last-written="Mon Jan  8 23:26:47 2018" update-origin="rhel7-1" update-client="crm_node" update-user="root" have-quorum="1">
   <configuration>
      <crm_config>
         <cluster_property_set id="cib-bootstrap-options">
            <nvpair id="cib-bootstrap-1" name="stonith-enabled" value="1"/>
            <nvpair id="cib-bootstrap-2" name="pe-input-series-max" value="30000"/>
See the next section, Simulate Cluster Activity with crm_simulate, for how to test your changes before committing them to the live cluster.
6.5. Simulate Cluster Activity with crm_simulate
The command-line tool crm_simulate shows the results of the same logic the cluster itself uses to respond to a particular cluster configuration and status.
As always, the man page is the primary documentation, and should be consulted for further details. This section aims for a better conceptual explanation and practical examples.
6.5.1. Replaying cluster decision-making logic
At any given time, one node in a Pacemaker cluster will be elected DC, and that node will run Pacemaker’s scheduler to make decisions.
Each time decisions need to be made (a “transition”), the DC will have log messages like “Calculated transition … saving inputs in …” with a file name. You can grab the named file and replay the cluster logic to see why particular decisions were made. The file contains the live cluster configuration at that moment, so you can also look at it directly to see the value of node attributes, etc., at that time.
The simplest usage is (replacing $FILENAME with the actual file name):
Simulate cluster response to a given CIB
# crm_simulate --simulate --xml-file $FILENAME
That will show the cluster state when the process started, the actions that need to be taken (“Transition Summary”), and the resulting cluster state if the actions succeed. Most actions will have a brief description of why they were required.
The transition inputs may be compressed. crm_simulate can handle these
compressed files directly, though if you want to edit the file, you’ll need to
uncompress it first.
You can do the same simulation for the live cluster configuration at the
current moment. This is useful mainly when using crm_shadow to create a
sandbox version of the CIB; the --live-check option will use the shadow CIB
if one is in effect.
Simulate cluster response to current live CIB or shadow CIB
# crm_simulate --simulate --live-check
6.5.2. Why decisions were made
To get further insight into the “why”, it gets user-unfriendly very quickly. If
you add the --show-scores option, you will also see all the scores that
went into the decision-making. The node with the highest cumulative score for a
resource will run it. You can look for -INFINITY scores in particular to
see where complete bans came into effect.
You can also add -VVVV to get more detailed messages about what’s happening
under the hood. You can add up to two more V’s even, but that’s usually useful
only if you’re a masochist or tracing through the source code.
6.5.3. Visualizing the action sequence
Another handy feature is the ability to generate a visual graph of the actions
needed, using the --save-dotfile option. This relies on the separate
Graphviz [1] project.
Generate a visual graph of cluster actions from a saved CIB
# crm_simulate --simulate --xml-file $FILENAME --save-dotfile $FILENAME.dot
# dot $FILENAME.dot -Tsvg > $FILENAME.svg
$FILENAME.dot will contain a GraphViz representation of the cluster’s
response to your changes, including all actions with their ordering
dependencies.
$FILENAME.svg will be the same information in a standard graphical format
that you can view in your browser or other app of choice. You could, of course,
use other dot options to generate other formats.
How to interpret the graphical output:
- Bubbles indicate actions, and arrows indicate ordering dependencies
- Resource actions have text of the form
<RESOURCE>_<ACTION>_<INTERVAL_IN_MS> <NODE>indicating that the specified action will be executed for the specified resource on the specified node, once if interval is 0 or at specified recurring interval otherwise- Actions with black text will be sent to the executor (that is, the appropriate agent will be invoked)
- Actions with orange text are “pseudo” actions that the cluster uses internally for ordering but require no real activity
- Actions with a solid green border are part of the transition (that is, the cluster will attempt to execute them in the given order – though a transition can be interrupted by action failure or new events)
- Dashed arrows indicate dependencies that are not present in the transition graph
- Actions with a dashed border will not be executed. If the dashed border is blue, the cluster does not feel the action needs to be executed. If the dashed border is red, the cluster would like to execute the action but cannot. Any actions depending on an action with a dashed border will not be able to execute.
- Loops should not happen, and should be reported as a bug if found.
Small Cluster Transition
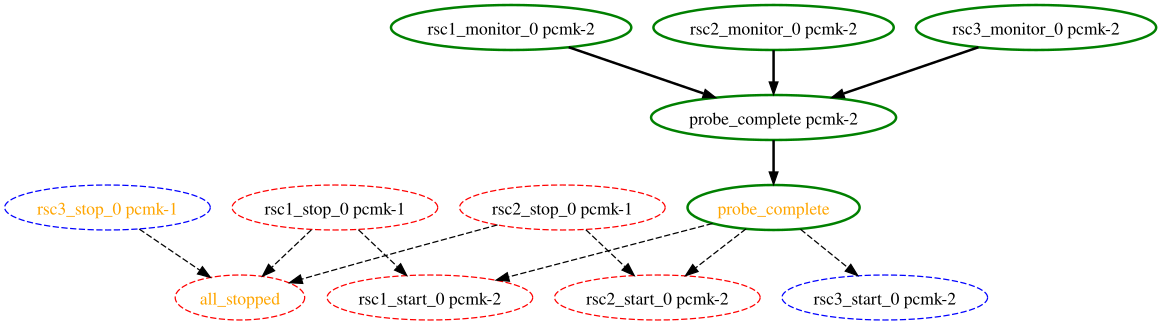
In the above example, it appears that a new node, pcmk-2, has come online
and that the cluster is checking to make sure rsc1, rsc2 and rsc3
are not already running there (indicated by the rscN_monitor_0 entries).
Once it did that, and assuming the resources were not active there, it would
have liked to stop rsc1 and rsc2 on pcmk-1 and move them to
pcmk-2. However, there appears to be some problem and the cluster cannot or
is not permitted to perform the stop actions which implies it also cannot
perform the start actions. For some reason, the cluster does not want to start
rsc3 anywhere.
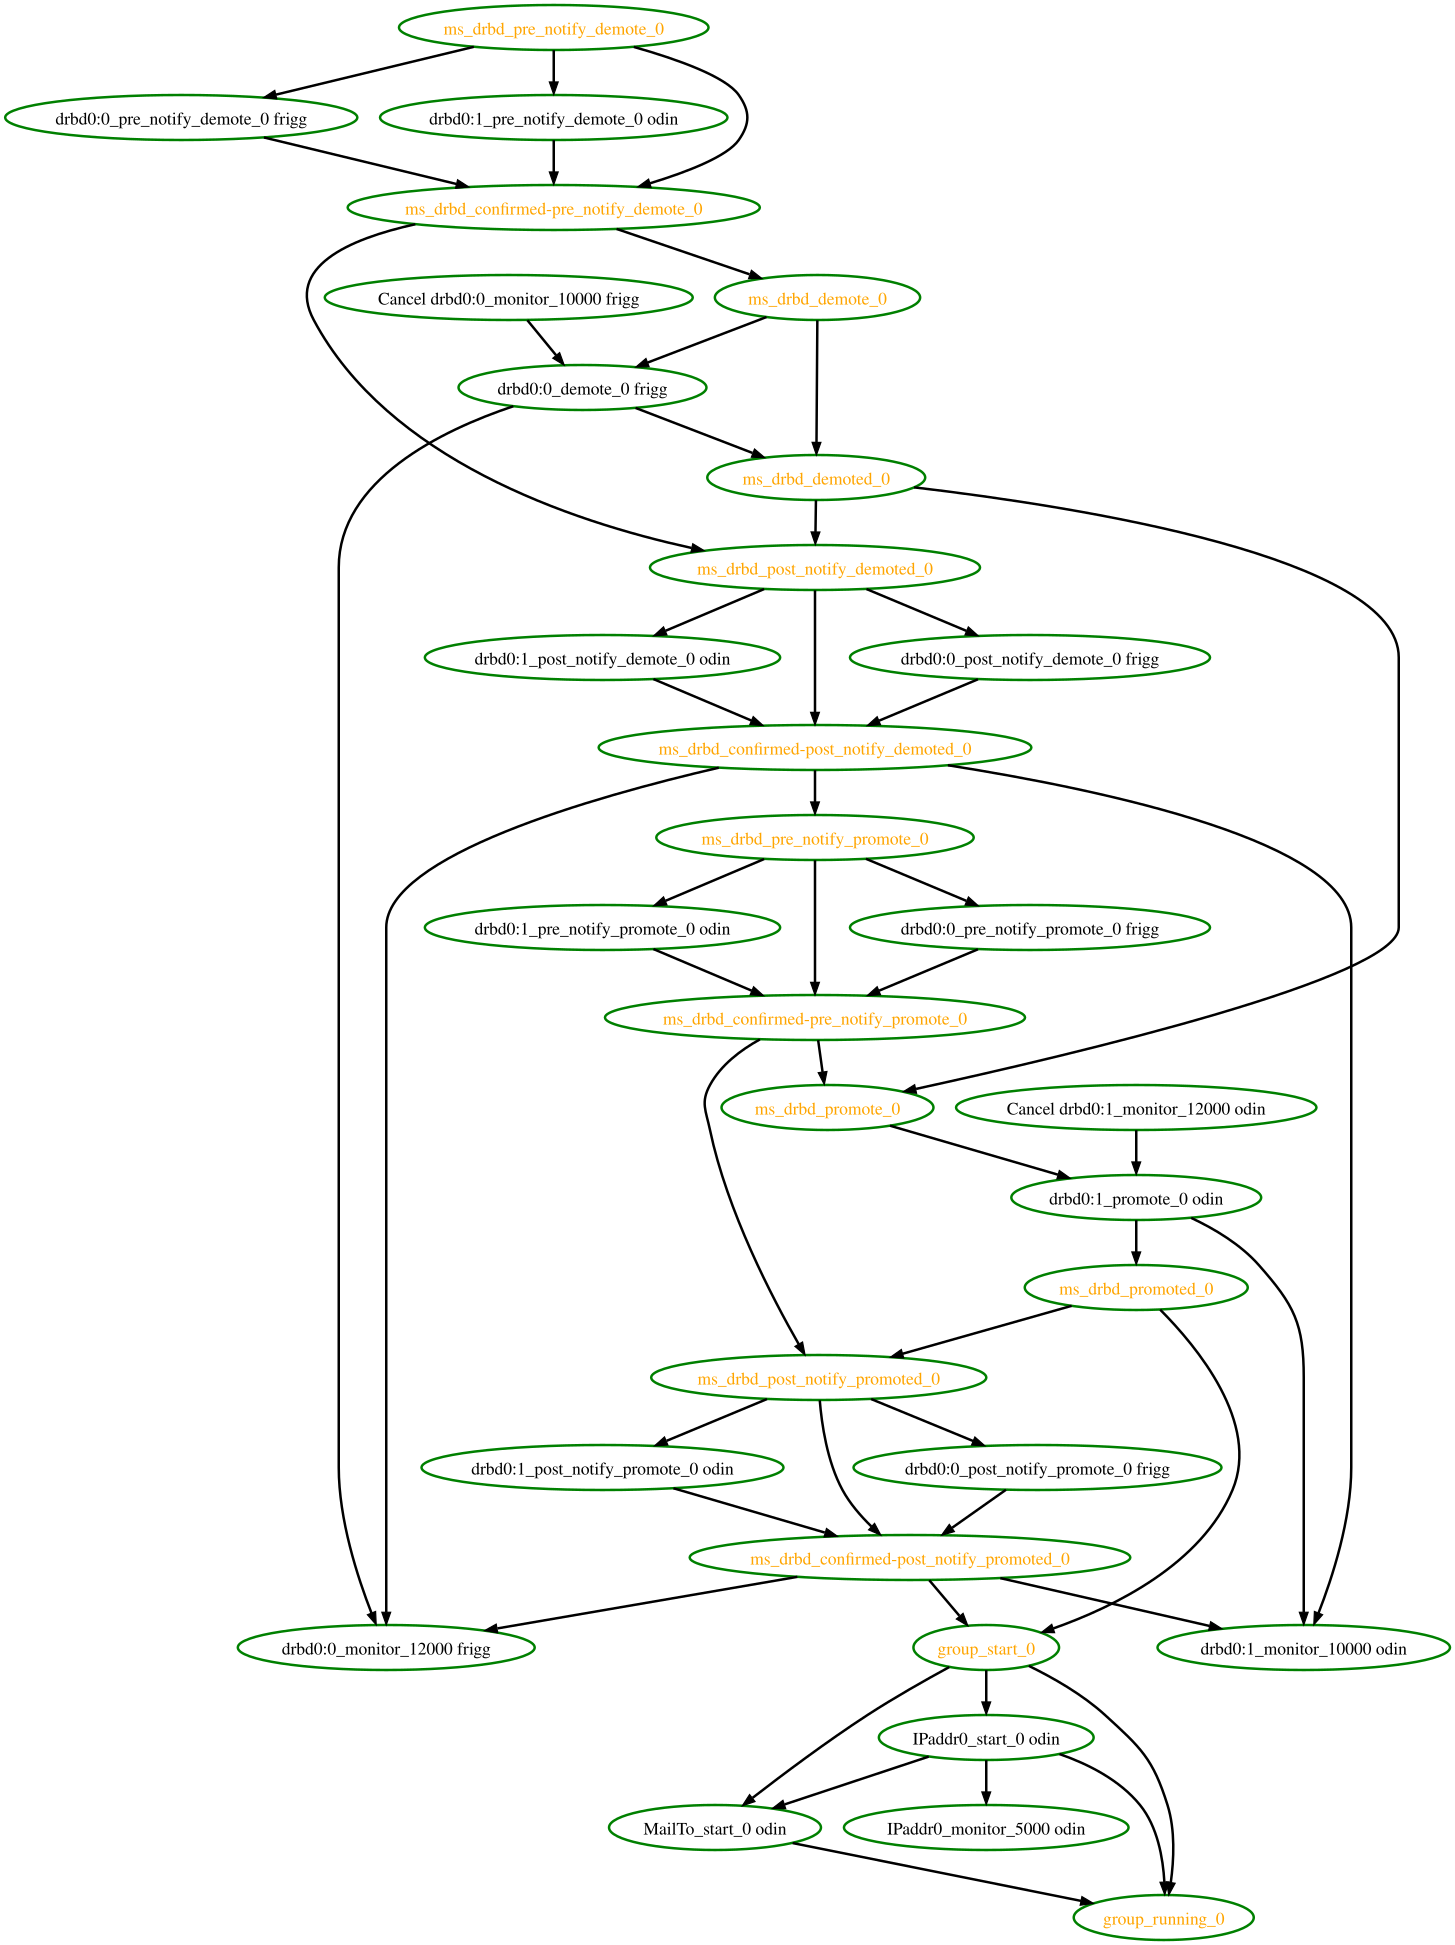
Complex Cluster Transition
6.5.4. What-if scenarios
You can make changes to the saved or shadow CIB and simulate it again, to see
how Pacemaker would react differently. You can edit the XML by hand, use
command-line tools such as cibadmin with either a shadow CIB or the
CIB_file environment variable set to the filename, or use higher-level tool
support (see the man pages of the specific tool you’re using for how to perform
actions on a saved CIB file rather than the live CIB).
You can also inject node failures and/or action failures into the simulation;
see the crm_simulate man page for more details.
This capability is useful when using a shadow CIB to edit the configuration.
Before committing the changes to the live cluster with crm_shadow --commit,
you can use crm_simulate to see how the cluster will react to the changes.
6.6. Manage Node Attributes, Cluster Options and Defaults with crm_attribute and attrd_updater
crm_attribute and attrd_updater are confusingly similar tools with subtle
differences.
attrd_updater can query and update node attributes. crm_attribute can query
and update not only node attributes, but also cluster options, resource
defaults, and operation defaults.
To understand the differences, it helps to understand the various types of node attribute.
| Type | Recorded in CIB? | Recorded in attribute manager memory? | Survive full cluster restart? | Manageable by crm_attribute? | Manageable by attrd_updater? |
|---|---|---|---|---|---|
| permanent | yes | no | yes | yes | no |
| transient | yes | yes | no | yes | yes |
| private | no | yes | no | no | yes |
As you can see from the table above, crm_attribute can manage permanent and
transient node attributes, while attrd_updater can manage transient and
private node attributes.
The difference between the two tools lies mainly in how they update node
attributes: attrd_updater always contacts the Pacemaker attribute manager
directly, while crm_attribute will contact the attribute manager only for
transient node attributes, and will instead modify the CIB directly for
permanent node attributes (and for transient node attributes when unable to
contact the attribute manager).
By contacting the attribute manager directly, attrd_updater can change
an attribute’s “dampening” (whether changes are immediately flushed to the CIB
or after a specified amount of time, to minimize disk writes for frequent
changes), set private node attributes (which are never written to the CIB), and
set attributes for nodes that don’t yet exist.
By modifying the CIB directly, crm_attribute can set permanent node
attributes (which are only in the CIB and not managed by the attribute
manager), and can be used with saved CIB files and shadow CIBs.
However a transient node attribute is set, it is synchronized between the CIB and the attribute manager, on all nodes.
6.7. Other Commonly Used Tools
Other command-line tools include:
crm_failcount: query or delete resource fail countscrm_node: manage cluster nodescrm_report: generate a detailed cluster report for bug submissionscrm_resource: manage cluster resourcescrm_standby: manage standby status of nodescrm_verify: validate a CIBstonith_admin: manage fencing devices
See the manual pages for details.
Footnotes
| [1] | Graph visualization software. See http://www.graphviz.org/ for details. |